How to setup SonarQube using Docker compose?
SonarQube is static code analysis tool. It is open source and Java based tool. SonarQube can be setup using Docker Compose with less manual steps.
What is Docker Compose?
Compose is a tool for defining and running multi-container Docker applications. With Compose, you use a YAML file to configure your application’s services. Then, with a single command, you create and start all the services from your configuration. Since Docker Compose lets you configure related containers in a single YAML file, you get the same Infrastructure-as-Code abilities as Kubernetes. But they come in a simpler system that’s more suited to smaller applications that don’t need Kubernetes’ resiliency and scaling.
The purpose of docker-compose is to function as docker cli but to issue multiple commands much more quickly. To make use of docker-compose, you need to encode the commands you were running before into a docker-compose.yml file
Run docker-compose up and Compose starts and runs your entire app.
SonarQube Architecture
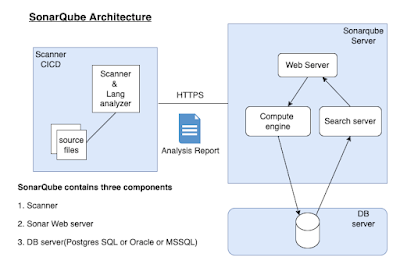
1. Scanner - This contains scanner and analyser to scan application code.
2. SonarQube server - contains Webserver(UI) and search server
3. DB server - used for storing the analysis reports.
Watch steps in YouTube channel:
Pre-requisites:
- New Ubuntu 24.0.4 EC2 instance with at least t2.medium (4 GB RAM)
- Port 9000 is opened in security firewall rule
- Make sure below is taken care off.
Login to SonarQube EC2 instance using git bash or iTerm, perform below command to configure virtual memory permanently for SonarQube to function:
sudo nano /etc/sysctl.conf

Add the following lines to the bottom of that file by scrolling all the way down:
vm.max_map_count=262144
fs.file-max=65536
Press Ctrl + O and Enter for saving the file.
Press Ctrl + X for exiting the file after saving.
To make sure changes are getting into effect:
sudo sysctl -p
Change Host Name to SonarQube
sudo hostnamectl set-hostname SonarQube
sudo hostnamectl set-hostname SonarQube
Perform System update
sudo apt update
Install Docker-Compose
sudo apt install docker-compose -y
Create docker-compose.yml
this yml has all configuration for installing both SonarQube and Postgresql:
sudo vi docker-compose.yml
(press I or insert button and then Copy the below code high-lighted in yellow color)
version: "3"
services:
sonarqube:
image: sonarqube:community
restart: unless-stopped
depends_on:
- db
environment:
SONAR_JDBC_URL: jdbc:postgresql://db:5432/sonar
SONAR_JDBC_USERNAME: sonar
SONAR_JDBC_PASSWORD: sonar
volumes:
- sonarqube_data:/opt/sonarqube/data
- sonarqube_extensions:/opt/sonarqube/extensions
- sonarqube_logs:/opt/sonarqube/logs
ports:
- "9000:9000"
db:
image: postgres:12
restart: unless-stopped
environment:
POSTGRES_USER: sonar
POSTGRES_PASSWORD: sonar
volumes:
- postgresql:/var/lib/postgresql
- postgresql_data:/var/lib/postgresql/data
volumes:
sonarqube_data:
sonarqube_extensions:
sonarqube_logs:
postgresql:
postgresql_data:
services:
sonarqube:
image: sonarqube:community
restart: unless-stopped
depends_on:
- db
environment:
SONAR_JDBC_URL: jdbc:postgresql://db:5432/sonar
SONAR_JDBC_USERNAME: sonar
SONAR_JDBC_PASSWORD: sonar
volumes:
- sonarqube_data:/opt/sonarqube/data
- sonarqube_extensions:/opt/sonarqube/extensions
- sonarqube_logs:/opt/sonarqube/logs
ports:
- "9000:9000"
db:
image: postgres:12
restart: unless-stopped
environment:
POSTGRES_USER: sonar
POSTGRES_PASSWORD: sonar
volumes:
- postgresql:/var/lib/postgresql
- postgresql_data:/var/lib/postgresql/data
volumes:
sonarqube_data:
sonarqube_extensions:
sonarqube_logs:
postgresql:
postgresql_data:
Press escape button and then
Save the file by entering :wq!
Now execute the compose file using Docker compose command:
sudo docker-compose up -d

Make sure SonarQube is up and running by checking the logs
sudo docker-compose logs --follow

Once you see the message, that's it. SonarQube is been installed successfully. press control C and enter.
Now access sonarQube UI by going to browser and enter public dns name with port 9000
Now to go to browser --> http://your_SonarQube_publicdns_name:9000
Please follow steps for integrating SonarQube with Jenkins
https://www.coachdevops.com/2020/04/how-to-integrate-sonarqube-with-jenkins.html
https://www.coachdevops.com/2020/04/how-to-integrate-sonarqube-with-jenkins.html


