Showing posts with label Terraform. Show all posts

Friday, May 23, 2025

How to Automate Security Scan of Terraform Files using Checkov with Jenkins Pipeline? | How to Perform Security scan for Terraform Files using Checkov?


Checkov is a static code analysis tool designed to scan Infrastructure as Code (IaC) files and identify potential security and compliance misconfigurations. 

Pre-requisites:

Jenkins pipeline code:

Below Jenkins Pipeline code scan Terraform files and write the output to a file which can be viewed in Jenkins.

pipeline {

    agent any
    stages {
        stage('Checkout') {
            steps {
                git 'https://github.com/akannan1087/myInfra2021Repo'
            }
        }

        stage('Run Checkov Scan') {
            steps {
                sh 'checkov -d . -o junitxml > checkov-report.xml || true'
            }
        }

        stage('Publish Report') {
            steps {
                junit 'checkov-report.xml'
            }
        }
    }
    
    post {
        always {
            archiveArtifacts artifacts: 'checkov-report.xml', fingerprint: true
        }
    }
}


Watch steps in YouTube channel:

Wednesday, April 16, 2025

What is Checkov? | How to install Checkov on Linux Ubuntu to scan Terraform Code for finding security issues?

Checkov is an open source, static code analysis tool designed to scan Infrastructure as Code (IaC) files and identify potential security and compliance misconfigurations. 

Supported IaC types:

Checkov scans following IaC file types:

  • Terraform (for AWS, GCP, Azure and OCI)
  • CloudFormation (including AWS SAM)
  • Azure Resource Manager (ARM)
  • Serverless framework
  • Helm charts
  • Kubernetes
  • Docker

Here's a breakdown of Checkov tutorials

Getting Started and Basic Usage:

  • Installation: Checkov can be installed using pip, brew, or Docker. For example, using pip:
          sudo apt install python3-pip -y
              sudo pip3 install checkov
    • Basic Scanning: To scan a single file or a directory, use the -f (file) or -d (directory) flags:
      checkov -f main.tf
      checkov -d /path/to/your/iac/code
    • Output: Checkov provides a detailed output of passed and failed checks, including the check ID, description, the resource and file location, and a link to more information about the policy
    • Specifying Frameworks: You can specify the IaC framework to scan using the --framework flag:
             checkov -d /path/to/kubernetes/manifests --framework kubernetes
             checkov -f eks-deploy-k8s.yaml
    • Output Formats: Checkov supports various output formats using the --output flag, such as cli (default), jsonjunitxml, and sarif. For e.g, for JSON output format, use below command:
              checkov -d . --output json


    Wednesday, May 15, 2024

    How to install Terraform on Linux OS | Install Terraform on Ubuntu 24.0.4 | TerraForm Installation on Linux


    Terraform is an open source infrastructure as code (IaC) tool developed by HashiCorp. It allows you to define, manage, and provision infrastructure resources in a cloud or on-premises environment using declarative configuration files. Terraform maintains the state of the infrastructure in a state file. 

    Please find the steps for installing Terraform On Ubuntu 24.0.4 in AWS cloud.

    Pre-requisites:

    Go to HashiCorp Website

    Copy steps from Linux-> Ubuntu/Debian


    wget -O- https://apt.releases.hashicorp.com/gpg | sudo gpg --dearmor -o /usr/share/keyrings/hashicorp-archive-keyring.gpg

    echo "deb [signed-by=/usr/share/keyrings/hashicorp-archive-keyring.gpg] https://apt.releases.hashicorp.com $(lsb_release -cs) main" | sudo tee /etc/apt/sources.list.d/hashicorp.list

    sudo apt update && sudo apt install terraform

    Check Terraform version
    terraform -version

    this should show version of Terraform. As of May 15, 2024 version was
     
    Terraform v1.8.3

    Please watch the above steps as Demo in YouTube below: 

    Tuesday, September 5, 2023

    How to Automate Infra setup in Azure Cloud using Terraform and Azure DevOps Pipeline | Automate App Service or Web App creation in Azure cloud using Terraform and Azure DevOps Pipeline and store Terraform state remotely

    Automating infrastructure setup in Azure Cloud using Terraform and Azure DevOps is a powerful approach to managing your infrastructure as code (IaC). This allows you to define and manage your Azure resources programmatically, version control your infrastructure configurations, and automate the deployment process. 

    We will be creating a Java based WebApp(app service) in Azure cloud using Terraform and automate the process using Azure Devops Pipelines.


    Watch Steps in YouTube channel:

    Pre-requisites:
    Implementation Steps:
    • Create a resource group first in Azure cloud
    • Create storage account, container for Terraform to store state information in Azure cloud remotely.
    • Create pipeline and add Terraform tasks
    • Execute pipeline to deploy resources(App service plan and WebApp) in Azure cloud
    • Verify resources are created in Azure cloud
    • Confirm if the terraform.tfstate file is updated
    Create Resource Group in Azure cloud

    Login to Azure portal, Create a new RG, or you can skip this step if you already have existing group.

    Create Storage Account in Azure cloud
    Create a new resource, type storage account


    Click on create
    select RG, enter unique account name, select standard as performance, select locally redundant storage

    Click on create

    Create a container inside the storage account
    Select the storage account you just created, click on containers under Data storage


    enter a name for the container

    Create a pipeline in Azure DevOps
    Login to Azure Devops, select Pipelines, select use the classic editor to create a pipeline


    Configure Pipeline with tasks

    Add Terraform installer task to install Terraform on build agent


    Add Terraform task 

    Configure the task

    enter storage account, container, key information as below:


    Add terraform tasks to plan, apply
    Add Terraform task for plan
    change the command to plan from drop down and also select azure subscription from drop down

    Add Terraform task for apply
    change the command to apply from drop down and also select azure subscription from drop down


    Now verify to make sure if we have correct values in each/every task. Now click on Save + Queue.


    Click on Save and Run


    This confirms that pipeline have successfully created resources in Azure cloud. You can login to Azure portal to see the resources - app service plan and web app.


    You can also verify terraform state info which has resources entry for all the resources created
    Click on Containers, mytfstatecontainer
    Click on terraform.tfstate
    Click on Edit to view the content of terraform state file


    Clean up resources created in Azure using the pipeline - destroy command

    change the command to destroy instead of apply from the drop down


    You can either add a new task for destroy or modify to destroy from apply in the existing task.

    Now save the pipeline and run the pipeline. check the output of destroy task


    Check terraform.tfstate file after destroy.

      Saturday, June 24, 2023

      How to create AKS cluster using Terraform | Create Kubernetes Cluster using Terraform | How to Create Azure Kubernetes Cluster using Terraform

      What is Azure Kubernetes Service (AKS)

      Azure Kubernetes Service (AKS) is a managed container orchestration service, based on the open source Kubernetes system, which is available on the Microsoft Azure public cloud. AKS allows you to quickly deploy a production ready Kubernetes cluster in Azure, deploy and manage containerized applications more easily with a fully managed Kubernetes service. We will see how to create AKS cluster in Azure cloud using Terraform.

      AKS cluster can be created by many ways as mentioned below:

      1. Create AKS cluster in Azure portal directly

      2. Create AKS cluster using Azure CLI

      3. Create AKS cluster using Terraform. 

      Creating an AKS resource with Terraform is incredibly easy, it only requires a single resource azurerm_kubernetes_cluster and in this post, we are going to walk through the necessary steps to create this with Terraform. We will create ACR and create a role with ACRpull assignment as well

      Pre-requisites:

      Login to Azure using credentials

      Make sure you are login to Azure portal first.

      az login

      Choose your Microsoft credentials. 

      Let's create following tf files using Visual studio Code:

      1. Variables.tf - where we will define the variables used in main.tf
      2. terraform.tfvars - Declare the values for the variables
      3. providers.tf - declare the providers with version
      4. main.tf - main configuration file with all the resources which will be created
      5. output.tf - Export some data to output file

      create providers.tf
      provider "azurerm" {
        features {}
      }

      terraform {
        required_providers {
          azurerm = {
            source  = "hashicorp/azurerm"
            version = "3.62.1"
          }
        }
      }

      create variables.tf

      variable "resource_group_name" {
        type        = string
        description = "RG name in Azure"
      }
      variable "location" {
        type        = string
        description = "Resources location in Azure"
      }
      variable "cluster_name" {
        type        = string
        description = "AKS name in Azure"
      }
      variable "kubernetes_version" {
        type        = string
        description = "Kubernetes version"
      }
      variable "system_node_count" {
        type        = number
        description = "Number of AKS worker nodes"
      }
      variable "acr_name" {
        type        = string
        description = "ACR name"
      }

      create terraform.tfvars
      resource_group_name = "aks_tf_rg"
      location            = "CentralUS"
      cluster_name        = "my-aks-cluster"
      kubernetes_version  = "1.26.3"
      system_node_count   = 2
      acr_name            = "myacr321012"

      create main.tf
      #In Azure, all infrastructure elements such as virtual machines, storage, and our Kubernetes cluster need to be attached to a resource group.

      resource "azurerm_resource_group" "aks-rg" {
        name     = var.resource_group_name
        location = var.location
      }

      resource "azurerm_role_assignment" "role_acrpull" {
        scope                            = azurerm_container_registry.acr.id
        role_definition_name             = "AcrPull"
        principal_id                     = azurerm_kubernetes_cluster.aks.kubelet_identity.0.object_id
        skip_service_principal_aad_check = true
      }

      resource "azurerm_container_registry" "acr" {
        name                = var.acr_name
        resource_group_name = azurerm_resource_group.aks-rg.name
        location            = var.location
        sku                 = "Standard"
        admin_enabled       = false
      }

      resource "azurerm_kubernetes_cluster" "aks" {
        name                = var.cluster_name
        kubernetes_version  = var.kubernetes_version
        location            = var.location
        resource_group_name = azurerm_resource_group.aks-rg.name
        dns_prefix          = var.cluster_name

        default_node_pool {
          name                = "system"
          node_count          = var.system_node_count
          vm_size             = "Standard_DS2_v2"
          type                = "VirtualMachineScaleSets"
          zones  = [1, 2, 3]
          enable_auto_scaling = false
        }

        identity {
          type = "SystemAssigned"
        }

        network_profile {
          load_balancer_sku = "standard"
          network_plugin    = "kubenet" 
        }
      }

      create output.tf
      output "aks_id" {
        value = azurerm_kubernetes_cluster.aks.id
      }

      output "aks_fqdn" {
        value = azurerm_kubernetes_cluster.aks.fqdn
      }

      output "aks_node_rg" {
        value = azurerm_kubernetes_cluster.aks.node_resource_group
      }

      output "acr_id" {
        value = azurerm_container_registry.acr.id
      }

      output "acr_login_server" {
        value = azurerm_container_registry.acr.login_server
      }

      resource "local_file" "kubeconfig" {
        depends_on   = [azurerm_kubernetes_cluster.aks]
        filename     = "kubeconfig"
        content      = azurerm_kubernetes_cluster.aks.kube_config_raw
      }

      Run terraform commands

      terraform init


      terraform validate

      just to make sure syntax is right..

      terraform plan


      terraform apply

      and type yes

      You will see following resources are created:


      Move the generated Kubeconfig file to ~/.kube/config
      mv kubeconfig ~/.kube/config

      To verify if worker nodes are created, use the kubectl get nodes command to return a list of the cluster nodes.

      kubectl get nodes

       
      You will see worker nodes with health status ready.

      Let's deploy some apps into AKS cluster. 

      Deploy Nginx App

      kubectl create -f https://raw.githubusercontent.com/kubernetes/website/master/content/en/examples/controllers/nginx-deployment.yaml

      Once the deployment is created, use kubectl to check on the deployments by running this command: 

      kubectl get deployments


      To see the list of pods

      kubectl get pods


      Perform cleanup by deleting the AKS cluster

      To avoid Azure charges, you should clean up unneeded resources. When the cluster is no longer needed, use terraform destroy command to remove the resource group, AKS cluster service, and all related resources. 

      terraform destroy --auto-approve

      Watch this step on YouTube channel:

      Wednesday, August 10, 2022

      Create Amazon EKS cluster by Terraform | How to create Amazon EKS cluster in AWS cloud using Terraform | Create EKS Cluster using Terraform

      What is Amazon EKS

      Amazon EKS is a fully managed container orchestration service. EKS allows you to quickly deploy a production ready Kubernetes cluster in AWS, deploy and manage containerized applications more easily with a fully managed Kubernetes service. Kubernetes is an open-source system for automating deployment, scaling, and management of containerized applications.

      EKS takes care of master node/control plane. We need to create worker nodes.

      You can create EKS cluster with following node types:
      • Managed nodes -  Linux - Amazon EC2 instances
      • Fargate - Serverless
      We will learn how to create EKS cluster based on Managed nodes (EC2 instances).

      EKS cluster can be created in following different ways

      1. AWS console
      2. AWS CLI
      3. eksctl command
      4. using Terraform

      We will create EKS cluster nodes using Terraform.

      Pre-requisites:

      This Lab is using an EC2 instance with following configured:

      Create IAM Role with Administrator Access

      You need to create an IAM role with AdministratorAccess policy.
      Go to AWS console, IAM, click on Roles. create a role


      Select AWS services, Click EC2, Click on Next permissions.
       
       Now search for AdministratorAccess policy and click


      Skip on create tag.
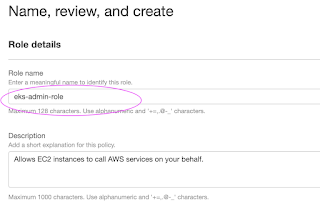
      Now give a role name and create it.

      Assign the role to EC2 instance
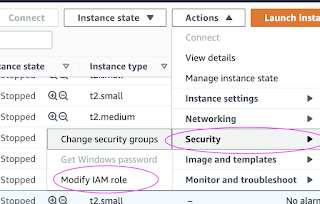
      Go to AWS console, click on EC2, select EC2 instance, Choose Security.
      Click on Modify IAM Role


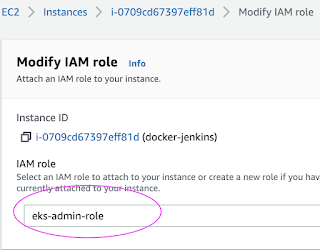
      Choose the role you have created from the dropdown.
      Select the role and click on Apply.


      Create Terraform files

      sudo vi variables.tf

       variable "subnet_id_1" {
        type = string
        default = "subnet-ec90408a"
       }

       variable "subnet_id_2" {
        type = string
        default = "subnet-0a911b04"
       }

       variable "cluster_name" {
        type = string
        default = "my-eks-cluster"
       }

      sudo vi main.tf

      terraform {
       required_providers {
        aws = {
         source = "hashicorp/aws"
        }
       }
      }

      resource "aws_iam_role" "eks-iam-role" {
       name = "devops-eks-iam-role"

       path = "/"

       assume_role_policy = <<EOF
      {
       "Version": "2012-10-17",
       "Statement": [
        {
         "Effect": "Allow",
         "Principal": {
          "Service": "eks.amazonaws.com"
         },
         "Action": "sts:AssumeRole"
        }
       ]
      }
      EOF

      }

      resource "aws_iam_role_policy_attachment" "AmazonEKSClusterPolicy" {
       policy_arn = "arn:aws:iam::aws:policy/AmazonEKSClusterPolicy"
       role    = aws_iam_role.eks-iam-role.name
      }
      resource "aws_iam_role_policy_attachment" "AmazonEC2ContainerRegistryReadOnly-EKS" {
       policy_arn = "arn:aws:iam::aws:policy/AmazonEC2ContainerRegistryReadOnly"
       role    = aws_iam_role.eks-iam-role.name
      }

      resource "aws_eks_cluster" "my-eks" {
       name = var.cluster_name
       role_arn = aws_iam_role.eks-iam-role.arn

       vpc_config {
        subnet_ids = [var.subnet_id_1, var.subnet_id_2]
       }

       depends_on = [
        aws_iam_role.eks-iam-role,
       ]
      }

      resource "aws_iam_role" "workernodes" {
        name = "eks-node-group-example"

        assume_role_policy = jsonencode({
         Statement = [{
          Action = "sts:AssumeRole"
          Effect = "Allow"
          Principal = {
           Service = "ec2.amazonaws.com"
          }
         }]
         Version = "2012-10-17"
        })
       }

       resource "aws_iam_role_policy_attachment" "AmazonEKSWorkerNodePolicy" {
        policy_arn = "arn:aws:iam::aws:policy/AmazonEKSWorkerNodePolicy"
        role    = aws_iam_role.workernodes.name
       }

       resource "aws_iam_role_policy_attachment" "AmazonEKS_CNI_Policy" {
        policy_arn = "arn:aws:iam::aws:policy/AmazonEKS_CNI_Policy"
        role    = aws_iam_role.workernodes.name
       }

       resource "aws_iam_role_policy_attachment" "EC2InstanceProfileForImageBuilderECRContainerBuilds" {
        policy_arn = "arn:aws:iam::aws:policy/EC2InstanceProfileForImageBuilderECRContainerBuilds"
        role    = aws_iam_role.workernodes.name
       }

       resource "aws_iam_role_policy_attachment" "AmazonEC2ContainerRegistryReadOnly" {
        policy_arn = "arn:aws:iam::aws:policy/AmazonEC2ContainerRegistryReadOnly"
        role    = aws_iam_role.workernodes.name
       }

       resource "aws_eks_node_group" "worker-node-group" {
        cluster_name  = aws_eks_cluster.my-eks.name
        node_group_name = "my-workernodes"
        node_role_arn  = aws_iam_role.workernodes.arn
        subnet_ids   = [var.subnet_id_1, var.subnet_id_2]
        instance_types = ["t2.medium"]

        scaling_config {
         desired_size = 2
         max_size   = 2
         min_size   = 1
        }

        depends_on = [
         aws_iam_role_policy_attachment.AmazonEKSWorkerNodePolicy,
         aws_iam_role_policy_attachment.AmazonEKS_CNI_Policy,
         aws_iam_role_policy_attachment.AmazonEC2ContainerRegistryReadOnly,
        ]
       }

      Create EKS Cluster with two worker nodes using Terraform

      Now execute the below command:
      terraform init

      This will initialize terraform working directory.
      you should see like below screenshot.


      Eecute the below command
      terraform plan
      the above command will show how many resources will be added.

      Plan: 10 to add, 0 to change, 0 to destroy.

      Now let's create the EKS cluster:

      terraform apply


      This will create 10 resources.

      Update Kube config

      Update Kube config by entering below command:

      aws eks update-kubeconfig --name my-eks-cluster --region us-east-1

      kubeconfig file be updated under /home/ubuntu/.kube folder.

      you can view the kubeconfig file by entering the below command:

      cat  /home/ubuntu/.kube/config

      Connect to EKS cluster using kubectl commands

      To view the list of worker nodes as part of EKS cluster.

      kubectl get nodes

      kubectl get ns

      Deploy Nginx on a Kubernetes Cluster
      Let us run some apps to make sure they are deployed to Kubernetes cluster. The below command will create deployment:

      kubectl create deployment nginx --image=nginx


      View Deployments
      kubectl get deployments

      Delete EKS Cluster

      terraform destroy

      the above command should delete the EKS cluster in AWS, it might take a few mins to clean up the cluster.

      Errors during Cluster creation
      If you are having issues when creating a cluster, try to delete the cluster by executing the below command and re-create it.

      you can also delete the cluster under AWS console --> Elastic Kubernetes Service --> Clusters
      Click on Delete cluster

      🚀 Live AI-Enabled DevSecOps & Cloud Engineering Bootcamp – Sep 2026

      Live AI-Enabled DevSecOps & Cloud Engineering Bootcamp from Coach AK - Sep 2026 Schedule