Showing posts with label AKS. Show all posts

Saturday, June 24, 2023

How to create AKS cluster using Terraform | Create Kubernetes Cluster using Terraform | How to Create Azure Kubernetes Cluster using Terraform

What is Azure Kubernetes Service (AKS)

Azure Kubernetes Service (AKS) is a managed container orchestration service, based on the open source Kubernetes system, which is available on the Microsoft Azure public cloud. AKS allows you to quickly deploy a production ready Kubernetes cluster in Azure, deploy and manage containerized applications more easily with a fully managed Kubernetes service. We will see how to create AKS cluster in Azure cloud using Terraform.

AKS cluster can be created by many ways as mentioned below:

1. Create AKS cluster in Azure portal directly

2. Create AKS cluster using Azure CLI

3. Create AKS cluster using Terraform. 

Creating an AKS resource with Terraform is incredibly easy, it only requires a single resource azurerm_kubernetes_cluster and in this post, we are going to walk through the necessary steps to create this with Terraform. We will create ACR and create a role with ACRpull assignment as well

Pre-requisites:

Login to Azure using credentials

Make sure you are login to Azure portal first.

az login

Choose your Microsoft credentials. 

Let's create following tf files using Visual studio Code:

1. Variables.tf - where we will define the variables used in main.tf
2. terraform.tfvars - Declare the values for the variables
3. providers.tf - declare the providers with version
4. main.tf - main configuration file with all the resources which will be created
5. output.tf - Export some data to output file

create providers.tf
provider "azurerm" {
  features {}
}

terraform {
  required_providers {
    azurerm = {
      source  = "hashicorp/azurerm"
      version = "3.62.1"
    }
  }
}

create variables.tf

variable "resource_group_name" {
  type        = string
  description = "RG name in Azure"
}
variable "location" {
  type        = string
  description = "Resources location in Azure"
}
variable "cluster_name" {
  type        = string
  description = "AKS name in Azure"
}
variable "kubernetes_version" {
  type        = string
  description = "Kubernetes version"
}
variable "system_node_count" {
  type        = number
  description = "Number of AKS worker nodes"
}
variable "acr_name" {
  type        = string
  description = "ACR name"
}

create terraform.tfvars
resource_group_name = "aks_tf_rg"
location            = "CentralUS"
cluster_name        = "my-aks-cluster"
kubernetes_version  = "1.26.3"
system_node_count   = 2
acr_name            = "myacr321012"

create main.tf
#In Azure, all infrastructure elements such as virtual machines, storage, and our Kubernetes cluster need to be attached to a resource group.

resource "azurerm_resource_group" "aks-rg" {
  name     = var.resource_group_name
  location = var.location
}

resource "azurerm_role_assignment" "role_acrpull" {
  scope                            = azurerm_container_registry.acr.id
  role_definition_name             = "AcrPull"
  principal_id                     = azurerm_kubernetes_cluster.aks.kubelet_identity.0.object_id
  skip_service_principal_aad_check = true
}

resource "azurerm_container_registry" "acr" {
  name                = var.acr_name
  resource_group_name = azurerm_resource_group.aks-rg.name
  location            = var.location
  sku                 = "Standard"
  admin_enabled       = false
}

resource "azurerm_kubernetes_cluster" "aks" {
  name                = var.cluster_name
  kubernetes_version  = var.kubernetes_version
  location            = var.location
  resource_group_name = azurerm_resource_group.aks-rg.name
  dns_prefix          = var.cluster_name

  default_node_pool {
    name                = "system"
    node_count          = var.system_node_count
    vm_size             = "Standard_DS2_v2"
    type                = "VirtualMachineScaleSets"
    zones  = [1, 2, 3]
    enable_auto_scaling = false
  }

  identity {
    type = "SystemAssigned"
  }

  network_profile {
    load_balancer_sku = "standard"
    network_plugin    = "kubenet" 
  }
}

create output.tf
output "aks_id" {
  value = azurerm_kubernetes_cluster.aks.id
}

output "aks_fqdn" {
  value = azurerm_kubernetes_cluster.aks.fqdn
}

output "aks_node_rg" {
  value = azurerm_kubernetes_cluster.aks.node_resource_group
}

output "acr_id" {
  value = azurerm_container_registry.acr.id
}

output "acr_login_server" {
  value = azurerm_container_registry.acr.login_server
}

resource "local_file" "kubeconfig" {
  depends_on   = [azurerm_kubernetes_cluster.aks]
  filename     = "kubeconfig"
  content      = azurerm_kubernetes_cluster.aks.kube_config_raw
}

Run terraform commands

terraform init


terraform validate

just to make sure syntax is right..

terraform plan


terraform apply

and type yes

You will see following resources are created:


Move the generated Kubeconfig file to ~/.kube/config
mv kubeconfig ~/.kube/config

To verify if worker nodes are created, use the kubectl get nodes command to return a list of the cluster nodes.

kubectl get nodes

 
You will see worker nodes with health status ready.

Let's deploy some apps into AKS cluster. 

Deploy Nginx App

kubectl create -f https://raw.githubusercontent.com/kubernetes/website/master/content/en/examples/controllers/nginx-deployment.yaml

Once the deployment is created, use kubectl to check on the deployments by running this command: 

kubectl get deployments


To see the list of pods

kubectl get pods


Perform cleanup by deleting the AKS cluster

To avoid Azure charges, you should clean up unneeded resources. When the cluster is no longer needed, use terraform destroy command to remove the resource group, AKS cluster service, and all related resources. 

terraform destroy --auto-approve

Watch this step on YouTube channel:

Monday, June 12, 2023

How to Deploy Springboot Microservices App into AKS cluster using Jenkins Pipeline and Helm | Deploy Microservices into AKS cluster using Helm Charts and Jenkins Pipeline

We are going to learn how to Automate build and deploy of Springboot Microservices App into Azure Kubernetes Cluster(AKS) using Helm and Jenkins pipeline.


Sample springboot App Code:

I have created a sample Springboot App setup in GitHub. Click here to access code base in GitHub. 

Jenkins pipeline will:

- Automate maven build(jar) using Jenkins
- Automate Docker image creation
- Automate Docker image upload into Azure container registry
- Automate Springboot docker container Deployments to Azure Kubernetes Cluster using Helm charts


Pre-requisites:
2.  Install Docker in Jenkins and Jenkins have proper permission to perform Docker builds
3. Install Azure CLI on your Jenkins machine. (We will be creating AKS cluster from Jenkins machine running in Azure Cloud)
4. Helm installed on Jenkins instance
5. Install Kubectl on Jenkins instance
6. AKS cluster needs to be up running. You can create AKS cluster, ACR Repo using shell script provided in my website.
7. Make sure to Install Docker, Docker pipeline 


8. ACR is also setup in Azure cloud. 
10. Dockerfile created along with the application source code for springboot App.

The Code for this video is here:

Implementation steps:

  1. Create a resource group, AKS cluster and Azure container registry 
  2. Provide pull access for AKS to pull image from ACR 
  3. Create a namespace for helm deployment
  4. Create a helm chart for spring boot app
  5. Create a Jenkins pipeline with below stages:
    • checkout
    • Build Jar
    • Build docker image
    • Upload image to ACR
    • Deploy to AKS using helm
  6. Run the pipeline to deploy springboot app into AKS
  7. Verify deployments in the namespace in AKS
  8. Access the app in the browser
Create AKS cluster from Jenkins Virtual machine
Login to Jenkins virtual machine. switch as jenkins user
sudo su - jenkins

Authenticate to Azure Cloud by typing:
az login


Now to the browser, type https://microsoft.com/devicelogin
enter the code as received from previous step:

Enter your microsoft credentials, click continue per below screen:

You will be shown below screen:

 
Create a shell script based on the script provided here

vi create-aks.sh
copy and paste entire script provided in this link.

Execute shell script to create the following in Azure clid:
  • Resource group
  • AKS cluster
  • ACR repo
  • provide pull access to AKS for pulling docker image from ACR
  • namespace in AKS cluster for deploying our springboot app
sh create-aks.sh
This will take 2 to 5 mins to create the resources in Azure cloud.

Make sure cluster is up and running with worker nodes
kubectl get nodes


Create Helm chart using helm command
Go to your root of repo where you have source code for your springboot application. Create helm chart by executing below command:

helm create mychart
tree mychart
Execute the above command to see the files created.


Add Docker image details to download from ECR before deploying to EKS cluster
open mychart/values.yaml. change per below values:

image:
repository: myacrrepo531.azurecr.io/myacrrepo531
tag: ""


Enter service type as LoadBalancer
And also
open mychart/templates/deployment.yaml and change containerPort to 8080


Save the files, commit and push into repo.
Step # 1 - Create Maven3 variable under Global tool configuration in Jenkins
Make sure you create Maven3 variable under Global tool configuration. 


Step #2 - Create Credentials to connect to ACR from Jenkins

Go to Azure Portal console, go to container registry
Settings--> Access keys
Get the username and password 
Go to Jenkins-> Manage Jenkins. Create credentials.


Enter ID as ACR and enter some text for description and Save.


Step # 3 - Create a pipeline in Jenkins
Create a new pipeline job.

Step # 4 - Copy the pipeline code from below
Make sure you change values as per your settings highlighted in yellow below:

pipeline {
  tools {
        maven 'Maven3'
    }
    agent any
        environment {
        //once you create ACR in Azure cloud, use that here
        registryName = "myacrrepo531"
        //- update your credentials ID after creating credentials for connecting to ACR
        registryCredential = 'ACR'
        dockerImage = ''
        registryUrl = 'myacrrepo531.azurecr.io'
    }
    
    stages {
        stage('checkout') {
            steps {
                checkout([$class: 'GitSCM', branches: [[name: '*/master']], extensions: [], userRemoteConfigs: [[url: 'check_out_from_your_repo_after_forking_my_repo']]])
            }
        }
        
        stage ('Build Jar') {
        steps {
            sh 'mvn clean install'           
        }
     }
     
    stage ('Build Docker image') {
        steps {
                script {
                    dockerImage = docker.build registryName
                }
            }
        }
        
    // Uploading Docker images into ACR
        stage('Upload Image to ACR') {
         steps{   
             script {
                docker.withRegistry( "http://${registryUrl}", registryCredential ) {
                dockerImage.push("$BUILD_NUMBER")
                }
            }
          }
        }
        
        stage ('Helm Deploy') {
          steps {
            script {
                sh "helm upgrade first --install mychart --namespace helm-deployment --set image.tag=$BUILD_NUMBER"
                }
            }
        }
    }
}

Step # 5 - Build the pipeline

Step # 6 - Verify deployments in AKS
Execute the below command to list the helm deployments:
helm ls -n helm-deployment


kubectl get pods -n helm-deployment

kubectl get services -n helm-deployment

Steps # 7 - Access Springboot App Deployed in AKS cluster
Once deployment is successful, go to browser and enter above load balancer URL mentioned above

You should see page like below:

Clean up the Cluster:

To avoid charges from Azure, you should clean up unneeded resources, use az group delete command to remove the resource group, and all related resources in that group. 

az group delete --name resource-group-name --yes --no-wait

Watch steps in YouTube Channel:

Tuesday, April 25, 2023

Shell Script for creating AKS Cluster and Azure Container Registry | Setup ACR and AKS Cluster in Azure Cloud using Azure CLI and Script

#!/bin/sh

# This is the shell script for creating AKS cluster, ACR Repo and a namespace


#Create Resource Group

AKS_RESOURCE_GROUP=aks-rg

AKS_REGION=centralus

# Set Cluster Name

AKS_CLUSTER=aks-cluster

# set ACR name

ACR_NAME=myacrrepo531


echo $AKS_RESOURCE_GROUP, $AKS_REGION, $AKS_CLUSTER, $ACR_NAME


# Create Resource Group

az group create --location ${AKS_REGION} --name ${AKS_RESOURCE_GROUP}


# Create AKS cluster with two worker nodes

az aks create --resource-group ${AKS_RESOURCE_GROUP} --name ${AKS_CLUSTER} --node-count 2 --generate-ssh-keys


# Create Azure Container Registry

az acr create --resource-group ${AKS_RESOURCE_GROUP} \

                     --name ${ACR_NAME} \

                     --sku Standard \

                     --location ${AKS_REGION}

#Providing required permission for downloading Docker image from ACR into AKS Cluster

az aks update -n ${AKS_CLUSTER} -g ${AKS_RESOURCE_GROUP} --attach-acr ${ACR_NAME}

# Configure Kube Credentials

az aks get-credentials --name ${AKS_CLUSTER}  --resource-group ${AKS_RESOURCE_GROUP}


# Create a namespace in AKS cluster for Helm deployment

kubectl create namespace helm-deployment

Saturday, April 22, 2023

How to Deploy Springboot Microservices into AKS cluster using Helm and Azure Pipelines | Deploy Docker Containers into AKS cluster using Azure Release Pipelines | Deploy Microservices into AKS cluster using Helm and Azure Pipelines

We are going to learn how to deploy Springboot Microservices Docker container into Azure Kubernetes Cluster(AKS) using Helm and Azure pipelines. 

Sample springboot App Code:

I have created a sample Springboot App setup in GitHub. Click here to access code base in GitHub.

Watch steps in YouTube channel:

What is Helm?

Helm is a package manager for Kubernetes. Helm is the K8s equivalent of yum or apt. It accomplishes the same goals as Linux system package managers like APT or YUM: managing the installation of applications and dependencies behind the scenes and hiding the complexity from the user.

Helm Charts


Helm uses a packaging format called Charts. A Helm Chart is a collection of files that describe a set of Kubernetes resources. Helm Charts helps you define, install, and upgrade even the most complex Kubernetes application. Charts are easy to create, version, share, and publish.

Implementation steps:

  1. Create a resource group, AKS cluster and Azure container registry 
  2. Provide pull access for AKS to pull image from ACR 
  3. Create a namespace for helm deployment
  4. Create a helm chart for spring boot app
  5. Create a build pipeline to automate docker image
  6. Customize pipeline with helm package tasks
  7. Create a release pipeline
  8. Customize pipeline with helm upgrade tasks 
  9. Run the pipeline to deploy springboot app into AKS
  10. Verify deployments in the namespace in AKS
  11. Use kubectl port forward to access app locally
  12. Access the app in the browser
Pre-requisites:
Create Helm chart using helm
Go to your root of repo where you have source code for your springboot application. Create helm chart by executing below command:

helm create mychart
tree mychart
Execute the above command to see the files created.


Add Docker image details to download from ACR before deploying to AKS cluster
open mychart/values.yaml

change per below values:

image:
repository: myacrrepo531.azurecr.io/akannan1087/docker-spring-boot
tag: ""

open mychart/templates/deployment.yaml and change containerPort to 8080


Save the files, commit and push into source code repo you are using.

Make sure worker nodes are running
kubectl get nodes

Pipeline Implementation Steps:

Part 1 - Create Azure Build pipeline for building Docker image, uploading image into ACR and packaging helm chart.
Part 2 - Create Azure Release pipeline for deploying Springboot Docker containers into AKS using helm upgrade task.
 
Part 1 - How to create a Azure Build Pipeline

1. Login into your Azure DevOps dashboard
2. Click on Pipelines.

3. Click on New Pipeline

4. Click on use the classic editor
Enter your repo name and branch name where you have stored your source code along with Dockerfile:


Click on Continue. Now choose the template by typing Helm, Select Azure Kubernetes service and click Apply.


Now pipeline is created with six tasks already. We need to start customizing the pipeline:
Select Ubuntu as build agent from Agent specification drop down, avoid Windows server as build agent.


Let's also add Maven build task for building the JAR file.
Click on + icon and type Maven. this should be the first task.
And then enter maven goal as package


Let's modify Build an image task.


Select Push an image task


Leave Install Helm Task as it is, we need that task to install Helm on build agent

Remove helm init task by selecting remove selected task

Customize helm package task, select Chart Path by clicking ... dots

Choose the folder where you have helm chart files, select OK


Leave Publish artifact task as it is.


Now click Save + Queue and run to start Building the pipeline


Check build output..


Once the build is completed, you should be able to see the Docker image in Azure Portal under Resource Group, ACR repo name --> Repositories


Part 2  - How to Create Release pipeline for deploying Springboot Microservices containers into AKS Cluster

Go to Pipelines --> Click on Releases --> New Release pipeline


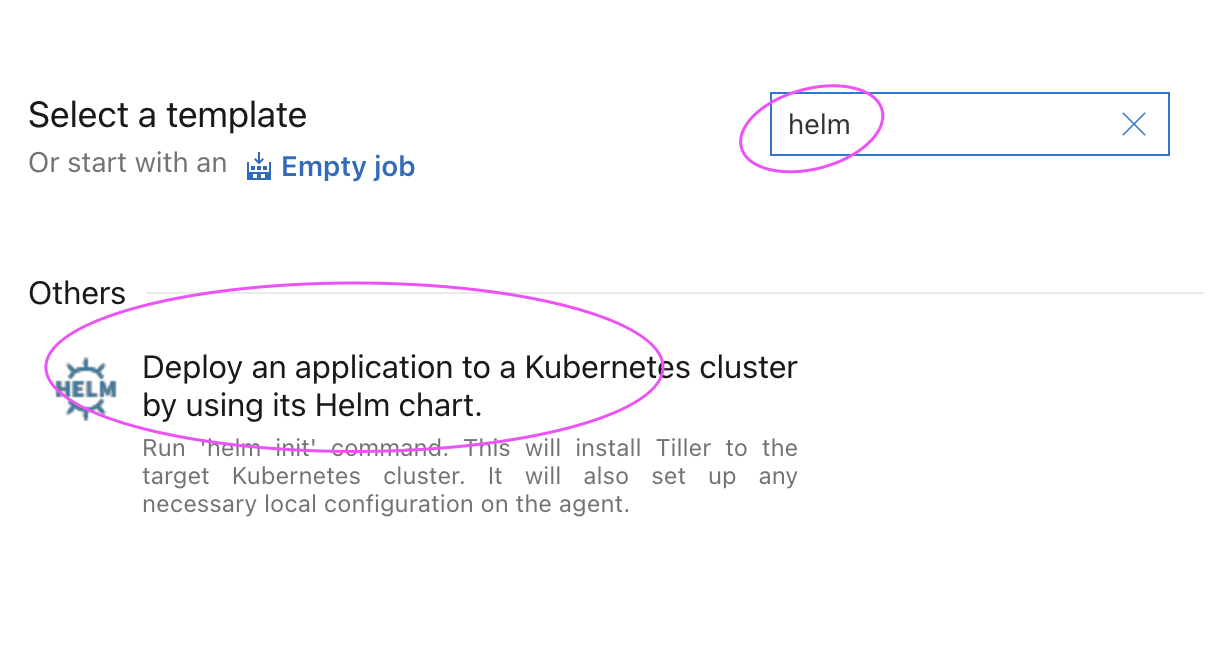
Click on Stage 1 and choose a template by typing helm
and choose Deploy an application to K8S cluster using helm chart


Change the stage name to Deploy to AKS


Now click on Add an artifact


Select the Build pipeline and click on the latest version

Now click on Deploy to AKS stage
Click on Deploy to AKS 
Enter right value for Azure subscription, Resource group and AKS Cluster by selecting from down down.


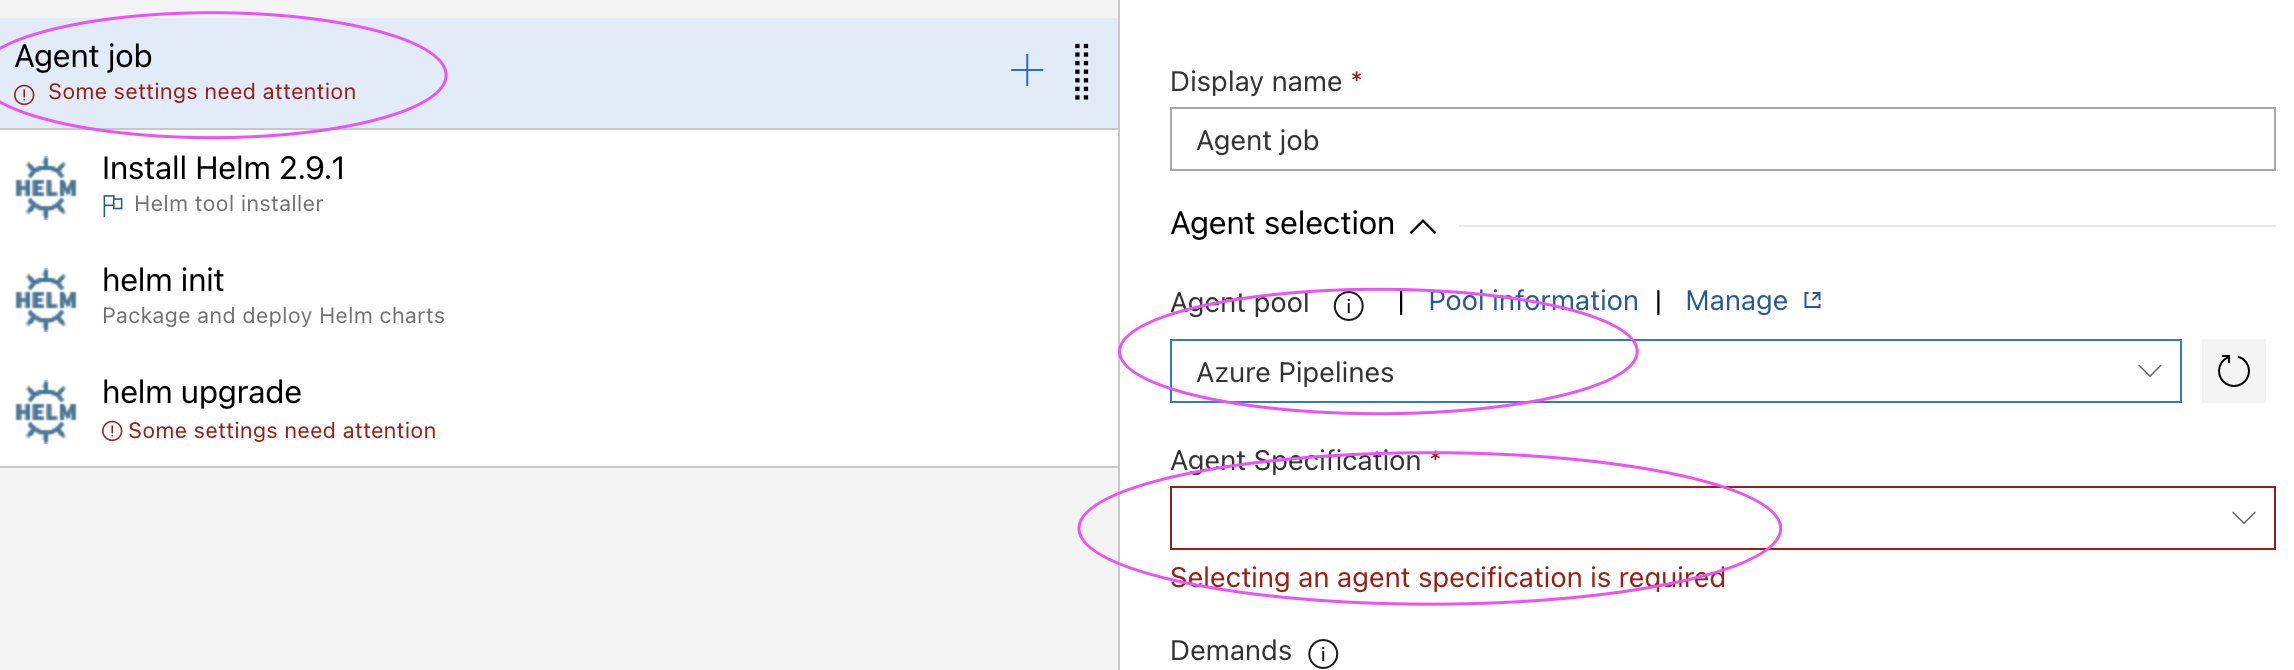
Now click on the Agent Job, and select Azure pipelines and choose Ubutu as Build agent, avoid windows agents.

Leave install Helm 2.9.1 task
make sure check for latest version of Helm. this will install latest version of Helm which is 3.x


Remove helm init task by selecting remove selected task

Let's start customizing helm upgrade task. Enter helm-deployment as namespace, chart type as File path and click on three dots.


choose the package mychart-0.1.0.tgz and click ok.


Enter first as release name
enter below values for for set values:
image.tag=$(Build.BuildId)


Now click on Save.

Optional step - Enable Continuous Deploy Trigger

This will deploy microservices into AKS cluster for every new build in build pipeline.


Click on Create a release

and then click Create 


Click on Release number to see the output


Click on Stage to see the logs
Click on Logs, you will see the following tasks are in green to confirm Deployment was successful.


Let's check if deployment created any pods in helm-deployment namespace.

How to access Springboot Application using port forward locally?

kubectl get deployments -n helm-deployment 

kubectl get pod-n helm-deployment 

Get the pod name and use port forward to access locally
kubectl port-forward first-springboot-pod_name 8080 -n helm-deployment


If you see any errors after deploying the pods, you can check the pod logs.
kubectl describe pod <pod_name>  -n helm-deployment 

Go to the browser enter http://localhost:8080
You should see below web page.

Clean up Resources

Let us see how to clean up the resources that were created. We can use az group delete command to remove the resource group, AKS cluster, and all related resources. 

az group delete --name aks-rg --yes --no-wait

Watch Steps in YouTube Channel:

🚀 Live AI-Enabled DevSecOps & Cloud Engineering Bootcamp – Sep 2026

Live AI-Enabled DevSecOps & Cloud Engineering Bootcamp from Coach AK - Sep 2026 Schedule