Showing posts with label Declarative. Show all posts

Thursday, April 1, 2021

How to create Multibranch pipeline in Jenkins | Multibranch pipeline tutorial

Let us learn how to create multi branch pipeline using Jenkins.

What is Multi-branch pipeline?

 - Automatically create new pipelines for every Git branch in source version control.

- Enables different pipeline implementation for every branch. for e.g let us say you want to have CICD pipeline for master branch and only CI pipeline for develop branch.

- an automatically discover new branches in the source control (GitHub or any SCM) and automatically create a pipeline for that branch.

Watch the steps in YouTube:

Pre-requisites:

  • Jenkins up and running
  • source code configured in GitHub or any SCM

Create Jenkinsfile first

Please follow the link above to understand how to create Declarative pipeline - Jenkinsfile.

How to create multibranch pipeline?

 Go to Jenkins. Create a new Item. give a name like myMultiBranchPipelineJob

Click ok

Click branch source,  Add source, Add git.

Give your repo URL which has Jenkinsfile already.


Give your Git repo url, credentials. select credentials from the drop down.

Click apply and Save.

Now the pipeline job will automatically scan and creates pipeline per branch.

Saturday, October 10, 2020

Jenkins Pipelines - Pipeline as a code - Difference between Scripted and Declartive Pipelines

Jenkins is an Open source, Java-based automation tool. This tool automates the Software Integration and delivery process called Continuous Integration and Continuous Delivery.

Jenkins support various source code management, build, and delivery tools. Jenkins is #1 Continuous integration tool, especially new features like Jenkins Pipelines (Scripted and Declarative Pipeline) makes the delivery process very easy and help Team to adopt DevOps easily.


Jenkins pipeline

- Pipelines are better than freestyle jobs, you can write a lot of complex tasks using pipelines when compared to Freestyle jobs.
- You can see how long each stage takes time to execute so you have more control compared to freestyle.
- Pipeline is groovy based script that have set of plug-ins integrated for automating the builds, deployment and test execution.
- Pipeline defines your entire build process, which typically includes stages for building an application, testing it and then delivering it.
- You can use snippet generator to generate pipeline code for the stages you don't know how to write groovy code.
- Pipelines are two types - Scripted pipeline and Declarative pipeline

Jenkins Pipeline execution engine supports two DSL syntaxes: Scripted Pipeline and Declarative Pipeline.

Type of Jenkins Pipelines
  1. Scripted pipeline
  2. Declarative pipeline
 Scripted pipeline

- Scripted pipeline is traditional way of writing pipeline using groovy scripting in Jenkins UI.
- stricter groovy syntax
- each stage can not be executed in parallel in multiple build agents(Slaves) that easily.
- Code is defined within a node block

// Scripted pipeline
node {
  stage('Build') {
       echo 'Building....'
  }
  stage('Test') {
      echo 'Building....'
  }
  stage('Deploy') {
      echo 'Deploying....'
  }
}


Declarative Pipeline (Jenkinsfile)

- New feature added to Jenkins where you create a Jenkinsfile and check in as part of SCM such as Git.
- simpler groovy syntax
- Code is defined within a 'pipeline' block
- each stage can be executed in parallel in multiple build agents(Slaves)

// Declarative pipeline
pipeline {
  agent { label 'slave-node' }
  stages {
    stage('checkout') {
      steps {
        git 'https://bitbucket.org/myrepo''
      }
    }
    stage('build') {
      tools {
        gradle 'Maven3'
      }
      steps {
        sh 'mvn clean test'
      }
    }
  }
}

Sunday, March 8, 2020

How to create Jenkinsfile | How to configure Declarative Pipeline | create Jenkins Pipeline As code

Please find steps below for configuring Declarative Jenkins pipeline using Jenkinsfile.

Pre-requisites:

1. Java Project setup in Bitbucket/GitHub/GitLab
2. Jenkins and Tomcat (web container) set up.
3. Maven installed in Jenkins
4. Sonarqube setup and integrated with Jenkins
5. Nexus configured and integrated with Jenkins
6. Slack channel configured an integrated with Jenkins
7. Install Pipeline Stage View Plugin 

Create Jenkinsfile (pipeline code) to your MyWebApp

Step 1

Go to GitHub and choose the Repo where you setup MyWebApp in Lab exercise # 2

Step 2
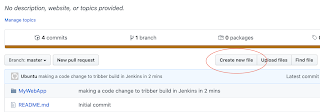
Click on create new file.


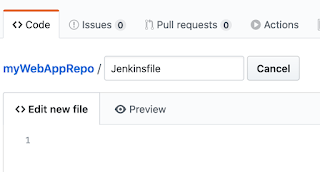
Step 3 - Enter Jenkinsfile as a file name
 

Step 4

Copy and paste the below code and make sure what ever is highlighted in red color needs to be changed per your settings.

That's it. Pipeline as a code - Jenkinsfile is setup in GitHub.

pipeline {
  agent any
 
  tools {
  maven 'Maven3'
  }
  stages {
    stage ('Build') {
      steps {
      sh 'mvn clean install -f MyWebApp/pom.xml'
      }
    }
    stage ('Code Quality') {
      steps {
        withSonarQubeEnv('SonarQube') {
        sh 'mvn -f MyWebApp/pom.xml sonar:sonar'
        }
      }
    }
    stage ('JaCoCo') {
      steps {
      jacoco()
      }
    }
    stage ('Nexus Upload') {
      steps {
      nexusArtifactUploader(
      nexusVersion: 'nexus3',
      protocol: 'http',
      nexusUrl: 'nexus_url:8081',
      groupId: 'myGroupId',
      version: '1.0-SNAPSHOT',
      repository: 'maven-snapshots',
      credentialsId: 'fc0f1694-3036-41fe-b3e3-4c5d96fcfd26',
      artifacts: [
      [artifactId: 'MyWebApp',
      classifier: '',
      file: 'MyWebApp/target/MyWebApp.war',
      type: 'war']
      ])
      }
    }
    stage ('DEV Deploy') {
      steps {
      echo "deploying to DEV Env "
      deploy adapters: [tomcat9(credentialsId: '268c42f6-f2f5-488f-b2aa-f2374d229b2e', path: '', url: 'http://your_public_dns:8080')], contextPath: null, war: '**/*.war'
      }
    }
    stage ('Slack Notification') {
      steps {
        echo "deployed to DEV Env successfully"
        slackSend(channel:'your slack channel_name', message: "Job is successful, here is the info - Job '${env.JOB_NAME} [${env.BUILD_NUMBER}]' (${env.BUILD_URL})")
      }
    }

    stage ('DEV Approve') {
      steps {
      echo "Taking approval from DEV Manager for QA Deployment"
        timeout(time: 7, unit: 'DAYS') {
        input message: 'Do you want to deploy?', submitter: 'admin'
        }
      }
    }

     stage ('QA Deploy') {
      steps {
        echo "deploying to QA Env "
        deploy adapters: [tomcat9(credentialsId: '268c42f6-f2f5-488f-b2aa-f2374d229b2e', path: '', url: 'http://your_dns_name:8080')], contextPath: null, war: '**/*.war'
        }
    }
    stage ('QA Approve') {
      steps {
        echo "Taking approval from QA manager"
        timeout(time: 7, unit: 'DAYS') {
        input message: 'Do you want to proceed to PROD?', submitter: 'admin,manager_userid'
        }
      }
    }

    stage ('Slack Notification for QA Deploy') {
      steps {
        echo "deployed to QA Env successfully"
        slackSend(channel:'your slack channel_name', message: "Job is successful, here is the info - Job '${env.JOB_NAME} [${env.BUILD_NUMBER}]' (${env.BUILD_URL})")
      }
    }
  

  }
    post {
        always {
            // Clean up workspace
            cleanWs()
        }
        success {
            // Notify success (you can add email or Slack notifications here)
            echo "Build and deployment successful."
        }
        failure {
            // Notify failure
            echo "Build or deployment failed."
        }
    }
}


Step 5
That's it. Pipeline as a code - Jenkinsfile is setup in GitHub.

Click on commit to save into GitHub.


Create Pipeline and Run pipeline from Jenkinsfile

1. Login to Jenkins
2. Click on New item, give some name and choose Pipeline and say OK


3. Under build triggers, choose Poll SCM,
Enter H/02 * * * *


4. Under Pipeline section. click on choose pipeline script from SCM

5. Under SCM, choose Git


6. Enter HTTPS URL of repo and choose credentials - enter user name/password of GitHub.
Script path as Jenkinsfile

7. Click on Apply and Save
8. Click on Build now.

You should see pipeline running and application is deployed to Tomcat.


Declarative Jenkins Pipeline YouTube Video is below:

🚀 Live AI-Enabled DevSecOps & Cloud Engineering Bootcamp – Sep 2026

Live AI-Enabled DevSecOps & Cloud Engineering Bootcamp from Coach AK - Sep 2026 Schedule