Showing posts with label Jenkins integration. Show all posts

Tuesday, December 19, 2023

How to trigger a Jenkins job from another Jenkins job | Jenkins job Integrating another Jenkins Job | Jenkins Pipeline job triggering another Jenkins Job

Jenkins job can be triggered so many different ways. This article provides steps to trigger a Jenkins job from another Jenkins job. 


Pre-requisites:

Scenario #1(post build) - How to trigger a Jenkins job from another Free style Job?

1. Login to Jenkins instance.
2. Open your any existing freestyle build job.
3. Click on Configure


4. Go to post build action

5. Add post-build action --> click on Build other projects

6. Select job name(projects)  that you want to trigger by typing the name of the job and also check trigger only if build is stable


7. Save the job. 
8. Build job now, once the current job is built, it will trigger the next job immediately.
Check the console output of the current job, you will see id would trigger second job 

9. Go to the secondJob
Check console output. You will see the second job got triggered by first build job.

Scenario #2 (pre-build) - How to trigger a Jenkins job from another Free style Job?

1. Open your freestyle build job.
2. Click on Configure
3. Click on Build triggers
4. Check build other projects are built.


Select source job name which will be built first and then once the build is stable, it will be trigger this job. And also check trigger only if build is stable.

5. Save the job. 

6. Run the first job. once that job is successful, and then it will trigger this job.


Scenario #3How to trigger any Jenkins job from a pipeline Job:

pipeline {

    agent any

    stages {

        stage('Trigger Another Job') {

            steps {

                    build job: 'mySecondJob', wait: false

            }

        }

    }

}


Watch Steps in YouTube channel:

Tuesday, January 31, 2023

How to Integrate Artifactory with Jenkins | Upload Artifacts from Jenkins to Artifactory | Artifactory and Jenkins Integration

How to Integrate Artifactory with Jenkins?

You can install plug-in called Artifactory plug-in to integrate Artifactory with Jenkins. Let us see how to integrate Jenkins with Artifactory and able to upload any binary file such as War/Ear/Jar/Exe/DLLs from Jenkins.

            go to Jenkins, Manage Jenkins, Click on Available plug-ins, type Artifactory. Click on Artifactory             and click install without restart


  • Configure Maven in Jenkins
Make sure Maven 3 is also configured under Manage Jenkins--> Global Tool configuration
Enter Name as Maven3
/usr/share/maven as MAVEN_HOME

Configure Artifactory in Jenkins:
1. Go to Manage Jenkins, Click on configure system. Look for JFrog section, click on Add JFrog Platform instance


2. Enter some name and Artifactory url like given below. Enter admin user name as ciadmin and admin password of ciadmin user you have configured.

You should get the message like below:


3. Once you configured Artifactory in Jenkins, let us integrate from our Jenkins job.

How to Integrate from Jenkins Job
1. Create a new free style job in Jenkins


2. Provide your repo details to check out the project you want to build

3. Go under Build environment
Select Maven 3 - Artifactory integration check box
and click on refresh Repositories and choose repos as mentioned below:

 4.Click on Add Build step and choose Invoke Artifactory Maven 3

5. Enter value as below, MyWebApp/pom.xml as root POM
and goal as install

6. Now click on Build, Jenkins should build using Maven and upload WAR file into Artifactory.

7. Login to Artifactory, Click on Artifactory --> Artifacts


That's it folks!

Please watch the steps in details in my YouTube channel:

Monday, October 10, 2022

Manual Process vs Automation | CICD Process Flow Diagram | How to Implement CICD using Jenkins and Other DevOps tools

Agile Development - Manual Process with No Automation


The key challenges in the above diagram revolve around manual processes that slow down development, introduce human errors, and reduce efficiency. Here are the main issues:

1. Manual Build & Deployment Process

  • Developers must manually push code and trigger builds, leading to delays and inconsistencies.
  • No automated CI/CD pipeline, which means every deployment requires manual effort.

2. Lack of Automated Testing

  • Unit tests are executed manually, which is time-consuming and error-prone.
  • No automated quality checks (e.g., linting, static code analysis), increasing the risk of bugs in production.

3. No Feedback Loops

  • Developers do not receive immediate feedback on code quality, test results, or deployment status.
  • Bugs might be detected late in the cycle, leading to longer resolution times.

4. No Binary Repository Management

  • Builds are not stored in a binary repository like Nexus or Artifactory, leading to dependency management issues.
  • Reproducing previous builds is difficult.

5. Infrastructure Setup is Manual

  • The Infra team manually sets up environments (DEV, QA, UAT, PROD), leading to delays and inconsistencies.
  • No Infrastructure as Code (IaC) tools like Terraform or Ansible, making scaling difficult.

6. Risk of Deployment Failures

  • Lack of consistent, repeatable deployment processes increases the risk of failures.
  • No automated rollback mechanism, making recovery from failures slower.

7. Slower Time to Market

  • Since every step is manual, the overall development and release cycle is slow, reducing agility.
  • Difficult to keep up with rapid business requirements.
CICD Process Flow Diagram - How to Implement CICD (Automation) in Agile Development?


What is Continuous Integration?

Continuous integration is a DevOps software development practice where developers regularly merge their code changes into a central repository, after which automated builds and tests are run.

The key goals of continuous integration are to find and address bugs quicker, improve software quality, and reduce the time it takes to validate and release new software updates.

Jenkins is a popular continuous integration tool. Jenkins can integrate with other tools using plug-ins.

How does Continuous Integration Work?

Developers frequently commit to a shared repository using a version control system such as Git. Prior to each commit, developers may choose to run local unit tests on their code as an extra verification layer before integrating. A continuous integration service automatically builds and runs unit tests on the new code changes to immediately surface any errors.

Benefits of Continuous Integration
  • Improve Developers productivity 
  • Find bugs early in the software development stage
  • Deliver products into market place sooner
  • Improve the feedback loop
What is Continuous Delivery?

Continuous delivery is a software development practice where code changes are automatically prepared for a release to production. Continuous delivery is the next extension of continuous integration. The delivery phase is responsible for packaging an artifact together to be delivered to end-users. This phase runs automated building tools to generate this artifact.

Benefits of Continuous Delivery
  • Automate the Software Release Process
  • Improve Developer Productivity
  • Find bugs early in the software development stage
  • Deliver updates faster

Enhanced Security and Compliance:

  • Integrate Security Early: Incorporate automated security tools like GitHub Advanced Security and Trivy Scanner into the pipeline to perform vulnerability scans and enforce compliance from the start.
  • Shift-Left Security: Embed security checks within the CI/CD process to catch issues before they move to production.

Infrastructure as Code (IaC):

  • Consistency Across Environments: Use IaC tools such as Terraform or Ansible to automate environment setup and configuration, ensuring consistency across deployments.
  • Version-Controlled Infrastructure: Manage infrastructure changes in the same way as code, enabling traceability and rollback if needed.

Continuous Monitoring & Feedback:

  • Real-Time Monitoring: Implement monitoring tools (such as Prometheus) to track the performance and health of applications in production.
  • Feedback Loops: Ensure that monitoring and logs feed back into the development process to enable rapid iteration and improvement.

Collaboration and Communication:

  • Integrated Communication Tools: Use platforms like Slack to notify teams about pipeline status, build failures, or deployments, ensuring everyone is on the same page.
  • Cultural Shift: Encourage a DevOps culture where development, testing, operations, and security teams collaborate closely.

Implementing these key points can help transition your workflow from manual processes to a streamlined, automated, and resilient DevOps model, as depicted in the diagram.

Thursday, September 22, 2022

Create Freestyle job in Jenkins | How to create build job in Jenkins to automate Java build and deployment of WAR into Tomcat | Bitbucket Jenkins Integration

Jenkins is popular open source Continuous integration tool. It was written entirely in Java. Jenkins is a self-contained automation server used for automating builds, tests and deployment.


See below the steps for configuring Jenkins to automate the build and deployment for the Java Web project we already set up in BitBucket into 


pre-requisites:
  • Also install deploy to container Jacoco plugins under Jenkins --> Manage Jenkins --> Manage plug-ins

Click on Available, type Deploy to container, select it. enter Jacoco, select it. Click on Install without restart.

Deploy to container


JaCoCo

Click on without restart.


steps to automate MyWebApp project in Jenkins:

1. Login to Jenkins. Click on New item.

2. Enter an item name --> select Free style project.
enter name as myFirstAutomateJob. click OK.
3. under source code mgmt, click git. enter Bitbucket URL
Click on your repo, Copy the url from the browser. Paste the url as Repository URL below.

under credentials --> click Add- > select Jenkins -->  enter your Bitbucket username and App passwordDO NOT use BitBucket password as it is removed from March 1st, 2022. Click to here to learn how to generate App Password in Bitbucket. Add description as my SCM credentials.


4. select that from drop down.


5. Enter main as branch specifier or which ever branch you want to check out.

6. under build trigger click on poll scm, enter this value to check

for every 2 mins --> H/02 * * * *

7. Build --> Add build step --> invoke top level maven targets -->

select Maven3 from drop down and goal as clean install


8. Click on advanced, enter the path of POM file as --> MyWebApp/pom.xml


9. click on Add post build action, select Record Jacoco Code coverage report
  
10. click on Add post build action, select deploy war/ear to container.

      for WAR/EAR files enter as 
          **/*.war


in WAR/EAR files, leave context path empty

   11. click on Add container , select Tomcat 9.x

   12. click on add credentials, enter tomcat as user name and password as password.
      select it from drop down.


13. tomcat url should be --> http://your_public_dns_name:8080


click Apply, click Save
click on build now..It should build.
if there is any error, please check the console output. Most of the common error would be checking the path of Maven installation, valid credentials for GitHub or Tomcat. Also make sure you install the plug-ins.

After successful deployment, please make sure you check the output in Tomcat by going to browser and enter below URL


This is how you automate the builds and deployments using Jenkins. 

Code Coverage Report can be seen in Jenkins as well. Click on Job name.


Please watch the steps in YouTube channel:

Friday, August 12, 2022

How to setup Docker Containers as Build Agents | Setup dynamic Docker Slave and Integrate with Jenkins Master | Jenkins Build Agent Setup using Docker

Jenkins has powerful feature of master slave architecture which enables distributed builds. This article we will learn how to setup slave nodes using Docker and integrate with Jenkins Master.


Advantages of using Docker Containers as Jenkins Build Agents
  • Ephemeral 
  • Better resource utilization
  • Customized agents as it can run different builds like Java 8, Java 11 
  • Scalability 
Let us see how to configure slave nodes dynamically using Docker. If you like to learn how to setup Jenkins Master on Ubuntu EC2 instance, click here.

Watch this in YouTube channel:

Pre-requisites:

Step 1 - Configure Docker Host with Remote API

Login to Docker host machine. Open docker service file. Search for ExecStart and replace that line with the following.
sudo vi /lib/systemd/system/docker.service

You can replace with below line:
ExecStart=/usr/bin/dockerd -H tcp://0.0.0.0:4243 -H unix:///var/run/docker.sock

Restart Docker service
   sudo systemctl daemon-reload
   sudo service docker restart

Validate API by executing below curl command
curl http://localhost:4243/version

Step 2 - Build Jenkins slave Docker image

Download Dockerfile from below repo.
git clone https://github.com/akannan1087/jenkins-docker-slave; cd jenkins-docker-slave

Build Docker image

sudo docker build -t my-jenkins-slave .

Perform below command to see the list of docker images:

sudo docker images

Step 3 - Configure Jenkins Server with Docker plug-in

Now login to Jenkins Master. Make sure you install Docker plug-in in Jenkins.


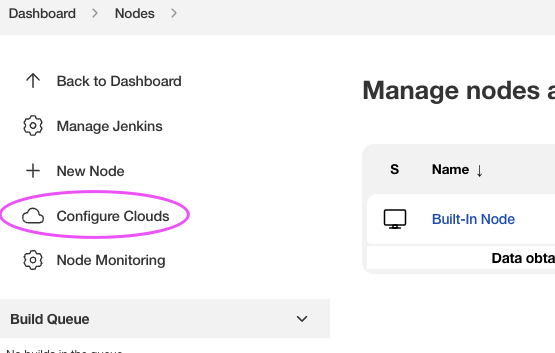
Now go to Manage Jenkins -> Configure Nodes Cloud


Click on Docker Cloud Details
Enter docker host dns name or ip address
tcp://docker_host_dns:4243
Make sure Enabled is selected
Now click on Test Connection to make sure connecting with docker host is working. 


Step 4 - Configure Docker Agent Templates

Now click on Docker Agent templates:
Enter label as "docker-slave" and give some name
Click on Enabled
Now enter the name of the docker image you have built previously in docker host.
enter /home/jenkins as Remote file system root
 

Choose Connect with SSH as connection method:
Enter SSH credentials per your Dockerfile - jenkins/password


choose Never Pull as pull strategy as we have already image stored in DockerHost.
Click on Save.

Step 5 - Create build job in Jenkins

Now Create a pipeline job in Jenkins with below pipeline code:

pipeline {
    agent { 
        label "docker-slave"
     }
    stages {
        stage('Hello') {
            steps {
                echo 'Hello World'
            }
        }
    }
}

Click Apply and Save. 
Now build the job. Now you will see output like below:


Create a free style job

Choose Restrict where this project can be run and enter docker-slave as label


🚀 Live AI-Enabled DevSecOps & Cloud Engineering Bootcamp – Sep 2026

Live AI-Enabled DevSecOps & Cloud Engineering Bootcamp from Coach AK - Sep 2026 Schedule