Monday, October 10, 2022

Manual Process vs Automation | CICD Process Flow Diagram | How to Implement CICD using Jenkins and Other DevOps tools

Agile Development - Manual Process with No Automation


The key challenges in the above diagram revolve around manual processes that slow down development, introduce human errors, and reduce efficiency. Here are the main issues:

1. Manual Build & Deployment Process

  • Developers must manually push code and trigger builds, leading to delays and inconsistencies.
  • No automated CI/CD pipeline, which means every deployment requires manual effort.

2. Lack of Automated Testing

  • Unit tests are executed manually, which is time-consuming and error-prone.
  • No automated quality checks (e.g., linting, static code analysis), increasing the risk of bugs in production.

3. No Feedback Loops

  • Developers do not receive immediate feedback on code quality, test results, or deployment status.
  • Bugs might be detected late in the cycle, leading to longer resolution times.

4. No Binary Repository Management

  • Builds are not stored in a binary repository like Nexus or Artifactory, leading to dependency management issues.
  • Reproducing previous builds is difficult.

5. Infrastructure Setup is Manual

  • The Infra team manually sets up environments (DEV, QA, UAT, PROD), leading to delays and inconsistencies.
  • No Infrastructure as Code (IaC) tools like Terraform or Ansible, making scaling difficult.

6. Risk of Deployment Failures

  • Lack of consistent, repeatable deployment processes increases the risk of failures.
  • No automated rollback mechanism, making recovery from failures slower.

7. Slower Time to Market

  • Since every step is manual, the overall development and release cycle is slow, reducing agility.
  • Difficult to keep up with rapid business requirements.
CICD Process Flow Diagram - How to Implement CICD (Automation) in Agile Development?


What is Continuous Integration?

Continuous integration is a DevOps software development practice where developers regularly merge their code changes into a central repository, after which automated builds and tests are run.

The key goals of continuous integration are to find and address bugs quicker, improve software quality, and reduce the time it takes to validate and release new software updates.

Jenkins is a popular continuous integration tool. Jenkins can integrate with other tools using plug-ins.

How does Continuous Integration Work?

Developers frequently commit to a shared repository using a version control system such as Git. Prior to each commit, developers may choose to run local unit tests on their code as an extra verification layer before integrating. A continuous integration service automatically builds and runs unit tests on the new code changes to immediately surface any errors.

Benefits of Continuous Integration
  • Improve Developers productivity 
  • Find bugs early in the software development stage
  • Deliver products into market place sooner
  • Improve the feedback loop
What is Continuous Delivery?

Continuous delivery is a software development practice where code changes are automatically prepared for a release to production. Continuous delivery is the next extension of continuous integration. The delivery phase is responsible for packaging an artifact together to be delivered to end-users. This phase runs automated building tools to generate this artifact.

Benefits of Continuous Delivery
  • Automate the Software Release Process
  • Improve Developer Productivity
  • Find bugs early in the software development stage
  • Deliver updates faster

Enhanced Security and Compliance:

  • Integrate Security Early: Incorporate automated security tools like GitHub Advanced Security and Trivy Scanner into the pipeline to perform vulnerability scans and enforce compliance from the start.
  • Shift-Left Security: Embed security checks within the CI/CD process to catch issues before they move to production.

Infrastructure as Code (IaC):

  • Consistency Across Environments: Use IaC tools such as Terraform or Ansible to automate environment setup and configuration, ensuring consistency across deployments.
  • Version-Controlled Infrastructure: Manage infrastructure changes in the same way as code, enabling traceability and rollback if needed.

Continuous Monitoring & Feedback:

  • Real-Time Monitoring: Implement monitoring tools (such as Prometheus) to track the performance and health of applications in production.
  • Feedback Loops: Ensure that monitoring and logs feed back into the development process to enable rapid iteration and improvement.

Collaboration and Communication:

  • Integrated Communication Tools: Use platforms like Slack to notify teams about pipeline status, build failures, or deployments, ensuring everyone is on the same page.
  • Cultural Shift: Encourage a DevOps culture where development, testing, operations, and security teams collaborate closely.

Implementing these key points can help transition your workflow from manual processes to a streamlined, automated, and resilient DevOps model, as depicted in the diagram.

Tuesday, October 4, 2022

How to Recover SonarQube Admin password | How to unlock SonarQube admin password in Postgres SQL

Let's say you have setup SonarQube using Docker or Docker Compose, you have forgotten the admin password for SonarQube. This article helps you to reset/recover the admin password. If you changed and then lost the admin password, you can reset it using the following steps.

Watch Steps in YouTube channel:


Pre-requisites:

As we have configured SonarQube using Docker compose, We need to login to PostgreSQL running inside postgres docker container and execute update command to reset to default password.

Step 1: Login to PostgreSQL docker container

type below command to see the list of containers running in your SonarQube instance.

sudo docker ps

Copy the container ID from above command. 

Now login into PostgresSQL docker container

sudo docker exec -it <container_id> /bin/bash

Step 2:  Connect to PostgreSQL database by executing below command:

psql -p 5432 -d sonar -U sonar -h <container_id>

now enter the password for sonarqube database:

from my lab exercise, password for sonar user is sonar

Make sure it shows sonarqube which is your database schema inside PostgresSQL db.

Step 3: Execute the below query to change admin password to default password which is also admin

update users set crypted_password='100000$t2h8AtNs1AlCHuLobDjHQTn9XppwTIx88UjqUm4s8RsfTuXQHSd/fpFexAnewwPsO6jGFQUv/24DnO55hY6Xew==', salt='k9x9eN127/3e/hf38iNiKwVfaVk=', hash_method='PBKDF2', reset_password='true', user_local='true' where login='admin';

Step 4: Login to SonarQube UI and login as admin/admin

Login as admin/admin

Now it will immediately ask you to change the default admin password to something else:

That's it! That is how you recover SonarQube admin password.

References:

https://docs.sonarqube.org/latest/instance-administration/security/

Thursday, September 22, 2022

Create Freestyle job in Jenkins | How to create build job in Jenkins to automate Java build and deployment of WAR into Tomcat | Bitbucket Jenkins Integration

Jenkins is popular open source Continuous integration tool. It was written entirely in Java. Jenkins is a self-contained automation server used for automating builds, tests and deployment.


See below the steps for configuring Jenkins to automate the build and deployment for the Java Web project we already set up in BitBucket into 


pre-requisites:
  • Also install deploy to container Jacoco plugins under Jenkins --> Manage Jenkins --> Manage plug-ins

Click on Available, type Deploy to container, select it. enter Jacoco, select it. Click on Install without restart.

Deploy to container


JaCoCo

Click on without restart.


steps to automate MyWebApp project in Jenkins:

1. Login to Jenkins. Click on New item.

2. Enter an item name --> select Free style project.
enter name as myFirstAutomateJob. click OK.
3. under source code mgmt, click git. enter Bitbucket URL
Click on your repo, Copy the url from the browser. Paste the url as Repository URL below.

under credentials --> click Add- > select Jenkins -->  enter your Bitbucket username and App passwordDO NOT use BitBucket password as it is removed from March 1st, 2022. Click to here to learn how to generate App Password in Bitbucket. Add description as my SCM credentials.


4. select that from drop down.


5. Enter main as branch specifier or which ever branch you want to check out.

6. under build trigger click on poll scm, enter this value to check

for every 2 mins --> H/02 * * * *

7. Build --> Add build step --> invoke top level maven targets -->

select Maven3 from drop down and goal as clean install


8. Click on advanced, enter the path of POM file as --> MyWebApp/pom.xml


9. click on Add post build action, select Record Jacoco Code coverage report
  
10. click on Add post build action, select deploy war/ear to container.

      for WAR/EAR files enter as 
          **/*.war


in WAR/EAR files, leave context path empty

   11. click on Add container , select Tomcat 9.x

   12. click on add credentials, enter tomcat as user name and password as password.
      select it from drop down.


13. tomcat url should be --> http://your_public_dns_name:8080


click Apply, click Save
click on build now..It should build.
if there is any error, please check the console output. Most of the common error would be checking the path of Maven installation, valid credentials for GitHub or Tomcat. Also make sure you install the plug-ins.

After successful deployment, please make sure you check the output in Tomcat by going to browser and enter below URL


This is how you automate the builds and deployments using Jenkins. 

Code Coverage Report can be seen in Jenkins as well. Click on Job name.


Please watch the steps in YouTube channel:

Wednesday, September 14, 2022

How To Setup Jenkins using BootStrap Scripts in AWS EC2 Instance while Launching | How to Run commands on your EC2 instance at launch

What is bootstrap script in aws?

If you want to execute some commands during boot up(launch), you can execute it easily by loading script in user data section during EC2 launch. Bootstrap scripts run only once - when the instance is instantiated for the 1st time.

Please follow the below steps to create an EC2 instance.  We will be installing Java, Maven and Jenkins during boot up.

How to create EC2 instance in AWS console?

What is EC2 instance? 

It is virtual server provided by AWS. We will be using this EC2 to setup Jenkins. Please follow the below steps to create an EC2 instance.

Pre-requisites:

Steps:
1: Login to AWS console by clicking this link -->  https://aws.amazon.com/console/
click on All services, Click on Compute -->  Click on EC2


2. Click on Launch instance


3. Enter Name as Jenkins-EC2 and enter 1 as number of instance


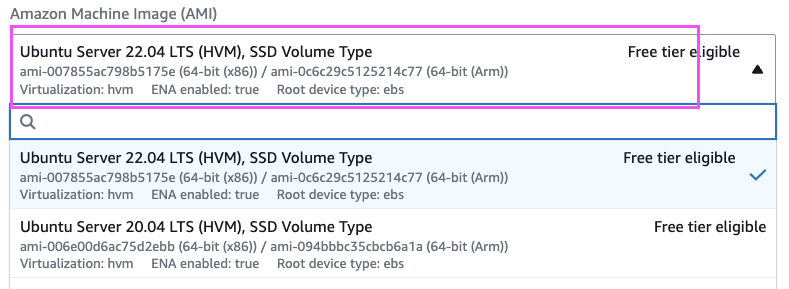
4. Select Ubuntu and choose Ubuntu server 22.0.4 as AMI


5. Enter t2.small as instance type
6. You can choose existing Key
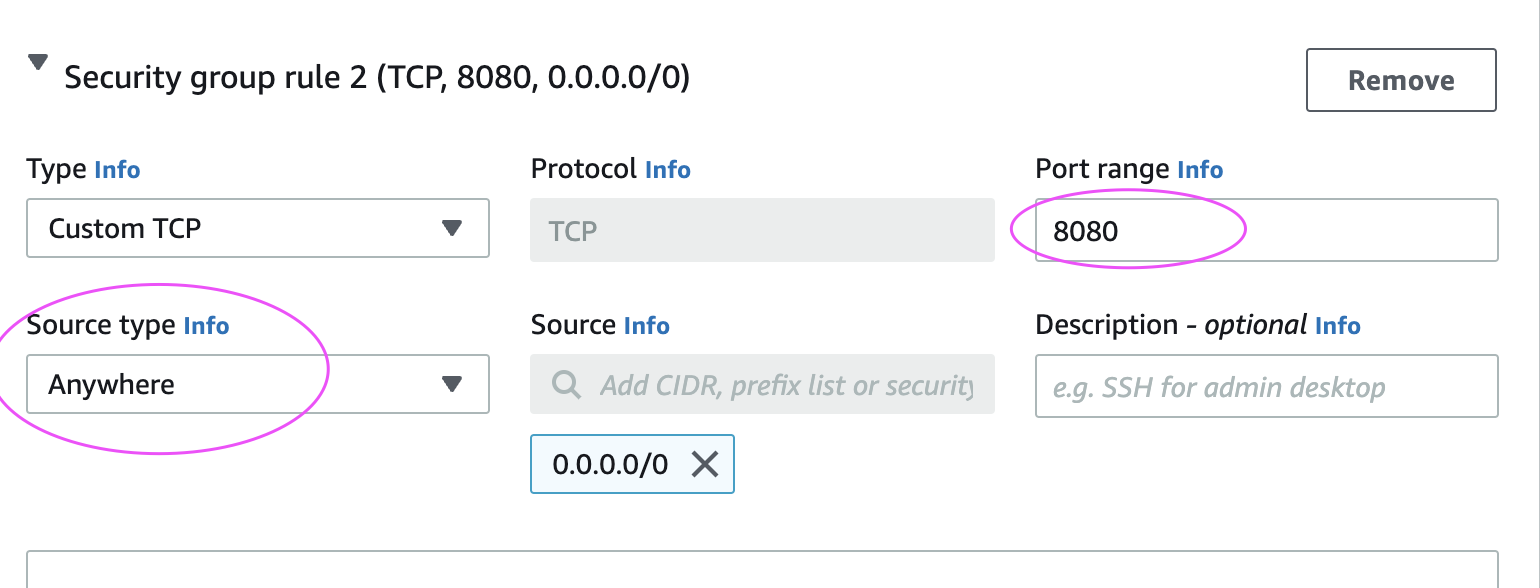
7. Under Network settings, Click Edit


Add port range as 8080 and select AnyWhere as Source Type, that should enter 0.0.0.0/0 as Source

8. Enter 10 GB as storage 

Steps to add bootstrap script during EC2 launch


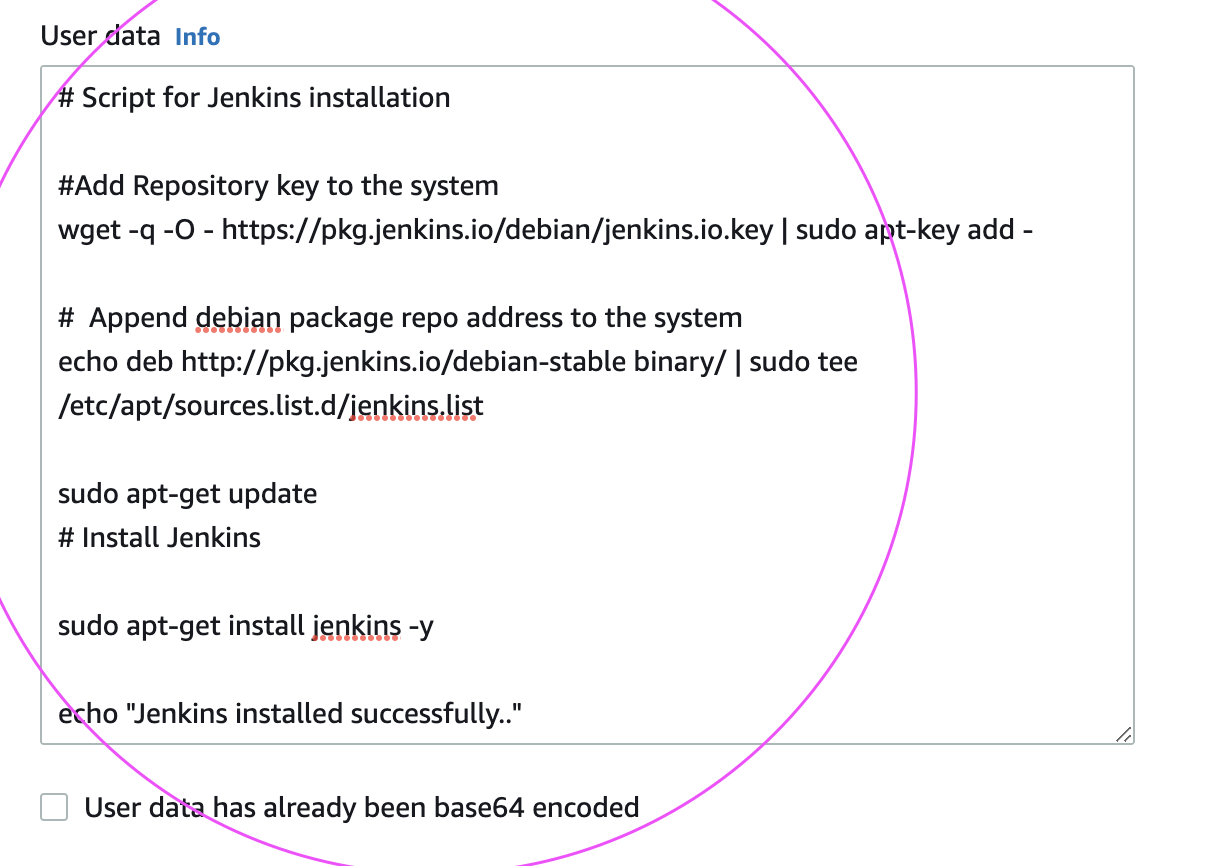
Click on Advanced Details:

go to User Data section and Copy the script from this link.


9. Click on Launch Instance.

Click on View instances

Now you should be able to view instances in AWS console. 

once EC2 is provisioned, you can login and you will be able to see Java, Maven and Jenkins installed in EC2 instance after launch.

Check the Console Output Logs in EC2 instance

Login to EC2 instance, and type the below command:

tail -f /var/log/cloud-init-output.log

This will give the output of bootstrap execution

Verify if Java got installed.

java -version
mvn --version


Go to the browser and try to access Jenkins in the browser, Jenkins should be coming up.(make sure you open port 8080 in the firewall rules)


Enter Jenkins Admin password:
Execute below command to get Jenkins admin password

sudo cat /var/lib/jenkins/secrets/initialAdminPassword

Enter the password and click on continue

Click on Suggested plug-ins and setup the admin user for Jenkins.

Watch the steps in YouTube channel:

Friday, September 9, 2022

How to download Visual Studio Code on iMac Desktop? | How to download VS Code on Mac Book pro Laptops?

Visual Studio Code can be installed on any desktops. Find steps for installing in Macbook pro Laptop or Desktop.

VS Code Installation Steps:

1. Go to https://code.visualstudio.com/download


 Click on Download.

2. After the VSCode zip file is downloaded, it will be installed automatically

You may see Visual Studio Code installed.

3. Click on Visual Studio Code icon. Now Click on Open


4. Once opened, you will see Visual Studio Code like below:


Wednesday, September 7, 2022

How to configure VS Code to integrate with GitHub | Working with GitHub in VS Code | GitHub Visual Studio Code Integration

GitHub is popular Git based SCM, hosted on cloud for storing and sharing code amongst developers. Using GitHub with Visual Studio Code lets you share your source code and collaborate with other developers right within your editor. 


There are many ways to integrate with GitHub, using the website or using Git client(CLI) or using VS Code as well. We will be learning how to integrate with GitHub from VS Code. Git Support is provided out-of-the-box in VS Code.

Pre-requisites:

Make sure Git is Enabled in Visual Studio Code

Let's make sure Git is Enabled in VS Code. Click on Manage Icon in the bottom left in VS Code. Click on Settings. 


Search for Git:Enabled make sure Git: Enabled is checked.


Steps to integrate with GitHub from Visual Studio Code

1. Open VS Code, Click on Git icon as Git support is provided out of the box in Visual Studio Code.


2. Click on clone repository, 


3. Click on clone from GitHub

4. Now Click on Allow to sign in using GitHub


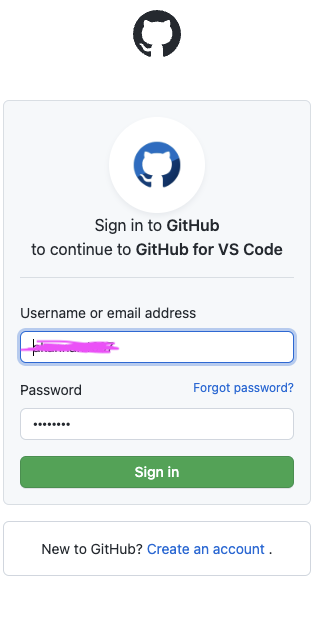
5. Enter GitHub Credentials

Click on Authorize Visual Studio code


6. Now Click on Open Visual studio code


7. Choose the location where you like to clone the repo:


8. Now click on Open to open the cloned repository.


How to make code changes in VS Code after cloning?

Open Terminal window in VS Code

Set user Name and Email before you push code changes:

Set your username: 
git config --global user.name " First Name Last Name"

Set your email address: 
git config --global user.email "your@email.com"

View the entries:
git config --global --list

It should print your entries.

Now let's make some code changes, click on Explorer Icon.


Make code changes. 
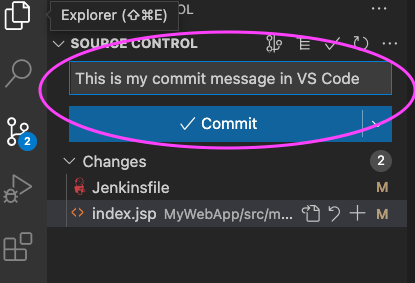
Save the changes. After saving, click on Git Icon on left to see the list of files modified. You will also notice M that says modified files.


Now you can enter commit message above Commit button and Click on Commit. 

Now click on Yes to stage all your changes.


Now to push your code changes into GitHub
Click on ... under Source Control and select Push

Now you can go into GitHub and see your code changes.


🚀 Live AI-Enabled DevSecOps & Cloud Engineering Bootcamp – Sep 2026

Live AI-Enabled DevSecOps & Cloud Engineering Bootcamp from Coach AK - Sep 2026 Schedule