Showing posts with label Python. Show all posts

Thursday, October 31, 2024

Deploy Python App into Kubernetes Cluster using kubectl Jenkins Pipeline | Containerize Python App and Deploy into EKS Cluster | Kubectl Deployment using Jenkins

We will learn how to automate Docker builds using Jenkins and Deploy into Kubernetes Cluster in AWS Cloud. We will use kubectl command to deploy Docker images into EKS cluster. We will use Python based application. I have already created a repo with source code + Dockerfile. The repo also have Jenkinsfile for automating the following:

- Automating builds using Jenkins
- Automating Docker image creation
- Automating Docker image upload into Elastic container registry
- Automating Deployments to Kubernetes Cluster using kubectl CLI plug-in


Pre-requisites:
1. EKS Cluster is setup and running. Click here to learn how to create EKS cluster.
2. Jenkins Master is up and running.
3. Install Docker in Jenkins.
4. Docker, Docker pipeline and Kubectl CLI plug-ins are installed in Jenkins


5. ECR repo created to store docker images.

The Code for this video is here:
and make necessary changes in eks-deploy-from-ecr.yaml file after you fork into your account.

Step #1 - Create Credentials for connecting to EKS cluster using Kubeconfig
Go to Jenkins UI, click on Credentials -->


Click on Global credentials
Click on Add Credentials

use secret file from drop down.

execute the below command to login as jenkins user.
sudo su - jenkins

you should see the nodes running in EKS cluster.

kubectl get nodes


Create namespace to deploy containers
kubectl create namespace python-app-ns
kubectl get ns

Execute the below command to get kubeconfig info, copy the entire content of the file:
cat /var/lib/jenkins/.kube/config


Open your text editor or notepad, copy and paste the entire content and save in a file.
We will upload this file.

Enter ID as K8S and choose File and upload the file and save.


Step # 2 - Create a pipeline in Jenkins
Create a new pipeline job.


Step # 3 - Copy the pipeline code from below
Make sure you change values as per your settings highlighted in yellow below:

pipeline {
    agent any

    environment {
        registry = "account_id.dkr.ecr.us-east-1.amazonaws.com/coachak/my-docker-repo"
    }
    stages {
        stage('checkout') {
            steps {
                checkout([$class: 'GitSCM', branches: [[name: '*/master']], extensions: [], userRemoteConfigs: [[url: 'https://github.com/akannan1087/myPythonDockerRepo']]])
            }
        }
        
        stage ("build image") 
        {
            steps {
                script {
                    dockerImage = docker.build registry
                      dockerImage.tag("$BUILD_NUMBER")
                    }
                }
        }
        
        stage ("upload ECR") {
            steps {
                script {
                    sh "aws ecr get-login-password --region us-east-2 | docker login --username AWS --password-stdin account_id.dkr.ecr.us-east-2.amazonaws.com"
                sh 'docker push account_id.dkr.ecr.us-east-1.amazonaws.com/coachak/my-docker-repo:$BUILD_NUMBER'
                }
            }
        }
        
    // Avoid latest tag image and pass build ID dynamically from Jenkins pipeline
       stage('K8S Deploy') {
        steps{   
            script {
                withKubeConfig([credentialsId: 'K8S', serverUrl: '']) {
                echo "Current build number is: ${env.BUILD_ID}"
               // Replace the placeholders in the deployment.yaml file 
                sh """ 
                sed -i 's/\${BUILD_NUMBER}/${env.BUILD_ID}/g' k8s-deployment.yaml
                """ 
                sh ('kubectl apply -f  k8s-deployment.yaml -n springboot-app-ns')
                }
            }
        }
       }
    }    
}

Step # 4 - Build the pipeline


Step # 5 - Verify deployments to EKS

kubectl get pods


kubectl get deployments
kubectl get services


Steps # 6 - Access Python App in K8S cluster
Once deployment is successful, go to browser and enter above load balancer URL 

You should see page like below:


Tuesday, June 9, 2020

Deploy Python App into Kubernetes Cluster using Jenkins Pipeline | Containerize Python App and Deploy into AKS Cluster

We will learn how to automate Docker builds using Jenkins and Deploy into Kubernetes Cluster setup using AKS. We will use Python based application. I have already created a repo with source code + Dockerfile. The repo also have Jenkinsfile for automating the following:

- Automating builds using Jenkins
- Automating Docker image creation
- Automating Docker image upload into Docker registry
- Automating Deployments to Kubernetes Cluster

Pre-requisites:
1. AKS Cluster is setup and running. Click here to learn how to create AKS cluster.
2. Jenkins Master is up and running. 
3. Setup Jenkins slave to run Docker builds
4. Docker, Docker pipeline and Kubernetes Deploy plug-ins are installed in Jenkins


5. Docker hub account setup in https://cloud.docker.com


Step #1 - Create Credentials for Docker Hub
Go to Jenkins UI, click on Credentials -->


Click on Global credentials
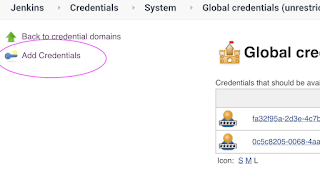
Click on Add Credentials


Now Create an entry for your Docker Hub account. Make sure you enter the ID as dockerhub

Step #2 - Create Credentials for Kubernetes Cluster
Click on Add Credentials, use Kubernetes configuration from drop down.


execute the below command to get kubeconfig info, copy the entire content of the file:
sudo cat ~/.kube/config


Enter ID as K8S and choose enter directly and paste the above file content and save.

Step # 3 - Create a pipeline in Jenkins
Create a new pipeline job.


Step # 4 - Copy the pipeline code from below
Make sure you change red highlighted values below:
Your docker user id should be updated.
your registry credentials ID from Jenkins from step # 1 should be copied

pipeline {
     agent {
         label 'myslave'
     }
        environment {
        //once you sign up for Docker hub, use that user_id here
        registry = "your_docker_hub_user_id/mypython-app"
        //- update your credentials ID after creating credentials for connecting to Docker Hub
        registryCredential = 'dockerhub'
        dockerImage = ''
    }
    stages {

        stage ('checkout') {
            steps {
            checkout([$class: 'GitSCM', branches: [[name: '*/master']], doGenerateSubmoduleConfigurations: false, extensions: [], submoduleCfg: [], userRemoteConfigs: [[url: 'https://github.com/akannan1087/myPythonDockerRepo']]])
            }
        }
       
        stage ('Build docker image') {
            steps {
                script {
                dockerImage = docker.build registry
                }
            }
        }
       
         // Uploading Docker images into Docker Hub
    stage('Upload Image') {
     steps{   
         script {
            docker.withRegistry( '', registryCredential ) {
            dockerImage.push()
            }
        }
      }
    }
   
    stage ('K8S Deploy') {
        steps {
            script {
                kubernetesDeploy(
                    configs: 'k8s-deployment.yaml',
                    kubeconfigId: 'K8S',
                    enableConfigSubstitution: true
                    )           
               
            }
        }
    }
  
    }  
}

Step # 5 - Build the pipeline
Once you create the pipeline and changes values per your Docker user id and credentials ID, click on 

Step # 6 - Verify deployments to K8S

kubectl get pods


kubectl get deployments
kubectl get services

Steps # 7 - Access Python App in K8S cluster
Once build is successful, go to browser and enter master or worker node public ip address along with port number mentioned above
http://master_or_worker_node_public_ipaddress:port_no_from_above

You should see page like below:


Please watch the above steps in YouTube channel:

Sunday, May 3, 2020

Create Jenkins Pipeline for automating Docker image creation and push docker image into Docker Hub | Dockerize Python App

We will learn how to automate Docker builds using Jenkins. We will use Python based application. I have already created a repo with source code + Dockerfile. We will be creating Jenkins pipeline for automating builds.


- Automating builds
- Automating Docker image creation
- Automating Docker image upload
- Automating Docker container provisioning

Pre-requisites:
1. Jenkins is up and running
2. Docker installed on Jenkins instance and configured.
3. Docker plug-in installed in Jenkins
4. user account setup in https://cloud.docker.com
5. port 8096 is opened up in firewall rules.

Step #1 - Create Credentials for Docker Hub
Go to your Jenkins where you have installed Docker as well. Go to credentials -->


Click on Global credentials
Click on Add Credentials


Now Create an entry for Docker Hub credentials

Make sure you take note of the ID as circled below:


Step # 2 - Create a pipeline in Jenkins, name can be anything

Step # 3 - Copy the pipeline code from below
Make sure you change red highlighted values below:
Your docker user id should be updated.
your registry credentials ID from Jenkins from step # 1 should be copied

pipeline {
    agent any 
    environment {
        //once you sign up for Docker hub, use that user_id here
        registry = "your_docker_user_id/mypythonapp"
        //- update your credentials ID after creating credentials for connecting to Docker Hub
        registryCredential = 'fa32f95a-2d3e-4c7b-8f34-11bcc0191d70'
        dockerImage = ''
    }
    
    stages {
        stage('Cloning Git') {
            steps {
                checkout([$class: 'GitSCM', branches: [[name: '*/master']], doGenerateSubmoduleConfigurations: false, extensions: [], submoduleCfg: [], userRemoteConfigs: [[credentialsId: '', url: 'https://bitbucket.org/ananthkannan/mypythonrepo']]])       
            }
        }
    
    // Building Docker images
    stage('Building image') {
      steps{
        script {
          dockerImage = docker.build registry
        }
      }
    }
    
     // Uploading Docker images into Docker Hub
    stage('Upload Image') {
     steps{    
         script {
            docker.withRegistry( '', registryCredential ) {
            dockerImage.push()
            }
        }
      }
    }
    
     // Stopping Docker containers for cleaner Docker run
     stage('docker stop container') {
         steps {
            sh 'docker ps -f name=mypythonappContainer -q | xargs --no-run-if-empty docker container stop'
            sh 'docker container ls -a -fname=mypythonappContainer -q | xargs -r docker container rm'
         }
       }
    
    
    // Running Docker container, make sure port 8096 is opened in 
    stage('Docker Run') {
     steps{
         script {
            dockerImage.run("-p 8096:5000 --rm --name mypythonappContainer")
         }
      }
    }
  }
}

Step # 4 - Click on Build - Build the pipeline
Once you create the pipeline and changes values per your Docker user id and credentials ID, click on 

Steps # 5 - Access Python App
Once build is successful, go to browser and enter http://public_dns_name:8096
You should see page like below:


🚀 Live AI-Enabled DevSecOps & Cloud Engineering Bootcamp – Sep 2026

Live AI-Enabled DevSecOps & Cloud Engineering Bootcamp from Coach AK - Sep 2026 Schedule