Terraform can provision resources on any cloud platform. We will see
how we can use Terraform to provision EC2 instance using Windows laptop. Please do the below
steps for provisioning EC2 instances on AWS:

Login to AWS console, click on username and go to My security credentials.
 Continue on security credentials, click on access keys
 Create a new access key if you don't have one. Make sure you download the keys in your local machine.
Perform below commands in Windows laptop where you have installed Terraform:
First setup your access keys, secret keys and region code locally.

cd c:
Create Terraform Files
variable "aws_region" {
start notepad main.tf
Apply complete! Resources: 3 added, 0 changed, 0 destroyed.
Create Remote repo in GitHub
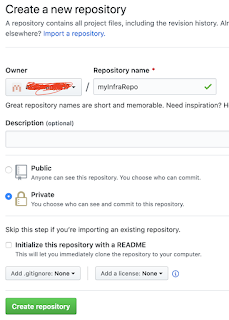
Create
a new repo with below name, make sure it is a private repo. Also do not
click on initialize this repository with a README option.
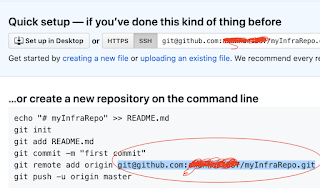
 Note down the remote url as highlighted below:
All Terraform files should be checked into version control systems such as GitHub, BitBucket or GitLab. Let us see how to push code changes into GitHub. Make sure you are in the directory where Terraform files are created.
Initialize the directory first
You need to setup your email address and user name.

Login to AWS console, click on username and go to My security credentials.


Pre-requisites:
First setup your access keys, secret keys and region code locally.
aws configure

Open Git bash and enter below commands:
mkdir project-terraform
cd project-terraform
start notepad variables.tf
variable "aws_region" {
description = "The AWS region to create things in."
default = "us-east-2"
}
variable "key_name" {
description = " SSH keys to connect to ec2 instance"
default = "myJune2021Key"
}
variable "instance_type" {
description = "instance type for ec2"
default = "t2.micro"
}
variable "security_group" {
description = "Name of security group"
default = "my-jenkins-security-group-2022"
}
variable "tag_name" {
description = "Tag Name of for Ec2 instance"
default = "my-ec2-instance"
}
variable "ami_id" {
description = "AMI for Ubuntu Ec2 instance"
default = "ami-0b9064170e32bde34"
}
save above file as "variables.tf" under c:\project-terraform folder
provider "aws" {
region = var.aws_region
}
resource "aws_vpc" "main" {
cidr_block = "172.16.0.0/16"
instance_tenancy = "default"
tags = {
Name = "main"
}
}
#Create security group with firewall rules
resource "aws_security_group" "jenkins-sg-2022" {
name = var.security_group
description = "security group for jenkins"
ingress {
from_port = 8080
to_port = 8080
protocol = "tcp"
cidr_blocks = ["0.0.0.0/0"]
}
ingress {
from_port = 22
to_port = 22
protocol = "tcp"
cidr_blocks = ["0.0.0.0/0"]
}
# outbound from Jenkins server
egress {
from_port = 0
to_port = 65535
protocol = "tcp"
cidr_blocks = ["0.0.0.0/0"]
}
tags= {
Name = var.security_group
}
}
resource "aws_instance" "myFirstInstance" {
ami = var.ami_id
key_name = var.key_name
instance_type = var.instance_type
vpc_security_group_ids = [aws_security_group.jenkins-sg-2022.id]
tags= {
Name = var.tag_name
}
}
save above file as "main.tf" under c:\project-terraform folder.
If you dont provide double quote, it will be .txt in the end.
Now execute the below command:
terraform init
* provider.aws: version = "~> 1.22"
Terraform has been successfully initialized!
Terraform has been successfully initialized!
and then execute the below command
terraform plan
the above command will show how many resources will be added.
Plan: 3 to add, 0 to change, 0 to destroy.
Execute the below command
terraform apply
Plan: 3 to add, 0 to change, 0 to destroy.
Do you want to perform these actions?
Terraform will perform the actions described above.
Only 'yes' will be accepted to approve.
Enter a value: yes
Do you want to perform these actions?
Terraform will perform the actions described above.
Only 'yes' will be accepted to approve.
Enter a value: yes
Apply complete! Resources: 3 added, 0 changed, 0 destroyed.
List Resources created by Terraform

How to push Terraform files into GitHub
Pre-requisites:
Execute the below command to view list of the resources created by Terraform.
terraform state list
The above command will list three resources created.

Now login to AWS EC2 console, you would see the new instances up and running.
Pre-requisites:
First create SSH keys and upload public keys into GitHub by executing below command:
ssh-keygen
This should generate both public and private keys. Now navigate
to c:\users\your_username\.ssh folder and open id_rsa.pub(pubkic key)
file probably in notepad and copy the whole content of it and upload into GitHub.
Create Remote repo in GitHub


All Terraform files should be checked into version control systems such as GitHub, BitBucket or GitLab. Let us see how to push code changes into GitHub. Make sure you are in the directory where Terraform files are created.
Initialize the directory first
Once you uploaded make sure you are in the directory where you had created tf files.
git init
The above command will create local git repository.
Now add terraform files.
git add *.tf
git init
The above command will create local git repository.
Now add terraform files.
git add *.tf
You need to setup your email address and user name.
git config --global user.email "your@email.com"
git config --global user.name "your_userid"
git commit -m "added terraform files"
Copy the below green highligted url from above screenshots circled in red.
git remote add origin git@github.com:userid/myInfraRepo.git
Now push the code into GitHub
git push -u origin master
Copy the below green highligted url from above screenshots circled in red.
git remote add origin git@github.com:userid/myInfraRepo.git
Now push the code into GitHub
git push -u origin master
Now Login to GitHub to view the Terraform files
 Note:
Note:
If you have any issues in uploading tf files, you may not have created ssh-keys and uploaded into GitHub. Create ssh keys using ssh-keygen command:

If you have any issues in uploading tf files, you may not have created ssh-keys and uploaded into GitHub. Create ssh keys using ssh-keygen command:
ssh-keygen
This should generate both public and private keys.
navigate
to c:\users\your_username\.ssh folder and open id_rsa.pub(pubkic key)
file and copy the content of it and upload into GitHub. 


This tells me that "tags" are an unexpected argument.
ReplyDeleteThis code snippet does not work..
ReplyDelete