Area
|
Jenkins
|
Azure DevOps
|
Type
|
Continuous integration tool
|
Project management + CI/CD tool
|
Git repo setup
|
Not possible
|
Git and TFVC repo creation is possible
|
SonarQube
|
Can be integrated
|
Can be integrated
|
licensing
|
Open source, java based
|
Proprietary from Microsoft
|
Branching and Merging
|
Not supported
|
Supported
|
Tools integration
|
Through plug-ins
|
Through add-ons
|
Release management
|
Not supported fully
|
Fully supported
|
Slack integration
|
Possible
|
possible
|
Saturday, November 16, 2019
Difference between Jenkins and Azure DevOps(VSTS) - What is the difference between Jenkins and Azure DevOps
Thursday, October 24, 2019
How to connect to an EC2 instance from local machine after creating EC2 in AWS?
Find the steps to connect to an EC2 instance from local machine after creating it in AWS.
Pre-requisites:
1. Keys(for e.g., yourkey.pem) already downloaded in your local machine, preferably in Downloads folder.
2. EC2 is up and running
3. For windows laptop, you need to install Git by downloading from this URL - https://git-scm.com/downloads
4. For apple desktop or laptops, download https://www.iterm2.com/downloads.html
Steps to connect to EC2 instance:
1. Go to AWS console.
2. Click on EC2, click on running instances link

3. Select the checkbox of EC2 you would like to connect to.
4. Click on Action. Copy the url from SSH which looks like below:
For e.g.
ssh -i "mykey.pem" ubuntu@dns_name.compute.amazonaws.com

5. Go to your local machine, Open Git bash, navigate to downloads directory like below:
For windows laptop --> cd downloads
steps For iMac only --> cd downloads
6. Paste the url from example highlighted above in step # 4.
ssh -i "mykey.pem" ubuntu@dns_name.compute.amazonaws.com
7. say yes when it is asking to connect.
8. now you should be in AWS cloud, screen should tell you something like this:
Last login: Sun Feb 18 19:01:21 2018 from 64.183.186.78
ubuntu@ip-172-31-26-96:~$
Pre-requisites:
1. Keys(for e.g., yourkey.pem) already downloaded in your local machine, preferably in Downloads folder.
2. EC2 is up and running
3. For windows laptop, you need to install Git by downloading from this URL - https://git-scm.com/downloads
4. For apple desktop or laptops, download https://www.iterm2.com/downloads.html
Steps to connect to EC2 instance:
1. Go to AWS console.
2. Click on EC2, click on running instances link

3. Select the checkbox of EC2 you would like to connect to.
4. Click on Action. Copy the url from SSH which looks like below:
For e.g.
ssh -i "mykey.pem" ubuntu@dns_name.compute.amazonaws.com

5. Go to your local machine, Open Git bash, navigate to downloads directory like below:
For windows laptop --> cd downloads
steps For iMac only --> cd downloads
chmod 400 yourkey.pem
6. Paste the url from example highlighted above in step # 4.
ssh -i "mykey.pem" ubuntu@dns_name.compute.amazonaws.com
7. say yes when it is asking to connect.
8. now you should be in AWS cloud, screen should tell you something like this:
Last login: Sun Feb 18 19:01:21 2018 from 64.183.186.78
ubuntu@ip-172-31-26-96:~$
Wednesday, October 9, 2019
DevOps BootCamp by Coach AK on AWS and Azure Cloud Online Classes | March 2023 Schedule
Are you in IT? Tired of your work? Are you not able to make any
good progress in your career?
Are you not having a job? Looking for a break in
IT? Are you interested in learning DevOps?
Did you get laid off from your previous job due to Covid-19?
You are in the right place to kick start your career in
DevOps. DevOps is one of the top and hot IT skills right
now. Currently almost all the employers are struggling to get
right resources in their teams who can do the DevOps and
automation work..You could be that person by attending this
coaching program.
DevOps Coaching Classes schedules for March 2023(currently enrollment is going on)
| Date | Time | Type | When? |
|---|---|---|---|
| Mar 6th | 6:00 to 8:00 PM CST | Weekdays | Mondays/Wednesdays |
| Mar 25th | 09:45 AM CST to 11:20 AM on Saturdays 10:30 AM CST to 12:30 PM CST on Sundays | Weekends | Sat/Sundays |
DevOps Coaching Highlights:
- Comprehensive hands on knowledge on Git, Jenkins, Maven, SonarQube, Nexus, Terraform, Ansible, Puppet, Docker, AWS IAM, ECR, Docker registry. AWS and Azure cloud platforms.
- Coach is having about 22+ yrs of professional IT experience, 8+ Yrs in DevOps/Cloud/Automation.
- Many students already got placed in reputed companies from this coaching program successfully.
- Working as a Sr.DevOps Coach/Architect in a one of the top IT services companies in USA.
- Unique program...less theory, more hands on lab exercises
- Resume preparation will be done with candidates personally.
- One-to-one Interview coaching.
- Coaching is purely hands on with 101% job relevant.
- 100% Job assistance.
- Coached about 1400+ students successfully for past five years and many of my students got placed with many large enterprises in DFW, Charlotte, Houston, Austin, Chicago, Florida, Seattle, Bay area, Ohio, NJ and NY areas..
To join DevOps Coaching classes, contact coach below:
Contact no # : +1(469)733-5248
Email id: devops.coaching@gmail.com
Contact: Coach AK
To join DevOps Coaching classes, contact coach below:
Email id: devops.coaching@gmail.com
Contact: Coach AK
Friday, October 4, 2019
Docker Interview Questions - Popular Docker Interview Questions
Docker Interview Questions - Popular Docker Interview Questions
1. What is the difference between Docker image and Docker container?
Docker container is simply an instance of Docker image.
A Docker image is an immutable file, which is a snapshot of container. We create an image with build command. Docker image contains all your application code along with all the dependencies packaged into this snapshot.
When we use run command, an Image will produce a container.
In programming language, an Image is a Class and a Container is an instance of the class.
2. Can we run multiple apps on one server with Docker?
Yes, theoretically we can run multiple apps on one Docker server. But in practice, it is better to run different components on separate containers.
With this we get cleaner environment and it can be used for multiple uses.

4. How to enable IPV6 in Docker
5. How to copy files inside Dockerfile?
6. How do you see running container in Docker?
docker ps command
7. How do you see all the containers?
9. What are the benefits of using Docker?
Docker is a very powerful tool. Some of the main benefits of using Docker are as follows:
I. Utilize Developer Skills : With Docker we maximize the use of Developer skills. With Docker there is less need of build or
release engineers. Same Developer can create software and wrap it in one single file.
II. Standard Application Image : Docker based system allows us to bundle the application software and Operating system files in a
single Application Image that can be deployed independently.
III. Uniform deployment : With Docker we can create one package of our software and deploy it on different platforms seamlessl y
10. What happens when you stop the container? Will you loose the data?
You won’t lose any data when Docker container exits. Any data that your application writes to the container gets preserved on the disk until you explicitly delete the container. The file system for the container persists even after the container halts.
11. What is the difference between Docker stop and Docker kill commands?
The difference between ‘docker kill’ and ‘docker stop’ is that ‘docker stop’ gives the container time to shutdown gracefully, in situations when it is taking too much time for getting the container to stop, one can opt to kill it.
3. How does docker client communicates with Docker daemon?
Docker client or command line
interface, communicated with Docker daemon through APIs.

Edit
/etc/docker/daemon.json and set the ipv6 key to true.
{
"ipv6": true
}
Save the file.
Reload the
Docker configuration file by executing the below command:
systemctl reload docker
5. How to copy files inside Dockerfile?
Use COPY command
For e.g.,
COPY app.py /usr/src/app/
6. How do you see running container in Docker?
docker ps command
7. How do you see all the containers?
docker ps -a command will show all the containers..
8. How to create directory inside Dockerfile?
mkdir -p /var/www/appor WORKDIR /var/www/app Docker is a very powerful tool. Some of the main benefits of using Docker are as follows:
I. Utilize Developer Skills : With Docker we maximize the use of Developer skills. With Docker there is less need of build or
release engineers. Same Developer can create software and wrap it in one single file.
II. Standard Application Image : Docker based system allows us to bundle the application software and Operating system files in a
single Application Image that can be deployed independently.
III. Uniform deployment : With Docker we can create one package of our software and deploy it on different platforms seamlessl y
10. What happens when you stop the container? Will you loose the data?
You won’t lose any data when Docker container exits. Any data that your application writes to the container gets preserved on the disk until you explicitly delete the container. The file system for the container persists even after the container halts.
11. What is the difference between Docker stop and Docker kill commands?
The difference between ‘docker kill’ and ‘docker stop’ is that ‘docker stop’ gives the container time to shutdown gracefully, in situations when it is taking too much time for getting the container to stop, one can opt to kill it.
Tuesday, October 1, 2019
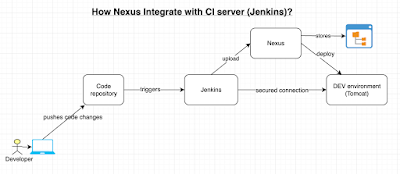
Jenkins Nexus Integration - How to integrate Sonatype Nexus with Jenkins - Upload artifacts from Jenkins to Nexus repository
You can install plug-in called Nexus Artifact Uploader plug-in to
integrate Nexus with Jenkins. Let us see how to integrate Jenkins with
Nexus and able to upload War/Ear/Jar/Exe/DLLs.

Pre-requisites:
Install Nexus Artifact Uploader plugin in Jenkins.
Steps:
1. Once you installed the above plug-ins, click existing FreeStyle job configuration or create a new job.
2. Under source code management. enter bitbucket repo url and git credentials.
3. Go to build section, add Maven targets. with goals clean install. Also click advance, give path of POM.xml


4. click on Add build step, choose Nexus artifact uploader.

5. Enter information per below screen shot.
Make sure you enter version as 1.0-SNAPSHOT and repository as maven-snapshots
6. Click on Apply, Save.

7. Now login to Nexus repo, Click on Components, Click on maven-snapshots

8. you shall see the WAR being uploaded here.

You can watch the above steps in detail in YouTube channel below:
How to setup SonaType Nexus 3 on Linux in EC2? Nexus installation on RedHat Linux | Install Nexus on RedHat Linux
Nexus is an open source, Java based binary repository manager, used for storing build artifacts. We will eventually
integrate Nexus with Jenkins for uploading WAR/EAR/JAR files.
Here are the steps for installing Sonatype Nexus 3 in RHEL in EC2 on AWS. Please create a new Redhat EC2 instance with small type. Choose Redhat Enterprise 8.

Pre-requisites:
Make sure you open port 8081 in AWS security group
Installation Steps:
Extract Nexus
sudo tar -xvf nexus3.tar.gz
sudo mv nexus-3* nexus
Create a user called Nexus
sudo adduser nexus
Change the ownership of nexus files and nexus data directory to nexus user.
sudo chown -R nexus:nexus /opt/nexus
sudo chown -R nexus:nexus /opt/sonatype-work
Add Nexus as a user
Modify memory settings in Nexus configuration file
sudo vi /opt/nexus/bin/nexus.vmoptions
Modify the above file as shown in below:

after making changes, press wq! to come out of the file.
Configure Nexus to run as a service
sudo vi /etc/systemd/system/nexus.service
Copy the below content highlighted in green color.
Click on Sign in link

Please watch my YouTube channel on demo on How to setup Nexus 3 on Red Hat Linux in AWS:
Here are the steps for installing Sonatype Nexus 3 in RHEL in EC2 on AWS. Please create a new Redhat EC2 instance with small type. Choose Redhat Enterprise 8.
Make sure you open port 8081 in AWS security group
Installation Steps:
sudo yum install wget -y

Download Java 8
you can confirm java is installed by typing the below command:
java -version
Execute the below command to navigate to /opt directory by changing directory:
cd /opt
Download Nexus Latest version

sudo yum install java-1.8.0-openjdk.x86_64 -y
you can confirm java is installed by typing the below command:
java -version
Execute the below command to navigate to /opt directory by changing directory:
cd /opt
Download Nexus Latest version
sudo wget -O nexus3.tar.gz https://download.sonatype.com/nexus/3/latest-unix.tar.gz
Extract Nexus
sudo tar -xvf nexus3.tar.gz
sudo mv nexus-3* nexus
Create a user called Nexus
sudo adduser nexus
Change the ownership of nexus files and nexus data directory to nexus user.
sudo chown -R nexus:nexus /opt/nexus
sudo chown -R nexus:nexus /opt/sonatype-work
Add Nexus as a user
sudo vi /opt/nexus/bin/nexus.rc
change as per above screenshot by removing # and adding nexus


Modify memory settings in Nexus configuration file
sudo vi /opt/nexus/bin/nexus.vmoptions
Modify the above file as shown in below:

-Xms512m
-Xmx512m
-XX:MaxDirectMemorySize=512m
-Xmx512m
-XX:MaxDirectMemorySize=512m
Configure Nexus to run as a service
sudo vi /etc/systemd/system/nexus.service
Copy the below content highlighted in green color.
[Unit]
Description=nexus service
After=network.target
[Service]
Type=forking
LimitNOFILE=65536
User=nexus
Group=nexus
ExecStart=/opt/nexus/bin/nexus start
ExecStop=/opt/nexus/bin/nexus stop
User=nexus
Restart=on-abort
[Install]
WantedBy=multi-user.target
Create a link to Nexus
sudo ln -s /opt/nexus/bin/nexus /etc/init.d/nexus
Execute the following command to add nexus service to boot.
sudo chkconfig --add nexus
sudo chkconfig --levels 345 nexus on
Start Nexus
sudo service nexus start

Check whether Nexus service is running
sudo service nexus status

Check the logs to see if Nexus is running
tail -f /opt/sonatype-work/nexus3/log/nexus.log
You will see Nexus started..If you Nexus stopped, review the steps above.
sudo ln -s /opt/nexus/bin/nexus /etc/init.d/nexus
Execute the following command to add nexus service to boot.
sudo chkconfig --add nexus
sudo chkconfig --levels 345 nexus on
Start Nexus
sudo service nexus start

Check whether Nexus service is running
sudo service nexus status

Check the logs to see if Nexus is running
tail -f /opt/sonatype-work/nexus3/log/nexus.log
Now press Ctrl C to come out of this windows.
Once Nexus is successfully installed, you can access it in the browser by URL - http://public_dns_name:8081
Click on Sign in link
user name is admin and password can be found by executing below command:
sudo cat /opt/sonatype-work/nexus3/admin.password

Copy the password and click sign in.
Now setup admin password as admin123

sudo cat /opt/sonatype-work/nexus3/admin.password
Copy the password and click sign in.
Now setup admin password as admin123

You should see the home page of Nexus:

Please follow steps for integrating Nexus with Jenkins
Friday, September 20, 2019
How to setup SSH keys in Bitbucket and Setup Java Web App in BitBucket | How to add a Java Web App in BitBucket using Maven
BitBucket is one of the popular git-based version control systems. BitBucket is very good example for Software-as-a-service, hosted on cloud. Let us learn how to setup a Java web project in BitBucket.
Git is a purely distributed version control system. Click here to learn more about Git and its advantages over other SCMs.

Pre-requistes:
If you don't have an bitbucket account, You need to create an account in bitbucket.org.Implementation steps:
1. after login into bitbucket, click on + and Click on Create Repository


3. Click on create repository.
4. now click on your avatar (left bottom of the screen, BitBucket settings-> security--> ssh keys

5. now go to your laptop, open git bash for windows laptop or iTerm (for iMac laptop) and connect to Jenkins EC2 instance using Git bash.
How to connect, refer this url - http://www.cidevops.com/2018/
6. Now type ssh-keygen (and then simply enter four times, do not give any password)

If you already have keys generated, you can use existing key. You don't have to over write the old key.
7. copy the content of public key executing below command in Gitbash.
sudo cat ~/.ssh/id_ed25519.pub
8. go to click on Add key from step # 3, and paste the content of public key. give some name as mySSH key. click on Add key.
9. Now click on repo you created in step # 1. Click on Clone and copy the SSH url. Do not select HTTPS Url. The url will be from your repo you created under Clone link.
10. go back to Gitbash windows connected to Jenkins EC2, execute the below command. Paste the SSH url you copied above.

git clone <ssh_url_from_bitbucket_repo_you_created>

11. Now after cloning, type ls -al command
12. It will show a folder with repo name..
14. use below command to create Java project using Maven. Maven is the build for creating and building java projects.
12. It will show a folder with repo name..
13. navigate to repo folder by below command:
cd mybitbucketrepo
cd mybitbucketrepo
14. use below command to create Java project using Maven. Maven is the build for creating and building java projects.
mvn archetype:generate -DgroupId=com.dept.app -DartifactId=MyWebApp -DarchetypeArtifactId=maven-ar
15. type ls -al to see the new folder called MyWebApp
16. type below command to see the newly created project
git status

17. git add *
18. Perform below command to commit the changes to local repository first.
git commit -m "my first project check-in to bitbucket"
git commit -m "my first project check-in to bitbucket"
19. Now perform below command to push from local repository to remote repository.
git push

Wednesday, August 14, 2019
How to test SSH keys were added in Bitbucket or GitHub successfully?
How to test your SSH keys were added in Bitbucket or GitHub successfully?
BitBucket
ssh -T git@bitbucket.org
logged in as <user_name>
You can use git or hg to connect to Bitbucket. Shell access is disabled
GitHub
ssh -T git@github.com
Hi <user-name>! You've successfully authenticated, but GitHub does not provide shell access.
BitBucket
ssh -T git@bitbucket.org
logged in as <user_name>
You can use git or hg to connect to Bitbucket. Shell access is disabled
GitHub
ssh -T git@github.com
Hi <user-name>! You've successfully authenticated, but GitHub does not provide shell access.
Monday, August 12, 2019
What is Git? What is difference between Git and GitHub or Bitbucket?
Git is a open source version control system, also known as SCM(source
code management system) tool. It was founded by Linux Torvalds (founder
of Linux OS).
Git is different from traditional version control systems such as SVN, CVS, etc. Git is distributed in nature which allows developers to have full history of their code repositories locally.
Git also has other features - branching, merging, pull requests, re-writing commit history.
Git is the most widely used version control system in the world today and is considered the modern standard for software development.
BitBucket and GitHub are git based repositories hosted on the internet or it could be hosted on-prem as well.
You need to have git client installed on your machine in order to access GitHub or BitBucket Repo.
To learn more about the difference between Git and other source version control systems, please click here.
Wednesday, July 31, 2019
Install Jenkins on RedHat Enterprise Linux 8 - How to setup Jenkins on RHEL
How to Install Jenkins on RedHat Enterprise Linux 8?
Please find below steps for setting up Jenkins on RHEL 8.
update package
sudo yum update
Install wget
sudo yum install wget -y
Java Installation
Download Java from Oracle site.
sudo wget --no-check-certificate --no-cookies --header 'Cookie: oraclelicense=accept-securebackup-cookie' 'http://download.oracle.com/ot
Install from RPM
sudo rpm -i jdk-8u141-linux-x64.rpm
Add Jenkins repository to yum repository
sudo wget -O /etc/yum.repos.d/jenkins.repo http://pkg.jenkins-ci.org/redhat/jenkins.repo
sudo rpm --import https://jenkins-ci.org/redhat/jenkins-ci.org.key
Install Jenkins
sudo yum install jenkins -y
Start Jenkins
sudo service jenkins start
sudo service jenkins status
Get Jenkins Admin Password
sudo cat /var/lib/jenkins/secrets/initialAdminPassword
Copy the output of the above command.
Now go to browser and access the Jenkins page.
http://dns_name:8080
Your page will look something like this. Now paste the password into the below Administrator password text box.
 Press Continue..Click on install suggested plug-ins..
 Install suggested plug-ins.
Please find below steps for setting up Jenkins on RHEL 8.
update package
sudo yum update
Install wget
sudo yum install wget -y
Java Installation
Download Java from Oracle site.
sudo wget --no-check-certificate --no-cookies --header 'Cookie: oraclelicense=accept-securebackup-cookie' 'http://download.oracle.com/ot
Install from RPM
sudo rpm -i jdk-8u141-linux-x64.rpm
Add Jenkins repository to yum repository
sudo wget -O /etc/yum.repos.d/jenkins.repo http://pkg.jenkins-ci.org/redhat/jenkins.repo
sudo rpm --import https://jenkins-ci.org/redhat/jenkins-ci.org.key
Install Jenkins
sudo yum install jenkins -y
Start Jenkins
sudo service jenkins start
sudo service jenkins status
Get Jenkins Admin Password
sudo cat /var/lib/jenkins/secrets/initialAdminPassword
Copy the output of the above command.
Now go to browser and access the Jenkins page.
http://dns_name:8080
Your page will look something like this. Now paste the password into the below Administrator password text box.


Tuesday, July 30, 2019
How to setup Jenkins master slave nodes in Ubuntu | Jenkins master and slave setup on Ubuntu | configure Jenkins slave in Ubuntu
Jenkins has powerful feature of master slave architecture which
enables distributed builds. This article we will learn how to establish
Jenkins Master and slave nodes on Ubuntu machines.

Few info on Jenkins master and slave setup:
Jenkins Master
sudo apt update
sudo apt install default-jdk -y
Install Java
sudo apt-get update
sudo apt-get install default-jdk -y
Install Maven
sudo apt-get install maven -y
Create User as Jenkins
Add SSH Keys from Master to Slave
Execute the below command in Jenkins master Ec2.
sudo cat ~/.ssh/id_rsa.pub
Copy the output of the above command:

Now go to Slave node and execute the below command
sudo -u jenkins vi /home/jenkins/.ssh/authorized_keys
Now go into master node
ssh jenkins@slave_node_ip

this is to make sure master is able to connect slave node. once you are successfully logged into slave, type exit to come out of slave.

Now copy the SSH keys into /var/lib/jenkins/.ssh by executing below command in master(make sure you exited from slave by typing exit command:
sudo cp ~/.ssh/known_hosts /var/lib/jenkins/.ssh
Because jenkins master will look keys from the above folder.
Step # 3 Register slave node in Jenkins:
Now to go Jenkins Master, manage jenkins, manage nodes.

Click on new node. give name and check permanent agent.
give name and no of executors as 1. enter /home/jenkins as remote directory.
select launch method as Launch slaves nodes via SSH.
enter Slave node ip address as Host.

click on credentials. Enter user name as jenkins. Make jenkins lowercase as it is shown.
Kind as SSH username with private key. enter private key of master node directly by executing below command:

sudo cat ~/.ssh/id_rsa
(Make sure you copy the whole key including the below without missing anything)
-----BEGIN RSA PRIVATE KEY-----
-----END RSA PRIVATE KEY-----
click Save.
select Host key verification strategy as "manually trusted key verification strategy".
Click Save.
Click on launch agent..make sure it connects to agent node.

Now you can kick start building the jobs, you will see Jenkins master runs jobs in slave nodes.

Few info on Jenkins master and slave setup:
Jenkins Master
Your main Jenkins server is the Master. The Master’s job is to handle:
- Scheduling build jobs.
- Dispatching builds to the slaves for the actual execution.
- Monitor the slaves (possibly taking them online and offline as required).
- Recording and presenting the build results.
- A Master instance of Jenkins can also execute build jobs directly.
Jenkins Slave
A Slave is a Java executable that runs on a remote machine. Following are the characteristics of Jenkins Slaves:
- It hears requests from the Jenkins Master instance.
- Slaves can run on a variety of operating systems.
- The job of a Slave is to do as they are told to, which involves executing build jobs dispatched by the Master.
- You can configure a project to always run on a particular Slave machine, or a particular type of Slave machine, or simply let Jenkins pick the next available Slave.
Lets see how to configure both Jenkins master and slave nodes on Ubuntu EC2.
Step 1 - Jenkins master node configuration (this step # 1 is NOT required)
(If you have already Jenkins up and running, this step is not required)
(If you have already Jenkins up and running, this step is not required)
Install first Java by following below steps. Make sure port 8080 is opened in security group.
sudo apt update
sudo apt install default-jdk -y
Jenkins (make sure you open port number)
wget -q -O - https://pkg.jenkins.io/debian/jenkins-ci.org.key | sudo apt-key add -
echo deb http://pkg.jenkins.io/debian-stable binary/ | sudo tee /etc/apt/sources.list.d/jenkins.list
sudo apt-get update
sudo apt-get install jenkins -y
now to go to browser --> http://server_ip_address:8080/
Copy the password from this location
By entering
sudo cat /var/lib/jenkins/secrets/initialAdminPassword
Paste the password and click on install suggested plug-ins.
Create SSH keys in master node by executing below command:
ssh-keygen (no need to enter any password, just enter three times)
ssh-keygen (no need to enter any password, just enter three times)
Step # 2 Slave node configuration(you need new micro Ubuntu instance for this slave)
only port 22 needs to be open
only port 22 needs to be open
Install Java
sudo apt-get update
sudo apt-get install default-jdk -y
sudo apt-get install maven -y
Create User as Jenkins
sudo useradd -m jenkins
sudo -u jenkins mkdir /home/jenkins/.ssh

Add SSH Keys from Master to Slave
Execute the below command in Jenkins master Ec2.
sudo cat ~/.ssh/id_rsa.pub
Copy the output of the above command:
Now go to Slave node and execute the below command
sudo -u jenkins vi /home/jenkins/.ssh/authorized_keys
This will be empty file, now copy the public keys from master into above file.
Once you pasted the public keys in the above file in Slave, come out of the file by entering wq!
Once you pasted the public keys in the above file in Slave, come out of the file by entering wq!
Now go into master node
ssh jenkins@slave_node_ip
this is to make sure master is able to connect slave node. once you are successfully logged into slave, type exit to come out of slave.
Now copy the SSH keys into /var/lib/jenkins/.ssh by executing below command in master(make sure you exited from slave by typing exit command:
sudo cp ~/.ssh/known_hosts /var/lib/jenkins/.ssh
Because jenkins master will look keys from the above folder.
Step # 3 Register slave node in Jenkins:
Now to go Jenkins Master, manage jenkins, manage nodes.

Click on new node. give name and check permanent agent.
give name and no of executors as 1. enter /home/jenkins as remote directory.
select launch method as Launch slaves nodes via SSH.
enter Slave node ip address as Host.

click on credentials. Enter user name as jenkins. Make jenkins lowercase as it is shown.
Kind as SSH username with private key. enter private key of master node directly by executing below command:

sudo cat ~/.ssh/id_rsa
(Make sure you copy the whole key including the below without missing anything)
-----BEGIN RSA PRIVATE KEY-----
-----END RSA PRIVATE KEY-----
click Save.
select Host key verification strategy as "manually trusted key verification strategy".
Click Save.
Click on launch agent..make sure it connects to agent node.

Now you can kick start building the jobs, you will see Jenkins master runs jobs in slave nodes.
Subscribe to:
Posts (Atom)
Complete AI-Enabled DevOps Learning Roadmap for 2026 | Skills Required to Become a Modern DevSecOps Engineer
🚀 AI-Enabled DevOps Engineer Roadmap for 2026 The future belongs to AI-Enabled DevOps Engineers, not AI-only Engineers. Strong DevOps fund...

-
 Let us learn how to create and configure a Self-Hosted Agent in Azure DevOps (ADO). What is an Agent? An agent is computing infrastructure w...
 -
 Pre-requisites: Make sure SonarQube is up and running Make sure Java Project is setup in GitHub SonarQube is already integrated with GitHub ...
 -
 Please find steps for integrating SonarQube with GitHub Actions: Pre-requisites: Make sure SonarQube is up and running Make sure Java Projec...