Showing posts with label Azure pipelines. Show all posts

Friday, January 10, 2025

How to Create a Docker Image for a Springboot App and Upload image into Azure Container Registry using Azure YAML Pipelines | Upload Spring boot Docker Image into Azure Container Registry (ACR)

We will learn how to build Docker image for a springboot app and upload the Docker image into Azure Container Registry(ACR) using Azure YAML pipelines.


Pre-requisites:

1. Azure subscription
2. Azure DevOps project dashboard in https://dev.azure.com/
3. Dockerfile created along with the application source code

Create Resource Group

Make sure you are login to Azure portal first.

az login

Execute below command to create a resource group in Azure portal.

az group create --name myResourceGroup --location southcentralus

How to Create Azure Container Registry?

Run the below command to create your own private container registry using Azure Container Registry (ACR).

az acr create --resource-group myResourceGroup --name myacrrepo31 --sku Standard --location southcentralus

You can login to Azure portal to see the ACR repo.

How to create Azure Build YAML Pipeline

1. Login into your Azure DevOps dashboard
2. Click on Pipelines.

3. Click on New Pipeline

4. Click on GitHub Repo as we have code committed into GitHub


5. Enter your repo name and branch name where you have stored your source code along with Dockerfile.
Type docker as name and select the below repo


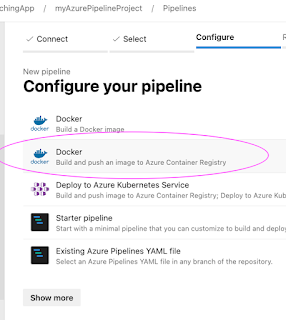
6. Click on Continue. Now choose the template by typing Docker, Select below task and Apply.


7. Choose the subscription

Click on Continue

Enter Microsoft credentials.
Now choose ACR repo and enter name for the image and select the path for Dockerfile


Click on Validate and configure.

# Create a Jar file using Maven
# Create a docker image and push the image to Azure Container Registry
# https://docs.microsoft.com/azure/devops/pipelines/languages/docker
trigger:
- master
resources:
- repo: self
variables:
# Container registry service connection established during pipeline creation
dockerRegistryServiceConnection: 'sdsd4'
imageRepository: 'mypythondockerrepo'
containerRegistry: 'myacrrep31.azurecr.io'
dockerfilePath: '$(Build.SourcesDirectory)/Dockerfile'
tag: '$(Build.BuildId)'
vmImageName: 'ubuntu-latest'
stages:
- stage: Build
displayName: Build and push stage
jobs:
- job: Build
displayName: Build
pool:
vmImage: $(vmImageName)
steps:
- task: Maven@4 inputs: mavenPomFile: 'pom.xml' publishJUnitResults: true testResultsFiles: '**/surefire-reports/TEST-*.xml' javaHomeOption: 'JDKVersion' mavenVersionOption: 'Default' mavenAuthenticateFeed: false effectivePomSkip: false sonarQubeRunAnalysis: false - task: Docker@2 displayName: Build and push an image to container registry inputs: command: buildAndPush repository: $(imageRepository) dockerfile: $(dockerfilePath) containerRegistry: $(dockerRegistryServiceConnection) tags: | $(tag)


Now click Save + run and run to start Building the pipeline. Now check the status of the pipeline.


Once the build is completed, you should be able to see the Docker images under 
Services --> Repositories


Clean up resources in Azure Cloud:
az group delete --resource-group MyResourceGroup

This should clean up resources in Azure cloud..

Watch Steps in YouTube channel:

Thursday, January 9, 2025

How to Create a Docker Image for a Python App and Upload image into Azure Container Registry using Azure YAML Pipelines | Automate Docker builds using Azure YAML Pipelines | Upload Docker Image into Azure Container Registry (ACR)

We will learn how to build Docker image and upload the Docker images into Azure Container Registry(ACR) using Azure YAML pipelines.


Pre-requisites:

1. Azure subscription
2. Azure DevOps project dashboard in https://dev.azure.com/
3. Dockerfile created along with the application source code

Create Resource Group

Make sure you are login to Azure portal first.

az login

Execute below command to create a resource group in Azure portal.

az group create --name myResourceGroup --location southcentralus

How to Create Azure Container Registry?

Run the below command to create your own private container registry using Azure Container Registry (ACR).

az acr create --resource-group myResourceGroup --name myacrrepo31 --sku Standard --location southcentralus

You can login to Azure portal to see the ACR repo.

How to create Azure Build YAML Pipeline

1. Login into your Azure DevOps dashboard
2. Click on Pipelines.

3. Click on New Pipeline

4. Click on GitHub Repo as we have code committed into GitHub


5. Enter your repo name and branch name where you have stored your source code along with Dockerfile.
Type python as name and select the below repo


6. Click on Continue. Now choose the template by typing Docker, Select below task and Apply.


7. Choose the subscription

Click on Continue

Enter Microsoft credentials.
Now choose ACR repo and enter name for the image and select the path for Dockerfile


Click on Validate and configure.

# Docker
# Build and push an image to Azure Container Registry
# https://docs.microsoft.com/azure/devops/pipelines/languages/docker
trigger:
- master
resources:
- repo: self

variables:
# Container registry service connection established during pipeline creation
dockerRegistryServiceConnection: 'sdsd4'
imageRepository: 'mypythondockerrepo'
containerRegistry: 'myacrrep31.azurecr.io'
dockerfilePath: '$(Build.SourcesDirectory)/Dockerfile'
tag: '$(Build.BuildId)'

vmImageName: 'ubuntu-latest'

stages:
- stage: Build
displayName: Build and push stage
jobs:
- job: Build
displayName: Build
pool:
vmImage: $(vmImageName)
steps:
- task: Docker@2
displayName: Build and push an image to container registry
inputs:
command: buildAndPush
repository: $(imageRepository)
dockerfile: $(dockerfilePath)
containerRegistry: $(dockerRegistryServiceConnection)
tags: |
$(tag)


Now click Save + run and run to start Building the pipeline. Now check the status of the pipeline.


Once the build is completed, you should be able to see the Docker images under 
Services --> Repositories


Sunday, November 17, 2024

How to Configure GitHub Advanced Security for Azure DevOps | How to Perform Security scan for Azure Repos using GitHub Advanced Security

GitHub Advanced Security for Azure DevOps brings the secret scanning, dependency scanning and CodeQL code scanning solutions already available for GitHub users and natively integrates them into Azure DevOps to protect your Azure Repos and Pipelines. 


Pre-requisites:

How to Set up dependency scanning?

Dependency scanning is a pipeline-based scanning tool. Results are aggregated per repository. It's recommended that you add the dependency scanning task to all the pipelines you'd like to be scanned.

Add the task Advanced Security Dependency Scanning task (AdvancedSecurity-Dependency-Scanning@1) directly to your YAML pipeline file or select the Advanced Security Dependency Scanning task from the task assistant.

How to Set up code scanning

Code scanning is also a pipeline-based scanning tool where results are aggregated per repository.

Add the tasks in the following order:

  1. Advanced Security Initialize CodeQL (AdvancedSecurity-Codeql-Init@1)
  2. Your custom build steps
  3. Advanced Security Perform CodeQL Analysis (AdvancedSecurity-Codeql-Analyze@1)
Pipeline YAML Code for scanning Java code using GitHub Advanced Security

Create a Pipeline:
Login to your Azure Devops dashboard https://dev.azure.com


Go to Pipelines, Click New, 
select your SCM.


Select your Repository. Use starter pipeline and copy and paste the below code:


trigger:
- main

resources:
- repo: self

variables:
tag: '$(Build.BuildId)'

stages:
- stage: Build
displayName: Build image
jobs:
- job: Build
displayName: Build
pool:
vmImage: ubuntu-latest
steps:
- task: AdvancedSecurity-Codeql-Init@1
inputs:
languages: 'java'
- task: Maven@4
inputs:
mavenPomFile: 'pom.xml'
goals: 'install'
publishJUnitResults: true
testResultsFiles: '**/surefire-reports/TEST-*.xml'
javaHomeOption: 'JDKVersion'
mavenVersionOption: 'Default'
mavenAuthenticateFeed: false
effectivePomSkip: false
sonarQubeRunAnalysis: false
- task: AdvancedSecurity-Dependency-Scanning@1
- task: AdvancedSecurity-Codeql-Analyze@1

Where to see the Scan resule in Azure DevOps?


Wednesday, March 20, 2024

How to Setup Self-Hosted Linux Docker Build Agent in Azure DevOps | How to configure Self-Hosted Linux Docker Agents in Azure Pipelines | Create Custom Build Agents in Azure DevOps

 Let us learn how to configure a self-hosted agent using Docker in Azure DevOps pipelines.

What is an Agent?

An agent is computing infrastructure with installed agent software that runs one job at a time.To build your code or deploy your software using Azure Pipelines, you need at least one agent. As you add more code and people, you'll eventually need more.

When your pipeline runs, the system begins one or more jobs. 


In Azure pipelines, there are two types of build agents:

  1. Microsoft-hosted agents - This is a service totally managed by Microsoft and it's cleared on every execution of the pipeline (on each pipeline execution, you have a fresh new environment).
  2. Self-hosted agents - This is a service that you can to set up and manage by yourself. This can be a custom virtual machine on Azure or a custom on-premise machine inside your infrastructure. In a self-hosted agent, you can install all the software you need for your builds, and this is persisted on every pipeline execution. A self-hosted agent can be on Windows, Linux, macOS, or in a Docker container.

You can set up a self-hosted agent in Azure Pipelines to run inside a Windows Server Core (for Windows hosts), or Ubuntu container (for Linux hosts) with Docker. We will learn in this article on how to host Ubuntu Docker container on Linux machines.

Pre-requisites:
How to configure Self-hosted docker build agent?

1. Go to Azure DevOps dashboard - https://dev.azure.com/
2. Select your project dashboard
3. Go to your project settings
4. Click on Agent pools


Create a new Agent pool name

Enter name as myAgentPool or any name
Make sure you select Grant access permission to all pipelines


Login to Azure VM where the docker build agents will be running.

Step #1 - Install Docker CLI so we can build docker image

sudo apt update && sudo apt install docker.io -y

Step #2 - Add logged in user to docker group
sudo usermod -a -G docker $USER

Step #3 - Clone repo which has Dockerfile

git clone https://github.com/akannan1087/ado-docker-agent-repo.git

Sample dockerfile is here.. please feel free to add any software in the docker agent.
FROM ubuntu:22.04

RUN apt update -y && apt upgrade -y && apt install curl git jq libicu70 maven -y

# Also can be "linux-arm", "linux-arm64".
ENV TARGETARCH="linux-x64"

WORKDIR /azp/

COPY ./start.sh ./
RUN chmod +x ./start.sh

# Create agent user and set up home directory
RUN useradd -m -d /home/agent agent
RUN chown -R agent:agent /azp /home/agent

USER agent
# Another option is to run the agent as root.
# ENV AGENT_ALLOW_RUNASROOT="true"

ENTRYPOINT ./start.sh

Step #4 - change directory
cd ado-docker-agent-repo/azp-agent-in-docker/

Step #5 - Build the Docker image
sudo docker build --tag "azp-agent:linux" --file Dockerfile .

Step #6: Run the agent as a container
Run the below command:

sudo docker run -e AZP_URL="https://dev.azure.com/your_org_name" -e AZP_TOKEN="XXXX" -e AZP_POOL=myAgentPool -e AZP_AGENT_NAME="myLinuxDockerBuildAgent" --name "azp-agent" azp-agent:linux

that's it, docker agent is successfully started.

Step #7: Verify if docker agent is running or not
Run the below command:
sudo docker ps


Check the status of build Agent
Click on agentPool name, click on Agents

This confirms that Build agent is successfully configured in Azure DevOps and is available to run builds.

How to use the Docker build agent in your pipelines?

Please use the docker agent in the classic pipeline like below: select the agentPool


run the job. now you can see the jobs under myAgentPool--> Jobs
 

Here is the sample pipeline YAML code for automating Maven build for a Java project:

trigger:
- main
pool:
name: myAgentPool
stages:
- stage: Build
displayName: Build stage
jobs:
- job: MavenPackageAndPublishArtifacts
displayName: Maven Package and Publish Artifacts
steps:
- task: Maven@3
displayName: 'Maven Package'
inputs:
mavenPomFile: 'MyWebApp/pom.xml'

References:

Watch steps in YouTube channel:

Wednesday, February 7, 2024

How to resolve No hosted parallelism has been purchased or granted Error in Azure Devops?


Potential root cause and fix:
Microsoft has temporarily disabled the free grant of parallel jobs for public projects and for certain private projects in new organizations. However, you can request this grant by submitting a request. Submit a ticket using below url to request increased parallelism in Azure DevOps. Please note that it takes us 2-3 business days to respond to your free tier requests.


Second Option:
You can configure self-hosted agent in Azure DevOps.

Friday, August 11, 2023

How to secure Azure DevOps Pipelines | Azure DevOps Build Pipelines Best Practices | Best practices for securing Azure DevOps Pipelines

Securing your Azure DevOps pipelines is crucial to protect your code, data, and infrastructure. Here are several best practices to consider for securing your Azure DevOps pipelines:

1. Pipeline Security:

  • Use Version Control: Store your pipeline definitions and code in version control repositories. This ensures version history, change tracking, and controlled access.
  • Secure Branch Policies: Implement branch policies to control who can make changes to specific branches. This prevents unauthorized or unreviewed changes from being deployed.
  • Use Parameterized Builds: Avoid hardcoding sensitive information like credentials directly into pipeline definitions. Use pipeline variables or parameterized builds instead.
  • Limit Access: Follow the principle of least privilege. Only grant necessary permissions to users and groups. Use role-based access control (RBAC) to manage access to pipelines and resources.
  • Monitor and Audit: Regularly review access logs, audit logs, and pipeline run history to identify suspicious activities.

2. Secrets Management:

  • Use Variable Groups: Azure DevOps provides variable groups that allow you to store sensitive information securely. These can be linked to pipelines without exposing the values directly in pipeline definitions.
  • Use Secure File Variables: For sensitive files, use secure file variables to securely store and manage encrypted files that your pipelines can use during execution.
  • Azure Key Vault Integration: Integrate Azure Key Vault to store and manage secrets, keys, and certificates. You can then reference these secrets in your pipelines securely.

3. Secure Pipeline Code:

  • Use Private Repositories: Store sensitive code in private repositories. Avoid exposing secrets in public repositories.
  • Encryption: Encrypt sensitive data at rest and during transmission. Use HTTPS for repository connections and secure protocols for data storage.
  • Secure Code Review: Implement code review processes to catch and address security issues in pipeline definitions.

4. Secure Pipeline Execution:

  • Agent Security: Secure the build and deployment agents by regularly updating them, applying security patches, and using agents in private networks when possible.
  • Use Service Principals: If your pipeline needs access to Azure resources, use service principals with the least privilege required. Avoid using personal credentials.
  • Secure Pipeline Variables: When using pipeline variables, ensure that they are set to "Secret" to hide their values in logs and run history.

5. Compliance:

  • Regulatory Compliance: If your organization needs to adhere to specific regulatory standards, ensure that your pipelines and processes align with those standards.
  • Compliance Scanning: Use security and compliance scanning tools to identify vulnerabilities in your pipeline code and configurations.

6. Continuous Improvement:

  • Stay Updated: Regularly review Azure DevOps documentation, security best practices, and new features to stay informed about security improvements.
  • Incident Response Plan: Develop an incident response plan to handle security breaches or unauthorized access.

By following these best practices, you can significantly enhance the security of your Azure DevOps pipelines and safeguard your development and deployment processes. Remember that security is an ongoing effort, and it's important to regularly assess and update your security measures as needed.


Click here to know the CICD process flow digram using Azure DevOps.

Saturday, April 22, 2023

How to Deploy Springboot Microservices into AKS cluster using Helm and Azure Pipelines | Deploy Docker Containers into AKS cluster using Azure Release Pipelines | Deploy Microservices into AKS cluster using Helm and Azure Pipelines

We are going to learn how to deploy Springboot Microservices Docker container into Azure Kubernetes Cluster(AKS) using Helm and Azure pipelines. 

Sample springboot App Code:

I have created a sample Springboot App setup in GitHub. Click here to access code base in GitHub.

Watch steps in YouTube channel:

What is Helm?

Helm is a package manager for Kubernetes. Helm is the K8s equivalent of yum or apt. It accomplishes the same goals as Linux system package managers like APT or YUM: managing the installation of applications and dependencies behind the scenes and hiding the complexity from the user.

Helm Charts


Helm uses a packaging format called Charts. A Helm Chart is a collection of files that describe a set of Kubernetes resources. Helm Charts helps you define, install, and upgrade even the most complex Kubernetes application. Charts are easy to create, version, share, and publish.

Implementation steps:

  1. Create a resource group, AKS cluster and Azure container registry 
  2. Provide pull access for AKS to pull image from ACR 
  3. Create a namespace for helm deployment
  4. Create a helm chart for spring boot app
  5. Create a build pipeline to automate docker image
  6. Customize pipeline with helm package tasks
  7. Create a release pipeline
  8. Customize pipeline with helm upgrade tasks 
  9. Run the pipeline to deploy springboot app into AKS
  10. Verify deployments in the namespace in AKS
  11. Use kubectl port forward to access app locally
  12. Access the app in the browser
Pre-requisites:
Create Helm chart using helm
Go to your root of repo where you have source code for your springboot application. Create helm chart by executing below command:

helm create mychart
tree mychart
Execute the above command to see the files created.


Add Docker image details to download from ACR before deploying to AKS cluster
open mychart/values.yaml

change per below values:

image:
repository: myacrrepo531.azurecr.io/akannan1087/docker-spring-boot
tag: ""

open mychart/templates/deployment.yaml and change containerPort to 8080


Save the files, commit and push into source code repo you are using.

Make sure worker nodes are running
kubectl get nodes

Pipeline Implementation Steps:

Part 1 - Create Azure Build pipeline for building Docker image, uploading image into ACR and packaging helm chart.
Part 2 - Create Azure Release pipeline for deploying Springboot Docker containers into AKS using helm upgrade task.
 
Part 1 - How to create a Azure Build Pipeline

1. Login into your Azure DevOps dashboard
2. Click on Pipelines.

3. Click on New Pipeline

4. Click on use the classic editor
Enter your repo name and branch name where you have stored your source code along with Dockerfile:


Click on Continue. Now choose the template by typing Helm, Select Azure Kubernetes service and click Apply.


Now pipeline is created with six tasks already. We need to start customizing the pipeline:
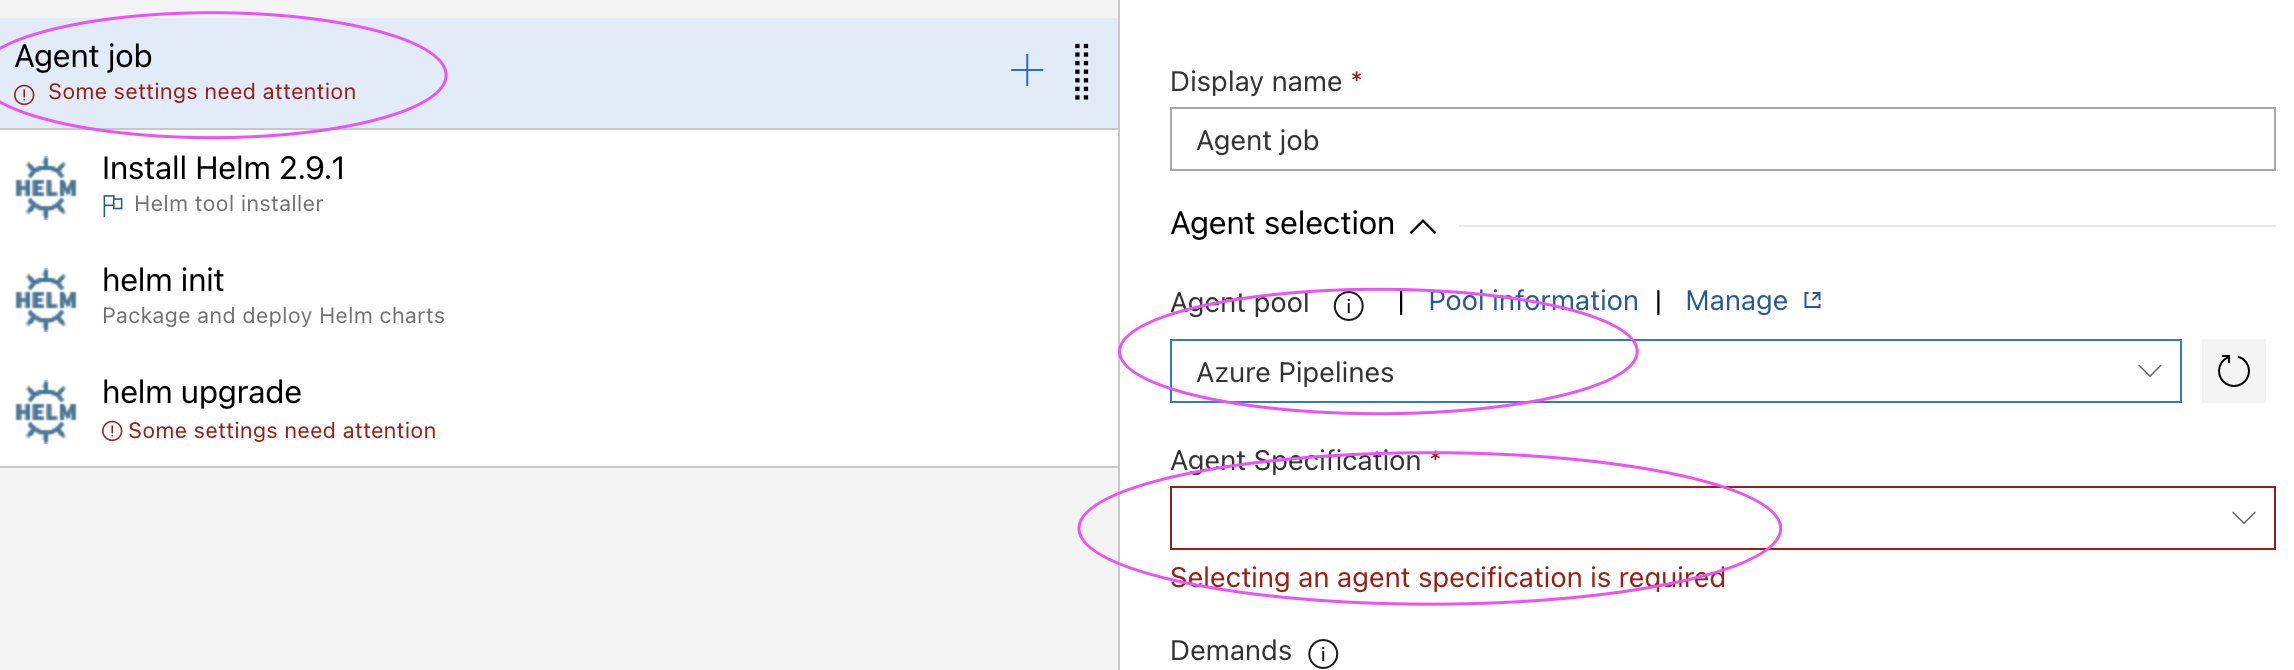
Select Ubuntu as build agent from Agent specification drop down, avoid Windows server as build agent.


Let's also add Maven build task for building the JAR file.
Click on + icon and type Maven. this should be the first task.
And then enter maven goal as package


Let's modify Build an image task.


Select Push an image task


Leave Install Helm Task as it is, we need that task to install Helm on build agent

Remove helm init task by selecting remove selected task

Customize helm package task, select Chart Path by clicking ... dots

Choose the folder where you have helm chart files, select OK


Leave Publish artifact task as it is.


Now click Save + Queue and run to start Building the pipeline


Check build output..


Once the build is completed, you should be able to see the Docker image in Azure Portal under Resource Group, ACR repo name --> Repositories


Part 2  - How to Create Release pipeline for deploying Springboot Microservices containers into AKS Cluster

Go to Pipelines --> Click on Releases --> New Release pipeline


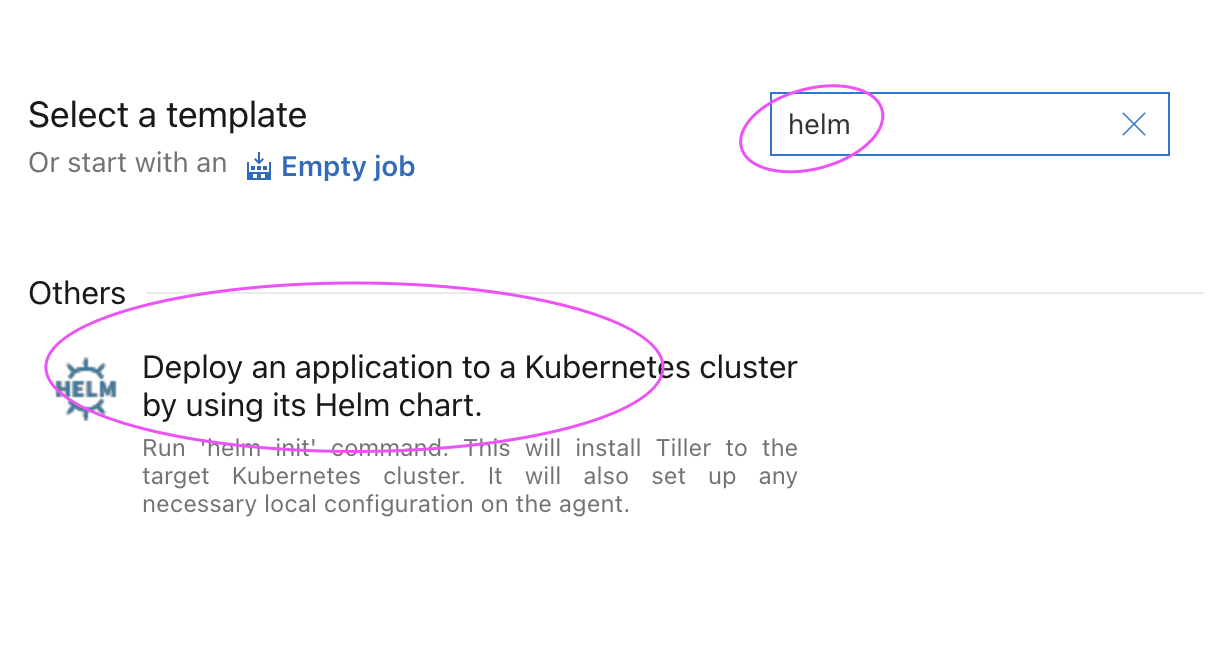
Click on Stage 1 and choose a template by typing helm
and choose Deploy an application to K8S cluster using helm chart


Change the stage name to Deploy to AKS


Now click on Add an artifact


Select the Build pipeline and click on the latest version

Now click on Deploy to AKS stage
Click on Deploy to AKS 
Enter right value for Azure subscription, Resource group and AKS Cluster by selecting from down down.


Now click on the Agent Job, and select Azure pipelines and choose Ubutu as Build agent, avoid windows agents.

Leave install Helm 2.9.1 task
make sure check for latest version of Helm. this will install latest version of Helm which is 3.x


Remove helm init task by selecting remove selected task

Let's start customizing helm upgrade task. Enter helm-deployment as namespace, chart type as File path and click on three dots.


choose the package mychart-0.1.0.tgz and click ok.


Enter first as release name
enter below values for for set values:
image.tag=$(Build.BuildId)


Now click on Save.

Optional step - Enable Continuous Deploy Trigger

This will deploy microservices into AKS cluster for every new build in build pipeline.


Click on Create a release

and then click Create 


Click on Release number to see the output


Click on Stage to see the logs
Click on Logs, you will see the following tasks are in green to confirm Deployment was successful.


Let's check if deployment created any pods in helm-deployment namespace.

How to access Springboot Application using port forward locally?

kubectl get deployments -n helm-deployment 

kubectl get pod-n helm-deployment 

Get the pod name and use port forward to access locally
kubectl port-forward first-springboot-pod_name 8080 -n helm-deployment


If you see any errors after deploying the pods, you can check the pod logs.
kubectl describe pod <pod_name>  -n helm-deployment 

Go to the browser enter http://localhost:8080
You should see below web page.

Clean up Resources

Let us see how to clean up the resources that were created. We can use az group delete command to remove the resource group, AKS cluster, and all related resources. 

az group delete --name aks-rg --yes --no-wait

Watch Steps in YouTube Channel:

🚀 Live AI-Enabled DevSecOps & Cloud Engineering Bootcamp – Sep 2026

  Live AI-Enabled DevSecOps & Cloud Engineering Bootcamp from Coach AK - Sep 2026 Schedule