Tuesday, December 8, 2020

Deploy Python App Docker Container into Amazon EKS Cluster using Jenkins Pipeline | Containerize Python App and Deploy into EKS Cluster

We will learn how to automate Docker builds using Jenkins and Deploy into AWS EKS - Kubernetes Cluster. We will use Python based container application. I have already created a repo with source code + Dockerfile. The repo also have Jenkinsfile for automating the following:


- Automating builds using Jenkins
- Automating Docker image creation
- Automating Docker image upload into Docker registry
- Automating Deployments to Kubernetes Cluster


Pre-requisites:
1. Amazon EKS Cluster is setup and running. Click here to learn how to create Amazon EKS cluster.
3. Setup Jenkins slave, install docker in it.
4. Docker, Docker pipeline and Kubernetes Deploy plug-ins are installed in Jenkins


5. Docker hub account setup in https://cloud.docker.com
6. Install kubectl on your instance


Step #1 -Make sure Jenkins can run Docker builds after validating per pre-requisites

Step #2 - Create Credentials for Docker Hub
Go to Jenkins UI, click on Credentials -->


Click on Global credentials
Click on Add Credentials


Now Create an entry for your Docker Hub account. Make sure you enter the ID as dockerhub

Step #3 - Create Credentials for Kubernetes Cluster
Click on Add Credentials, use Kubernetes configuration from drop down.


execute the below command to get kubeconfig info, copy the entire content of the file:
sudo cat ~/.kube/config


Enter ID as K8S and choose enter directly and paste the above file content and save.

Step #4 - set a clusterrole as cluster-admin

By default, clusterrolebinding has system:anonymous set which blocks the cluster access. Execute the following command to set a clusterrole as cluster-admin which will give you the required access.

kubectl create clusterrolebinding cluster-system-anonymous --clusterrole=cluster-admin --user=system:anonymous

Step # 5 - Create a pipeline in Jenkins
Create a new pipeline job.


Step # 6 - Copy the pipeline code from below
Make sure you change red highlighted values below:
Your docker user id should be updated.
your registry credentials ID from Jenkins from step # 1 should be copied

pipeline {
     agent {
         label 'myslave'
     }
        environment {
        //once you sign up for Docker hub, use that user_id here
        registry = "your_docker_hub_user_id/mypython-app"
        //- update your credentials ID after creating credentials for connecting to Docker Hub
        registryCredential = 'dockerhub'
        dockerImage = ''
    }
    stages {

        stage ('checkout') {
            steps {
            checkout([$class: 'GitSCM', branches: [[name: '*/master']], doGenerateSubmoduleConfigurations: false, extensions: [], submoduleCfg: [], userRemoteConfigs: [[url: 'https://github.com/akannan1087/myPythonDockerRepo']]])
            }
        }
       
        stage ('Build docker image') {
            steps {
                script {
                dockerImage = docker.build registry
                }
            }
        }
       
         // Uploading Docker images into Docker Hub
    stage('Upload Image') {
     steps{   
         script {
            docker.withRegistry( '', registryCredential ) {
            dockerImage.push()
            }
        }
      }
    }
   
    stage ('K8S Deploy') {
        steps {
            script {
                kubernetesDeploy(
                    configs: 'k8s-deployment.yaml',
                    kubeconfigId: 'K8S',
                    enableConfigSubstitution: true
                    )           
               
            }
        }
    }
  
    }  
}

Step # 7 - Build the pipeline
Once you create the pipeline and changes values per your Docker user id and credentials ID, click on 

Step # 8 - Verify deployments to K8S

kubectl get pods


kubectl get deployments
kubectl get services

Steps # 9 - Access Python App in K8S cluster
Once build is successful, go to browser and load balance url along with port number mentioned above
http://load_balancer_url:port_no_from_above

You should see page like below:


How to setup Jenkins slave node to run Docker Builds | Setup Jenkins Slave and Install Docker

How to configure Jenkins Slave to run Docker builds?

Create User as Jenkins
sudo useradd -m jenkins
sudo -u jenkins mkdir /home/jenkins/.ssh


Steps for installing Docker
sudo apt-get update && sudo apt install docker.io -y
 
Install Maven
sudo apt-get install maven -y
 
Add Jenkins to Docker Group
sudo usermod -aG docker jenkins
sudo newgrp docker
sudo systemctl daemon-reload
 
Restart Docker service
sudo systemctl start docker
sudo systemctl enable docker
sudo systemctl restart docker


Login to Jenkins Master and restart Jenkins service
sudo service jenkins restart
(Make sure you execute this in Jenkins Master)

Add SSH Keys from Master to Slave 

Execute the below command in Jenkins master Ec2.
sudo cat ~/.ssh/id_rsa.pub

Copy the output of the above command:

Now go to Slave node and execute the below command
sudo -u jenkins vi /home/jenkins/.ssh/authorized_keys

This will be empty file, now copy the public keys from master into above file.
Once you pasted the public keys in the above file in Slave, come out of the file by entering wq!

 Login to master node and try to SSH from Master to Slave
ssh jenkins@slave_node_ip


this is to make sure master is able to connect slave node. once you are successfully logged into slave, type exit to come out of slave.


Now copy SSH keys into /var/lib/jenkins/.ssh folder also by executing below command in Jenkins master(make sure you exited from slave by typing exit command:

sudo cp ~/.ssh/known_hosts  /var/lib/jenkins/.ssh

Register slave node in Jenkins:
Now to go Jenkins Master, manage jenkins, manage nodes.


Click on new node. give name and check permanent agent.
give name and no of executors as 1. enter /home/jenkins as remote directory.
select launch method as Launch slaves nodes via SSH.
enter Slave node ip address as Host.


click on credentials. Enter user name as jenkins. Make jenkins lowercase as it is shown.
 Kind as SSH username with private key. enter private key of master node directly by executing below command:

sudo cat ~/.ssh/id_rsa
(Make sure you copy the whole key including the below without missing anything)
-----BEGIN RSA PRIVATE KEY-----
-----
-----END RSA PRIVATE KEY-----

click Save.
select Host key verification strategy as "manually trusted key verification strategy".

Click Save.
Click on launch agent..make sure it connects to agent node.

 
That's it! Jenkins Master and Slave is configured up!

Sunday, November 29, 2020

How to setup Elastic Container Registry (ECR) for Docker on AWS | How to Create a Repo in ECR for Hosting Docker images | How to Push Docker image into Amazon ECR

Amazon ECR uses Amazon S3 for storage to make your container images highly available and accessible, allowing you to reliably deploy new containers for your applications. Amazon ECR transfers your container images over HTTPS and automatically encrypts your images at rest. Amazon ECR is integrated with Amazon Elastic Container Service (ECS), simplifying your development to production workflow.


What are we going to do in this lab?
1. Create a Repository in AWS ECR
2. Create an IAM role with AmazonEC2ContainerRegistryFullAccess policy.
3. Assign the role to EC2 instance
4. Download pythonApp from Github.
5. Build docker image for the Python App
6. Tag & push docker image to ECR
7. Run python app in Docker container

Pre-requisites:
  • Ec2 instance up and running with Docker installed
  • Make sure you open port 8081
Step 1 - Create a repo in ECR 

Go to AWS console and search for ECR

Click on Create Repository


Enter name for your repo - all lower case and Click create repository


Once repo is created, choose the repo and click on view push commands. Note down the account ID


Note the URL from step # 3 below, this will be used for tagging and pushing docker images into ECR.

That's it, you have created repo successfully. Let us create docker images and push it to above repo in ECR.

Step 2-  Create an IAM role
You need to create an IAM role with AmazonEC2ContainerRegistryFullAccess policy.
Go to AWS console, IAM, click on Roles. create a role


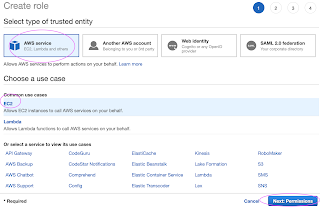
Select AWS services, Click EC2, Click on Next permissions.
 
 Now search for AmazonEC2ContainerRegistryFullAccess policy and click


Skip on create tag.
Now give a role name and create it.


Step 3 - Assign the role to EC2 instance

Go to AWS console, click on EC2, select EC2 instance, Choose instance setting.
Click on Attach/Replace IAM Role


Choose the role you have created from the dropdown.
Select the role and click on Apply.

Now Login to EC2 instance where you have installed Docker. You must be able to connect to AWS ECR through AWS CLI which can be installed by

sudo apt  install awscli -y

Once AWS CLI is installed, you can verify the installation:
aws --version
Now you can login to AWS ECR using CLI:
aws ecr get-login-password --region us-east-2 | docker login --username AWS --password-stdin your_acct_id.dkr.ecr.us-east-2.amazonaws.com

Where your_acct_id is from AWS ECR in the above picture.

You must get a message says Login succeeded. Now let's build a docker image, I have already created a public repo in Bitbucket. All you need to do is perform the below command to clone my repo:

Step 4 - Download GitHub Repo
git clone https://bitbucket.org/ananthkannan/mydockerrepo; cd mydockerrepo/pythonApp

Step 5 - Build Docker image
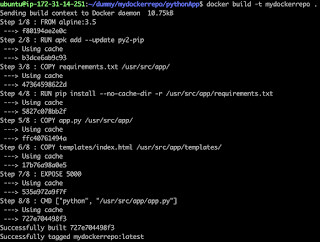
docker build . -t mypythonapp

the above command will build a docker image.


Now tag Docker image you had build
docker tag mypythonapp:latest your_acct_id.dkr.ecr.us-east-2.amazonaws.com/your-ecr-repo-name:latest


You can view the image you had built.


Step 6 - Push Docker image into AWS ECR

docker push your_acc_id.dkr.ecr.us-east-2.amazonaws.com/your-ecr-repo-name:latest
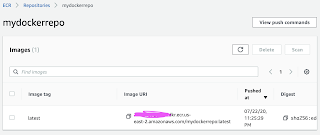
Now you should be able to login to ECR and see the images already uploaded.


Step 7 - Run Docker container from Docker image

sudo docker run -p 8081:5000 --rm --name myfirstApp1  your_acc_id.dkr.ecr.us-east-2.amazonaws.com/your-ecr-repo-name


Note: You can also create a ECR repo through AWS CLI command in AWS ECR.

aws ecr create-repository --repository-name myawesome-repo --region us-east-2

You can watch the steps on YouTube:


How to fix Jenkins Error | Incorrect Java 11 version

You may have this issue when trying to install Jenkins with default JDK version(Java 11) in Ubuntu 18.0.4. We need to fix by installing JDK 8.

Remove Jenkins first.

sudo apt-get remove jenkins -y
 

Install Java 8 version

sudo apt-get install openjdk-8-jdk -y


Now choose which version to select from both Java 11 and Java 8 
sudo update-alternatives --config java
type 2 to choose Java 8 version.

Check Java version after setting:

Install Jenkins

sudo apt-get install jenkins -y
Now try to access Jenkins in the browser.

DevOps Bootcamp Oct 2024 Schedule | DevOps & AWS Azure Cloud Coaching by Coach AK | DevOps and Cloud Computing Online Classes

  (Lot of new topics covered like GitHub Actions, Helm, Prometheus and Grafana..) The DevOps requirements in the IT market space is expected...