Friday, August 12, 2022

How to setup Docker Containers as Build Agents | Setup dynamic Docker Slave and Integrate with Jenkins Master | Jenkins Build Agent Setup using Docker

Jenkins has powerful feature of master slave architecture which enables distributed builds. This article we will learn how to setup slave nodes using Docker and integrate with Jenkins Master.


Advantages of using Docker Containers as Jenkins Build Agents
  • Ephemeral 
  • Better resource utilization
  • Customized agents as it can run different builds like Java 8, Java 11 
  • Scalability 
Let us see how to configure slave nodes dynamically using Docker. If you like to learn how to setup Jenkins Master on Ubuntu EC2 instance, click here.

Watch this in YouTube channel:

Pre-requisites:

Step 1 - Configure Docker Host with Remote API

Login to Docker host machine. Open docker service file. Search for ExecStart and replace that line with the following.
sudo vi /lib/systemd/system/docker.service

You can replace with below line:
ExecStart=/usr/bin/dockerd -H tcp://0.0.0.0:4243 -H unix:///var/run/docker.sock

Restart Docker service
   sudo systemctl daemon-reload
   sudo service docker restart

Validate API by executing below curl command
curl http://localhost:4243/version

Step 2 - Build Jenkins slave Docker image

Download Dockerfile from below repo.
git clone https://github.com/akannan1087/jenkins-docker-slave; cd jenkins-docker-slave

Build Docker image

sudo docker build -t my-jenkins-slave .

Perform below command to see the list of docker images:

sudo docker images

Step 3 - Configure Jenkins Server with Docker plug-in

Now login to Jenkins Master. Make sure you install Docker plug-in in Jenkins.


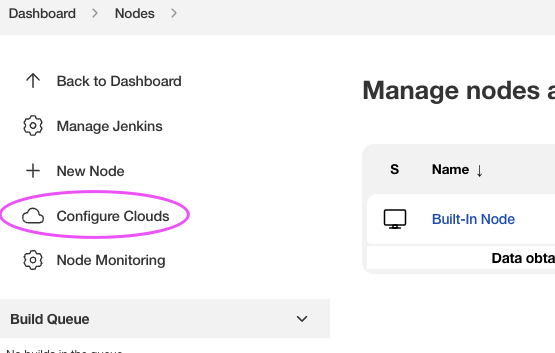
Now go to Manage Jenkins -> Configure Nodes Cloud


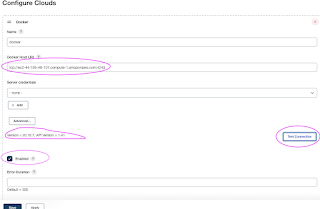
Click on Docker Cloud Details
Enter docker host dns name or ip address
tcp://docker_host_dns:4243
Make sure Enabled is selected
Now click on Test Connection to make sure connecting with docker host is working. 


Step 4 - Configure Docker Agent Templates

Now click on Docker Agent templates:
Enter label as "docker-slave" and give some name
Click on Enabled
Now enter the name of the docker image you have built previously in docker host.
enter /home/jenkins as Remote file system root
 

Choose Connect with SSH as connection method:
Enter SSH credentials per your Dockerfile - jenkins/password


choose Never Pull as pull strategy as we have already image stored in DockerHost.
Click on Save.

Step 5 - Create build job in Jenkins

Now Create a pipeline job in Jenkins with below pipeline code:

pipeline {
    agent { 
        label "docker-slave"
     }
    stages {
        stage('Hello') {
            steps {
                echo 'Hello World'
            }
        }
    }
}

Click Apply and Save. 
Now build the job. Now you will see output like below:


Create a free style job

Choose Restrict where this project can be run and enter docker-slave as label


Wednesday, August 10, 2022

Create IAM Role with Administrator Access | How to create IAM Role with admin policy

Create IAM Role with Administrator Access

You need to create an IAM role with AdministratorAccess policy.
Go to AWS console, IAM, click on Roles. create a role


Select AWS services, Click EC2, Click on Next permissions.
 
 Now search for AdministratorAccess policy and click


Skip on create tag.
Now give a role name and create it.

Assign the role to EC2 instance
Go to AWS console, click on EC2, select EC2 instance, Choose Security.
Click on Modify IAM Role


Choose the role you have created from the dropdown.
Select the role and click on Apply.


Create Amazon EKS cluster by Terraform | How to create Amazon EKS cluster in AWS cloud using Terraform | Create EKS Cluster using Terraform

What is Amazon EKS

Amazon EKS is a fully managed container orchestration service. EKS allows you to quickly deploy a production ready Kubernetes cluster in AWS, deploy and manage containerized applications more easily with a fully managed Kubernetes service. Kubernetes is an open-source system for automating deployment, scaling, and management of containerized applications.

EKS takes care of master node/control plane. We need to create worker nodes.

You can create EKS cluster with following node types:
  • Managed nodes -  Linux - Amazon EC2 instances
  • Fargate - Serverless
We will learn how to create EKS cluster based on Managed nodes (EC2 instances).

EKS cluster can be created in following different ways

1. AWS console
2. AWS CLI
3. eksctl command
4. using Terraform

We will create EKS cluster nodes using Terraform.

Pre-requisites:

This Lab is using an EC2 instance with following configured:

Create IAM Role with Administrator Access

You need to create an IAM role with AdministratorAccess policy.
Go to AWS console, IAM, click on Roles. create a role


Select AWS services, Click EC2, Click on Next permissions.
 
 Now search for AdministratorAccess policy and click


Skip on create tag.
Now give a role name and create it.

Assign the role to EC2 instance
Go to AWS console, click on EC2, select EC2 instance, Choose Security.
Click on Modify IAM Role


Choose the role you have created from the dropdown.
Select the role and click on Apply.


Create Terraform files

sudo vi variables.tf

 variable "subnet_id_1" {
  type = string
  default = "subnet-ec90408a"
 }

 variable "subnet_id_2" {
  type = string
  default = "subnet-0a911b04"
 }

 variable "cluster_name" {
  type = string
  default = "my-eks-cluster"
 }

sudo vi main.tf

terraform {
 required_providers {
  aws = {
   source = "hashicorp/aws"
  }
 }
}

resource "aws_iam_role" "eks-iam-role" {
 name = "devops-eks-iam-role"

 path = "/"

 assume_role_policy = <<EOF
{
 "Version": "2012-10-17",
 "Statement": [
  {
   "Effect": "Allow",
   "Principal": {
    "Service": "eks.amazonaws.com"
   },
   "Action": "sts:AssumeRole"
  }
 ]
}
EOF

}

resource "aws_iam_role_policy_attachment" "AmazonEKSClusterPolicy" {
 policy_arn = "arn:aws:iam::aws:policy/AmazonEKSClusterPolicy"
 role    = aws_iam_role.eks-iam-role.name
}
resource "aws_iam_role_policy_attachment" "AmazonEC2ContainerRegistryReadOnly-EKS" {
 policy_arn = "arn:aws:iam::aws:policy/AmazonEC2ContainerRegistryReadOnly"
 role    = aws_iam_role.eks-iam-role.name
}

resource "aws_eks_cluster" "my-eks" {
 name = var.cluster_name
 role_arn = aws_iam_role.eks-iam-role.arn

 vpc_config {
  subnet_ids = [var.subnet_id_1, var.subnet_id_2]
 }

 depends_on = [
  aws_iam_role.eks-iam-role,
 ]
}

resource "aws_iam_role" "workernodes" {
  name = "eks-node-group-example"

  assume_role_policy = jsonencode({
   Statement = [{
    Action = "sts:AssumeRole"
    Effect = "Allow"
    Principal = {
     Service = "ec2.amazonaws.com"
    }
   }]
   Version = "2012-10-17"
  })
 }

 resource "aws_iam_role_policy_attachment" "AmazonEKSWorkerNodePolicy" {
  policy_arn = "arn:aws:iam::aws:policy/AmazonEKSWorkerNodePolicy"
  role    = aws_iam_role.workernodes.name
 }

 resource "aws_iam_role_policy_attachment" "AmazonEKS_CNI_Policy" {
  policy_arn = "arn:aws:iam::aws:policy/AmazonEKS_CNI_Policy"
  role    = aws_iam_role.workernodes.name
 }

 resource "aws_iam_role_policy_attachment" "EC2InstanceProfileForImageBuilderECRContainerBuilds" {
  policy_arn = "arn:aws:iam::aws:policy/EC2InstanceProfileForImageBuilderECRContainerBuilds"
  role    = aws_iam_role.workernodes.name
 }

 resource "aws_iam_role_policy_attachment" "AmazonEC2ContainerRegistryReadOnly" {
  policy_arn = "arn:aws:iam::aws:policy/AmazonEC2ContainerRegistryReadOnly"
  role    = aws_iam_role.workernodes.name
 }

 resource "aws_eks_node_group" "worker-node-group" {
  cluster_name  = aws_eks_cluster.my-eks.name
  node_group_name = "my-workernodes"
  node_role_arn  = aws_iam_role.workernodes.arn
  subnet_ids   = [var.subnet_id_1, var.subnet_id_2]
  instance_types = ["t2.medium"]

  scaling_config {
   desired_size = 2
   max_size   = 2
   min_size   = 1
  }

  depends_on = [
   aws_iam_role_policy_attachment.AmazonEKSWorkerNodePolicy,
   aws_iam_role_policy_attachment.AmazonEKS_CNI_Policy,
   aws_iam_role_policy_attachment.AmazonEC2ContainerRegistryReadOnly,
  ]
 }

Create EKS Cluster with two worker nodes using Terraform

Now execute the below command:
terraform init

This will initialize terraform working directory.
you should see like below screenshot.


Eecute the below command
terraform plan
the above command will show how many resources will be added.

Plan: 10 to add, 0 to change, 0 to destroy.

Now let's create the EKS cluster:

terraform apply


This will create 10 resources.

Update Kube config

Update Kube config by entering below command:

aws eks update-kubeconfig --name my-eks-cluster --region us-east-1

kubeconfig file be updated under /home/ubuntu/.kube folder.

you can view the kubeconfig file by entering the below command:

cat  /home/ubuntu/.kube/config

Connect to EKS cluster using kubectl commands

To view the list of worker nodes as part of EKS cluster.

kubectl get nodes

kubectl get ns

Deploy Nginx on a Kubernetes Cluster
Let us run some apps to make sure they are deployed to Kubernetes cluster. The below command will create deployment:

kubectl create deployment nginx --image=nginx


View Deployments
kubectl get deployments

Delete EKS Cluster

terraform destroy

the above command should delete the EKS cluster in AWS, it might take a few mins to clean up the cluster.

Errors during Cluster creation
If you are having issues when creating a cluster, try to delete the cluster by executing the below command and re-create it.

you can also delete the cluster under AWS console --> Elastic Kubernetes Service --> Clusters
Click on Delete cluster

Tuesday, August 2, 2022

Install Jenkins using Docker | Run Jenkins using Docker Compose on Ubuntu 22.0.4 | Install Jenkins using Docker-Compose

Jenkins is an open source continuous integration/continuous delivery and deployment (CI/CD) automation software DevOps tool written in the Java programming language. It is used to implement CI/CD workflows, called pipelines.

How to setup Jenkins using Docker Compose?

Jenkins is Continuous integration server. It is open source and Java based tool. Jenkins can be setup using Docker Compose with less manual steps.


What is Docker Compose?
Compose is a tool for defining and running multi-container Docker applications. With Compose, you use a YAML file to configure your application’s services. Then, with a single command, you create and start all the services from your configuration. Since Docker Compose lets you configure related containers in a single YAML file, you get the same Infrastructure-as-Code abilities as Kubernetes. But they come in a simpler system that’s more suited to smaller applications that don’t need Kubernetes’ resiliency and scaling.
 
The purpose of docker-compose is to function as docker cli but to issue multiple commands much more quickly. To make use of docker-compose, you need to encode the commands you were running before into a docker-compose.yml file
 
Run docker-compose up and Compose starts and runs your entire app.

Watch the steps in YouTube Channel:


Pre-requisites:

  • New Ubuntu EC2 up and running with at least t2.small
  • Port 8080 is opened in security firewall rule
Change Host Name to Jenkins
sudo hostnamectl set-hostname Jenkins

Perform system update
sudo apt-get update

Install Docker-Compose
sudo apt-get install docker-compose -y

Create docker-compose.yml
this yml has all configuration for installing Jenkins.
sudo vi docker-compose.yml 

(Copy the below code high-lighted in yellow color)
version: '3'
services:
  jenkins:
    image: jenkins/jenkins:lts
    restart: always
    privileged: true
    user: root
    ports:
      - 8080:8080
      - 50000:50000
    container_name: jenkins
    volumes:
      - /home/ubuntu/jenkins_compose/jenkins_configuration:/var/jenkins_home
      - /var/run/docker.sock:/var/run/docker.sock

Save the file by entering :wq!

Execute Docker compose command:
sudo docker-compose up -d 


Make sure Jenkins is up and running by checking the logs
sudo docker-compose logs --follow


Once you see the message, that's it. Jenkins is been installed successfully. press control C and enter.
Now access Jenkins UI by going to browser and enter public dns name with port 8080
Now to go to browser --> http://your_jenkins_publicdns_name:8080/

You can get the Admin password from above command as well.

Enter Admin Password

Enter the password and Click on continue.
Then click on install suggested plug-ins. 
Also create user name and password.
enter everything as admin. at least user name as admin password as admin
Click on Save and Finish. Click on start using Jenkins. Now you should see a screen like below:


That's it. You have setup Jenkins successfully using Docker Compose.

To Clean Up Resources

sudo docker compose down


This should stop the Jenkins container that is running.

Click here to learn how to create a FreeStyle job in Jenkins to automate Build and Deployment of Java Web App.
Click here to learn how to create a Pipeline job in Jenkins to automate Build and Deployment of Java Web App.

Automate Azure App Service setup using Ansible and Azure DevOps pipeline | How to integrate Ansible with Azure DevOps | How to Create WebApp in Azure Cloud using Ansible

Ansible is an open-source, configuration management tool that automates cloud provisioning, configuration management, and application deploy...