Tuesday, April 28, 2020

How to add existing files into GitHub using command line - Add project to GitHub

Let us say you have a source files and you would like to check-in the source files into GitHub.

How will you do add project/source files from your machine into GitHub?

Pre-requistes:

1. Make sure git is installed on your source machine.
2. Make sure you add SSH public keys to GitHub by executing ssh-keygen command.

1. Create a new repo in GitHub. Do NOT create README file yet.
 
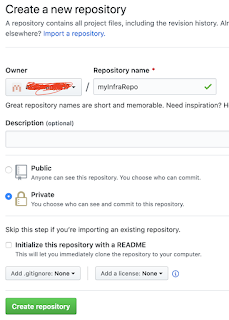
Once you create the repository. it should show something like below:

2. Open git bash or command line terminal
3. navigate to your directory where you have source files.
4. run the below command to initialize the directory as local repository.
       git init
5. Execute git add .
6. git commit -m "my project setup in GitHub"
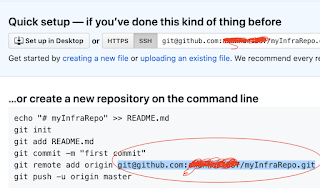
7. git remote add origin remote repository URL
(take the remote repo url from above image, marked in red color )
8. git push -u origin master

Now login to GitHub and make sure code is available under source tab for the repo. 

Provision Ubuntu 18.0.4 EC2 Instance | How to create EC2 instance in AWS console | Launch Ubuntu 18.0.4 instance in AWS

What is EC2 instance? 
It is virtual server provided by AWS. We will be using this EC2 to install Java, Jenkins, Tomcat, Maven. We will be using this as a CI server. Please follow the below steps to create an EC2 instance.

Steps:
1: Login to AWS console by clicking this link -->  https://aws.amazon.com/console/
click on All services, Click on Compute -->  Click on EC2


2. Click on Launch instance. Choose an Amazon machine image (AMI), click next

3. Type Ubuntu Server and select 
Ubuntu Server 18.04 LTS (HVM), SSD Volume Type as shown below:
click next

4. choose an instance type as t2.small, 2GB memory. click next
5. Enter number of instances as 2 as you need one for Jenkins and another one for Tomcat


6. Leave values to default in step 4. click next

7. enter tag name in step 5. Click to add a Name tag. it can be something like EC2.
click next:configure Security Group

8. Click create new security group, give name as MyES2SG, add custom rule for 8080, allow 0.0.0.0/0 as source IP

9. Click on Review and launch


Click on Launch

10. Choose the existing key pair if you have one, otherwise create new one, give some name as myEC2Key. Make sure you download the key in your local machine. Please do NOT give space or any character while naming the key.


10. Click on launch instance, Scroll down and click on view instances.


Connect to EC2 instance from local machine:
Please click the below link to understand the steps for connecting to EC2 instance from your local machine - windows or Apple laptop.

http://www.cidevops.com/2018/02/how-to-connect-to-ec2-instance-from.html

Watch here for live demo:


This completes our first lab exercise :-)

Monday, April 27, 2020

Provision EC2 instance using Puppet on AWS - Puppet to create EC2 instances in AWS

Puppet is an Infrastructure provisioning tool, similar to Ansible, Chef. We will see how to create EC2 instances in AWS using Puppet in this article.

Please watch the steps in action in YouTube:

 
How to provision an EC2 instance using Puppet?

Pre-requisites:
Make sure you have installed Puppet Master along with required AWS SDK gems
Make sure you have access keys+ secret keys created.

Go to the instance where you have installed Puppet Master.
cd ~

Now you need to create AWS credentials file. Create .aws directory under /home/ubuntu
sudo mkdir ~/.aws

Create the file to add credentials. make sure you give access key and secret keys:

sudo vi ~/.aws/credentials
[default]
aws_access_key_id = ?
aws_secret_access_key = ?

Now execute the below command just to make sure it is showing the information about current instance by executing below command:

sudo /opt/puppetlabs/bin/puppet resource ec2_instance


if you have any error, apply the below fix:
puppet module install puppetlabs-aws --force

Now let us create puppet modules to create new EC2 instance. Go into modules directory.
cd /opt/puppetlabs/puppet/modules/

create directory by 
sudo mkdir aws-examples
cd aws-examples

Go to VPC dashboard by typing VPC


Click on Subnets.

Make sure you give subnet name as subnet Ids. Copy any subnet ID and use it below:


Create Puppet Manifests

Create the below file called create-ec2.pp by executing below command:
sudo vi create-ec2.pp 

and then copy below code, make sure you change region, subnet name and key name based on yours

ec2_instance { 'Puppet Agent':
    ensure              => present,
    region              => 'us-east-2',
    image_id            => 'ami-07c1207a9d40bc3bd',
    instance_type       => 't2.small',
    security_groups     => ['mySecurityGroup'],
    subnet              => 'subnet-cd310ab7',
    key_name            => 'mykeyName',
  }

ec2_securitygroup { 'mySecurityGroup':
  region      => 'us-east-2',
  ensure      => present,
  description => 'Security group for aws Ec2 instance',
ingress     => [{
    protocol => 'tcp',
    port     => 8080,
    cidr     => '0.0.0.0/0',
  },{
    protocol => 'tcp',
    port     => 80,
    cidr     => '0.0.0.0/0',
  },{
    protocol => 'tcp',
    port     => 22,
    cidr     => '0.0.0.0/0',
 }],
  tags        => {
    tag_name  => 'mySecurityGroup',
},
}

You need to change all the values (high lighted above) per your settings. Make sure you also change the subnet id per your settings. you need to follow the below steps


13. Now execute the below command to create EC2 instance.
sudo /opt/puppetlabs/bin/puppet apply create-ec2.pp

If no errors, login to EC2 console to see the newly created instance.

Note:

If you would like destroy, just change to absent (This STEP is not required for this lab)

sudo vi destroy-ec2.pp
ec2_instance { 
   'Puppet Agent':
    ensure              => absent,
    region              => 'us-east-2',
    image_id            => 'ami-07c1207a9d40bc3bd',
    instance_type       => 't2.micro',
    security_groups     => ['mySecurityGroup'],
    subnet              => 'subnet-aff937d5',
    key_name            => 'mykeyName',
  }

sudo /opt/puppetlabs/bin/puppet apply destroy-ec2.pp

the above command will destroy EC2 instance that was created.

How to configure Puppet Master and integrate with Puppet Agent/nodes on Ubuntu 18.0.4 | Puppet Master and Agent integration

Puppet uses Client/Server model. The server does all the automation of tasks on nodes/servers that have a client(agent) installed. The work of the Puppet agent is to send facts to the puppet master and request a catalog based on certain interval level(default time 30 mins). Once it receives a catalog, Puppet agent applies it to the node by checking each resource the catalog describes. It makes relevant changes to attain the desired state. The work of the Puppet master is to control configuration information.  Each managed agent node requests its own configuration catalog from the master.

Please find the steps needed for Integrating Puppet master and agent on Ubuntu 18.0.4:
Watch the steps in YouTube video:

Pre-requisites:

a) One Ubuntu instance for Puppet Master - this instance should have 4 GB RAM, in AWS instance type should be at least t2.medium.
 Master ubuntu EC2 should have a security group to ensure that below ports are open in security firewall
        * TCP 8140 - Agents will talk to the master on this port(puppet enterprise)
        * TCP 22 - To login to the server/instance using SSH

b) one Ubuntu instance as node which will have agent installed - This can be micro instance.

1 Steps for Puppet Master:
Modify Puppet Master Hosts file to add hostname of Puppet Master
sudo vi /etc/hosts

(Add puppet master ip address and puppet next to it like shown below)


Download Puppet Master installation packages

curl -O https://apt.puppetlabs.com/puppet6-release-bionic.deb
sudo dpkg -i puppet6-release-bionic.deb
sudo apt-get update


Install Puppet Master

sudo apt-get install puppetserver -y
sudo ufw allow 8140
sudo systemctl enable puppetserver.service


(the above command is to start the service during starting the Ubuntu instance)
sudo systemctl start puppetserver.service           
(The above command is for starting the server and this may take some time)


sudo systemctl status puppetserver.service

Now press q to come out of window.

Verify version of Puppet Master

apt policy puppetserver


2 - Steps for Puppet Agent

Step 2.1 First edit the hosts file on the puppet agent by modifying /etc/hosts
sudo vi /etc/hosts

# Please add Puppet Master server IP address and space and enter puppet
puppet_master_ip_address   puppet


(please do not use public DNS name, use only private IP address)  

Press Ctrl O for saving and then enter
Press Ctrl X for exit after saving
.

Step 2.2 — Installing Puppet Agent on server node that Puppet master will manage
curl -O https://apt.puppetlabs.com/puppet6-release-bionic.deb
sudo dpkg -i puppet6-release-bionic.deb
sudo apt-get update
sudo apt-get install puppet-agent -y
sudo systemctl enable puppet
sudo systemctl restart puppet
sudo systemctl status puppet


Now press q to come out of window.

Step 3 - Signing certificates on Puppet Master
The first time you run the Puppet agent, it generates an SSL certificate and sends a signing request to the Puppet master. After the Puppet master signs the agent's certificate, it will be able to communicate  with and control the agent node.

First list the unsigned certificates on puppet master EC2 instance

sudo /opt/puppetlabs/server/bin/puppetserver ca list

The above command will list agent ip address.
  "your_puppet_Agent_Ec2_private_dns_name"  (SHA256) 46:19:79:3F:70:19:0A:FB:DA:3D:C8:74:47:EF:C8:B0:05:8A:06:50:2B:40:B3:B9:26:35:F6:96:17:85:5E:7C


Now sign the Puppet agent IP address.
sudo /opt/puppetlabs/server/bin/puppetserver ca sign --certname 
AgentEc2_private_dnsname

Step 4 - Verifying installation by creating Manifests in Puppet Master

The puppet manifest file is the actual file which contains the configuration details for the agents. This file is centrally stored at Puppet Master.

sudo nano /etc/puppetlabs/code/environments/production/manifests/site.pp

#copy the below yellow lines in the above file
    file {'/tmp/puppet_test.txt':                        # resource type file and filename
    ensure  => present,                      
       # make sure it exists
    mode    => '0644',                       
       # file permissions
  content => "Hello from Puppet master to agent on ${ipaddress_eth0}!\n",  # Print the eth0 IP fact
    }


Press Ctrl O for saving and then enter
Press Ctrl X for exit after saving
.


Step 5 - Apply Manifests in Puppet Agent
apply the changes in puppet agent by executing below command:
sudo /opt/puppetlabs/bin/puppet agent --test


You should see a file being modified in /tmp/puppet_works.txt in agent(node).
You can confirm by typing this command on puppet node 

sudo cat /tmp/puppet_test.txt
Hello from Puppet master to agent on IP_address!!

That's it! you have set up Puppet Master and configured agent on the target node successfully!

Puppet Install LAMP stack on Ubuntu | How to install LAMP stack using Puppet on Ubuntu 18.0.4 Node

How to install LAMP (Apache, MySQL, PHP) stack in Ubuntu 18.0.4?


Pre-requisites:
Puppet agent is installed on the node.

Watch the steps in YouTube channel:


Login to Puppet Master, follow the below steps:

cd /opt/puppetlabs/puppet/modules
sudo mkdir lamp
cd lamp
sudo mkdir manifests
cd manifests
sudo vi init.pp
Copy the below lines in init.pp

class lamp {
# execute 'apt-get update'
exec { 'apt-update':                    # exec resource named 'apt-update'
  command => '/usr/bin/apt-get update'  # command this resource will run
}

# install apache2 package
package { 'apache2':
  require => Exec['apt-update'],        # require 'apt-update' before installing
  ensure => installed,
}

# ensure apache2 service is running
service { 'apache2':
  ensure => running,
}

# install mysql-server package
package { 'mysql-server':
  require => Exec['apt-update'],        # require 'apt-update' before installing
  ensure => installed,
}

# ensure mysql service is running
service { 'mysql':
  ensure => running,
}

# install php7 package
package { 'php7.2-cli':
  require => Exec['apt-update'],        # require 'apt-update' before installing
  ensure => installed,
}

# ensure info.php file exists
file { '/var/www/html/info.php':
  ensure => file,
  content => '<?php  phpinfo(); ?>',    # phpinfo code
  require => Package['apache2'],        # require 'apache2' package before creating
}
}

sudo vi /etc/puppetlabs/code/environments/production/manifests/site.pp
Add below line of code where node should be your target node where you already approved the certificate. the highlighted below section needs to be changed:

node 'your_target_puppet_agent_node_private_DNS_name' {
 include lamp
 }

Now to login to puppet agent node, execute the below command:
sudo /opt/puppetlabs/bin/puppet agent --test

You should see message like below:

Now make sure Apache is running on the target node by entering the target node(Agent's) public IP address on the browser. You should see Apache home page in the browser.

Install Java 11 using Puppet on Agent - Create Puppet Manifest to Install Java 11 on Ubuntu

Puppet is a software configuration management tool, used for managing software stack on servers. Java also can be managed using Puppet.

Here below are the steps for installing Java using Puppet on Ubuntu:

First install Java modules on Puppet Master using sudo command.

Step 1
sudo /opt/puppetlabs/bin/puppet module install puppetlabs-java --version 6.2.0
The above command will install Java module on Puppet Master.

Step 2
After that change the manifest in site.pp file in Puppet Master by executing the below command:

sudo vi /etc/puppetlabs/code/environments/production/manifests/site.pp


node 'target_agent_node_private_dns_name' {
        include lamp

        class { 
           'java':
           distribution => 'jre',
        }

}

Step 3
Now go to Puppet Agent node and apply the changes by executing the below command:
sudo /opt/puppetlabs/bin/puppet agent --test

once you installed, type java -version to confirm Java version


Saturday, April 25, 2020

Install Ansible on Ubuntu | How to setup Ansible on AWS Ubuntu 22.0.4 instance | Ansible install on Ubuntu EC2 instance

Ansible is #1 configuration management tool. It can also be used for infrastructure provisioning as well. or You can use Ansible in combination of Terraform which can take care of infra automation and Ansible can do configuration management.
 
Ansible Architecture:


The best way to install Ansible for Ubuntu is to add the project's PPA (personal package archive) to your system. You also would need Boto framework for provisioning resources in AWS cloud.

Pre-requisites:
Create new Ubuntu EC2 instance for installing Ansible, just open port 22.

Change Host Name to AnsibleMgmtNode
sudo hostnamectl set-hostname 
AnsibleMgmtNode

Update Repository

sudo apt update


Install Ansible:
sudo apt install -y ansible


Install Python-pip3:
sudo apt install python3-pip -y
 ( this is just comment -  pip is package manager for Python)


Press tab and Enter on OK

Install Boto Framework - AWS SDK
sudo pip3 install boto boto3

Ansible will access AWS resources using boto SDK.

pip list boto | grep boto
(the above command should display below output)
You can ignore warning in red color.

 
ansible --version


Watch here for the steps to setup Ansible on Ubuntu:

Thursday, April 23, 2020

Jenkins pipeline code to upload artifacts to Artifactory

node {

    def server
    def buildInfo
    def rtMaven
    def mvnHome = tool 'Maven3'

stage ("checkout")  {
   //checkout code
}

  stage ('Artifactory configuration') {
    server = Artifactory.server('My_Artifactory');
    rtMaven = Artifactory.newMavenBuild()
    rtMaven.tool = 'Maven3'
    rtMaven.deployer releaseRepo: 'libs-release-local', snapshotRepo: 'libs-snapshot-local', server: server
    rtMaven.resolver releaseRepo: 'libs-release', snapshotRepo: 'libs-snapshot', server: server
    rtMaven.deployer.deployArtifacts = false // Disable artifacts deployment during Maven run

    buildInfo = Artifactory.newBuildInfo()
  }
  
   stage ('Build') {
        rtMaven.run pom: 'MyWebApp/pom.xml', goals: 'install', buildInfo: buildInfo
    }
   
    stage ('Upload Artifacts') {
        rtMaven.deployer.deployArtifacts buildInfo
       server.publishBuildInfo buildInfo
    }
}


Integrate Artifactory with Jenkins - Upload Artifacts from Jenkins to Artifactory - How to Integrate Jenkins with Artifactory

You can install plug-in called Artifactory plug-in to integrate Artifactory with Jenkins. Let us see how to integrate Jenkins with Artifactory and able to upload any binary file such as War/Ear/Jar/Exe/DLLs from Jenkins.


Pre-requisites:
Install Artifactory plugin in Jenkins.
go to Jenkins, Manage Jenkins, Available plug-ins page, search for artifactory.

Make sure Maven 3 is also configured under Manage Jenkins--> Global Tool configuration
Enter Name as Maven3
/usr/share/maven as MAVEN_HOME

Configure Arifactory in Jenkins:
1. Go to Manage Jenkins, Click on configure system. Look for Artifactory section, click on Add Artifactory server


2. Enter Artifactory url like given below:
some name for server_id
http://public_dns_name:8081/artifactory
admin/Admin123 as credentials
Click on Test connection to verify everything is right.
You should get the message like below:
Found Artifactory 7.12.8


3. Once you installed the above plug-in, click on existing Freestyle job configuration.
4. Go under Build environment
Select Maven 3 - Artifactory integration check box
and click on refresh Repositories and choose repos as mentioned below:

 5.Click on Add Build step and choose Invoke Artifactory Maven 3

6. Enter value as below, MyWebApp/pom.xml as root POM
and goal as install

7. Now click on Build, Jenkins should build using Maven and upload WAR file into Artifactory.

8. Login to Artifactory, Click on Artifactory --> Artifacts


That's it folks!

Please watch the steps in details in my YouTube channel:


How to Create Quality Gate in SonarQube and integrate with GitHub Actions | SonarQube Integration with GitHub Actions | Automate Code Scan using SonarQube In GitHub Actions and Force build to Fail or Pass

Pre-requisites: Make sure SonarQube is up and running Make sure Java Project is setup in GitHub SonarQube is already integrated with GitHub ...