Saturday, February 24, 2024

How to configure Self-Hosted GitHub Actions Runner | How to install Self-Hosted GitHub Actions Runner | Configure EC2 instance as self-hosted runner in GitHub Actions

A self-hosted GitHub runner is a machine (physical or virtual) that you set up and manage to run GitHub Actions workflows. A self-hosted runner differs from the default GitHub-hosted runners in that it runs on infrastructure that you control. Self-hosted runners can be physical, virtual, in a container, on-premises, or in a cloud. To learn more about GitHub runner, please click here.

    Advantages of self-hosted runners:

    • full control over the environment and tools
    • Any size machine or configuration
    • Secure access and networking

    Pre-requisites:

    • Project configured in GitHub
    • workflow yaml already checked-in GitHub. If you don't have one, click here to create one.
    • Create a virtual machine with at least 2 GB RAM. we will use EC2 instance in AWS cloud.
    • Install Maven on runner EC2 instance

    How to create self-hosted GitHub Actions Runner?

    Go to GitHub Repo--> Actions --> Runners


    Click on self-hosted runners --> New Runner

    Click on Linux


    Perform update
    sudo apt update

    Install Maven in Runner EC2 as We will be doing Maven build for Java project

    sudo apt install maven -y

    Execute below commands in your virtual machine to configure runner.

    Download installables

    # Create a folder

    mkdir actions-runner && cd actions-runner


    # Download the latest runner package

     curl -o actions-runner-linux-x64-2.313.0.tar.gz -L https://github.com/actions/runner/releases/download/v2.313.0/actions-runner-linux-x64-2.313.0.tar.gz


    # Extract the installer

    tar xzf ./actions-runner-linux-x64-2.313.0.tar.gz


    Configure the runner


    ./config.sh --url https://github.com/akannan1087/myJan2024WeekdayRepo --token Token


    Enter the name of the runner group to add this runner to: [press Enter for Default]

    press enter default for the runner group


    Enter name of the runner 

    MyRunner1


    Enter any additional labels

    MyRunner1


    Now run the runner


    ./run.sh

    this confirms that runner is setup and running fine. waiting for the jobs.

    you can also view in GitHub under Runners tab:


    Create a workflow or modify your workflow to include GitHub runner:


    name: Build a WAR file using Maven

    on:

      push:

        branches: [ "main" ]

    jobs:

      build:

        runs-on: self-hosted

        steps:

        - uses: actions/checkout@v3

        - name: Set up JDK 11
          uses: actions/setup-java@v2
          with:
            distribution: 'adopt'
            java-version: '11'
        - name: Build with Maven
          run: mvn clean install -f MyWebApp/pom.xml


    Save the file and run the workflow.


    Go to your virtual machine where build is running:


    Watch steps in YouTube channel:

    Thursday, February 22, 2024

    Maven Build compilation Error | Failed to execute goal org.apache.maven.plugins:maven-war-plugin:2.2:war

    When you are using Java 17 and trying to compile your Java project using Maven, you may experience this error. this is due to version incompatible issue of maven war plug-in.


    you can upgrade your Java version in Jenkins by executing below command:
    sudo apt install openjdk-17-jdk -y

    or you can follow steps to setup Jenkins with Java 17.

    Fix in your Java Web App:

    Add following plug-in to pom.xml of your Java Project to fix the build issue:

      <build>
        <finalName>MyWebApp</finalName>
         <plugins>
            <plugin>
              <groupId>org.apache.maven.plugins</groupId>
              <artifactId>maven-war-plugin</artifactId>
              <version>3.3.1</version>
            </plugin>
          </plugins>

      </build>
    </project>

    Save the pom.xml and re-run the build.


    Wednesday, February 21, 2024

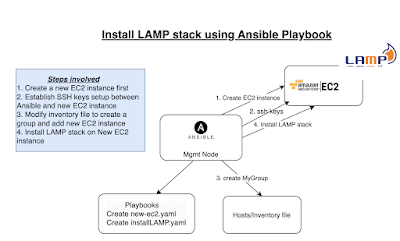
    Ansible Role for LAMP Installation on Ubuntu | Install LAMP stack using Ansible Role on Ubuntu 22.0.4

     LAMP Stack comprises the following open-source software applications.

      • Linux – This is the operating system hosting the Applications.
      • Apache – Apache HTTP is a free and open-source cross-platform web server.
      • MySQL– Open Source relational database management system.
      • PHP – Programming/Scripting Language used for developing Web applications.


      Pre-requisites:
      Steps to setup SSH keys:
      1. Login to Ansible management server/machine. Create SSH keys in Ansible host machine by executing the below command: (if you already have keys created, please skip this step)
      ssh-keygen 

      enter three times..now you will see keys successfully created.
      2.  Execute the below command on Ansible management node and copy the public key content:
      sudo cat ~/.ssh/id_rsa.pub

      copy the above output.
      3. Now login into target node where you want to install LAMP stack, execute the below command to open the file
      sudo vi /home/ubuntu/.ssh/authorized_keys
      type shift A and then enter now 
          and paste the key in the above file. please do not delete any existing values in this file.

      4. Now go back to Ansible mgmt node, do changes in /etc/ansible/hosts file to include the node you will be installing software. Make sure you add public or private IP address of target node as highlighted below in red color:
      sudo vi /etc/ansible/hosts
      [My_Group]  
      xx.xx.xx.xx ansible_ssh_user=ubuntu ansible_ssh_private_key_file=~/.ssh/id_rsa  ansible_python_interpreter=/usr/bin/python3

      Ansible playbook for installing LAMP(Linux Apache MySQL PHP) stack on Ubuntu

      sudo vi aws-infra-role/tasks/installLAMP.yml
      ---
          - name: Task # 1 - Update APT package manager repositories cache
            become: true
            apt:
              update_cache: yes
          - name: Task # 2 - Install LAMP stack using Ansible
            become: yes
            apt:
              name: "{{ packages }}"
              state: present
            vars:
              packages:
                 - apache2
                 - mysql-server
                 - php


      Create Ansible main playbook

      sudo vi aws-infra-role/setup-lamp.yml
      ---
      # This Playbook installs LAMP stack

      - hosts: My_Group
        gather_facts: False
        tags: LAMP creation

        tasks:
        - include: tasks/installLAMP.yml

      Execute Ansible Role

      ansible-playbook aws-infra-role/setup-lamp.yml


      This is the execution result of the playbook.

      Now go to browser and use target node DNS to confirm if Apache is installed. make sure port 80 is opened in security firewall rules.


      Now login to target EC2 instance, type below commands to verify PHP and MySql versions:

      php --version

      mysql --version

      Wednesday, February 14, 2024

      How to integrate SonarQube with GitHub Actions CICD Pipeine | SonarQube Integration with GitHub Actions| Automate Code Scan using SonarQube In GitHub Actions

      Please find steps for integrating SonarQube with GitHub Actions:


      Pre-requisites:

      How to integrate SonarQube with GitHub Actions:
      We will be following below steps:
      • Create Token in SonarQube to authenticate with GitHub Actions
      • Add Sonar Token, SonarQube URL as Secrets in GitHub Actions
      • Create GitHub Actions CICD workflow yaml
      • Add tasks for Maven build and Sonar Scan
      • Run the workflow in GitHub hosted runner(Ubuntu)
      • Verify scan report in SonarQube

      Create Token in SonarQube to authenticate with GitHub Actions
      You need to login to SonarQube using your admin password and click on Admin on your top side.
      Click on My Account, Security. 
      Under Tokens, Give some value for token name and choose global analysis token, click on generate Tokens. Copy the token value generated.


      Add Sonar Token and Sonar Host URLs as Secret in GitHub Actions
      Go to your GitHub Repo --> Settings --> 

      Click on Secrets and Variables under Security in left nav 
      Click new Repository Secret


      Add another variable for storing Sonar token


      Create GitHub Actions CICD workflow yaml:

      Go to GitHub repo where your Java project is, create a new file:

      .github/workflows/cicd.yml


      The below file have four steps(tasks) 
          - Checkout
          - Install Java on runner
          - Build using Maven
          - run Sonar Scan (this task need to have projectKey defined, otherwise build will fail)

      Copy the content from below:

      name: CI/CD workflow for Maven Build and Sonar Code scan
      on:
        push:
          branches:
            - main
        workflow_dispatch:
      jobs:
        build:
          runs-on: ubuntu-latest
          steps:
          - name: Checkout code
            uses: actions/checkout@v2
          - name: Set up JDK 11
            uses: actions/setup-java@v2
            with:
              distribution: 'adopt'
              java-version: '11'
          - name: Build with Maven
            run: mvn clean install -f MyWebApp/pom.xml
          - name: SonarQube Scan
            uses: sonarsource/sonarqube-scan-action@master
            with:
              projectBaseDir: .
              args: >
                -Dsonar.organization=my-org
                -Dsonar.projectKey=my-Java-web-app
            env:
              SONAR_TOKEN: ${{ secrets.SONAR_TOKEN }}
              SONAR_HOST_URL: ${{ secrets.SONAR_HOST_URL }}

      Commit the file.

      As soon as you commit, build will run immediately in GitHub Actions. 
      Now you can see the output of build in Actions tab.


      Now login to SonarQube to see the Scan report


      Notes:
      You can also refer the documentation below from below websites.


      Watch steps in YouTube channel:

      Saturday, February 10, 2024

      Install Jenkins using Ansible Role on Ubuntu | Install Jenkins using Ansible Role | How to Setup Jenkins using Ansible

      Find below Ansible Role for installing Jenkins on a Ubuntu machine.

      Pre-requisites:
      Java needs to be installed already on machine before setting up Jenkins. please Click here for Java Playbook. Here below is the Ansible Role for installing Jenkins using Ansible in Ubuntu EC2:

      cd ~/roles
      sudo vi aws-infra-role/tasks/installJenkins.yml

      Copy the below yellow highlighted in the above file: 

      ---
          - name: ensure the jenkins apt repository key is installed
            apt_key: url=https://pkg.jenkins.io/debian/jenkins.io-2023.key state=present
            become: yes

          - name: ensure the repository is configured
            apt_repository: repo='deb https://pkg.jenkins.io/debian-stable binary/' state=present
            become: yes

          - name: ensure jenkins is installed
            apt: name=jenkins update_cache=yes
            become: yes

          - name: ensure jenkins is running
            service: name=jenkins state=started


      Modify Hosts/Inventory file
      sudo vi /etc/ansible/hosts
      make sure you add below entry with target node IP changed (in red color).
      [My_Group]  
      xx.xx.xx.xx ansible_ssh_user=ubuntu ansible_ssh_private_key_file=~/.ssh/id_rsa  ansible_python_interpreter=/usr/bin/python3


      Modify Ansible main playbook

      sudo vi aws-infra-role/setup-jenkins.yml
      ---
      # This Playbook creates infra in aws cloud

      - hosts: My_Group
        gather_facts: False
        tags: jenkins creation

        tasks:
        - include: tasks/installJava11.yml
        - include: tasks/installMaven.yml
        - include: tasks/installJenkins.yml

      Execute Ansible Role
      ansible-playbook aws-infra-role/setup-jenkins.yml

      This should install Jenkins on the target node.

      Now enter public ip address or public dns name with port no 8080 of target server by in the browser to see Jenkins up and running.

      http://target_node_public_dns_name:8080

      Install Maven using Ansible Role on Ubuntu - Install Maven on Ubuntu using Ansible Role

      Ansible Role for installing Maven on Ubuntu

      cd ~/roles

      sudo vi aws-infra-role/tasks/installMaven.yml

          - name: Install Maven using Ansible
            become: yes
            apt:
              name: "{{ packages }}"
              state: present
            vars:
              packages:
                 - maven

      Modify Ansible main playbook

      sudo vi aws-infra-role/setup-jenkins.yml
      ---
      # This Playbook creates infra in aws cloud

      - hosts: My_Group
        gather_facts: False
        tags: jenkins creation

        tasks:
        - include: tasks/installJava11.yml
        - include: tasks/installMaven.yml

      Execute Ansible Role
      ansible-playbook aws-infra-role/setup-jenkins.yml

      This should install Maven on the  target node.

      Ansible Role for Java 11 Installation on Ubuntu - Ansible Role to Install Java on Ubuntu 22.0.4

      1. Login to Ansible management server/machine. Create SSH keys in Ansible host machine by executing the below command: (if you already have keys created, please skip this step)

      ssh-keygen 

      enter three times..now you will see keys successfully created.
      2.  Execute the below command on Ansible management node and copy the public key content:
      sudo cat ~/.ssh/id_rsa.pub

      copy the above output.
      3. Now login to target node, execute the below command to open the file
      sudo vi /home/ubuntu/.ssh/authorized_keys
      type shift A and then enter now 
          and paste the key in the above file. please do not delete any existing values in this file.

      4. Now go back to Ansible mgmt node, do changes in /etc/ansible/hosts file to include the node you will be installing software. Make sure you add public IP address of target node as highlighted below in red color:
      sudo vi /etc/ansible/hosts
      [My_Group]  
      xx.xx.xx.xx ansible_ssh_user=ubuntu ansible_ssh_private_key_file=~/.ssh/id_rsa  ansible_python_interpreter=/usr/bin/python3

      5. let's make sure Ansible Control node is able to connect to target node

      ansible -m ping all

      ansible all -a "whoami"


      6. make changes in Ansible Role as given below,
      cd ~/roles

      sudo vi aws-infra-role/tasks/installJava11.yml

      ---
          - name: Task - 1 Update APT package manager repositories cache
            become: true
            apt:
              update_cache: yes
          - name: Task -2 Install Java using Ansible
            become: yes
            apt:
              name: "{{ packages }}"
              state: present
            vars:
              packages:
                 - openjdk-11-jdk

      7. Create Ansible main playbook

      sudo vi aws-infra-role/setup-jenkins.yml
      ---
      # This Playbook creates infra in aws cloud

      - hosts: My_Group
        gather_facts: False
        tags: jenkins creation

        tasks:
        - include: tasks/installJava11.yml

      8. Execute Ansible Role
      ansible-playbook aws-infra-role/setup-jenkins.yml

      now after successfully executing, enter below command to make sure Java is installed in target node:

      java -version
      openjdk version "11.0.7" 2020-04-14
      OpenJDK Runtime Environment (build 11.0.7+10-post-Ubuntu-2ubuntu218.04)
      OpenJDK 64-Bit Server VM (build 11.0.7+10-post-Ubuntu-2ubuntu218.04, mixed mode, sharing)

      Wednesday, February 7, 2024

      How to resolve No hosted parallelism has been purchased or granted Error in Azure Devops?


      Potential root cause and fix:
      Microsoft has temporarily disabled the free grant of parallel jobs for public projects and for certain private projects in new organizations. However, you can request this grant by submitting a request. Submit a ticket using below url to request increased parallelism in Azure DevOps. Please note that it takes us 2-3 business days to respond to your free tier requests.


      Second Option:
      You can configure self-hosted agent in Azure DevOps.

      DevOps Interview Preparation Useful real time tips | Crack DevOps Interviews | How to clear DevOps Interviews

      Are you failing in DevOps Interviews? Are you not be able to next round in the Interview process?  Let's find out how to fix this:   Fir...