Showing posts with label Git. Show all posts

Tuesday, June 9, 2026

How to integrate SonarQube with GitLab CICD Pipeline | SonarQube Integration with GitLab CICD | Automate Code Scan using SonarQube In GitLab CICD

 Please find steps for integrating SonarQube with GitLab CICD


Pre-requisites:

How to integrate SonarQube with GitLab CICD:
We will be following below steps:
  • Create Token in SonarQube to authenticate with GitLab
  • Add Sonar Token, SonarQube URL as Secrets in GitLab
  • Create GitLab CICD yaml
  • Add tasks for Maven build and Sonar Scan
  • Verify scan report in SonarQube

Create Token in SonarQube to authenticate with GitLab
You need to login to SonarQube using your admin password and click on Admin on your top side.
Click on My Account, Security. 
Under Tokens, Give some value for token name and choose global analysis token, click on generate Tokens. Copy the token value generated.


Add Sonar Token and Sonar Host URLs as Secret in GitLab
Go to your GitLab Repo --> Click on Settings --> CICD --> Variables


Click new Repository Secret


Add another variable for storing Sonar token


Create GitLab CICD workflow yaml:

Go to GitLab repo where your Java project is, create a new file:.gitlab-ci.yml

The below file have three stages:
    - build
    - sonar
    - deploy

Create .gitlab-ci.yml CICD Pipeline:
stages:
  - build
  - sonar
  - deploy

build_war:
  stage: build
  image: maven:3.8.6-eclipse-temurin-11

  script:
    - echo "Building WAR file using Maven"
    - mvn clean install -f MyWebApp/pom.xml
    - echo "Listing target directory"
    - ls -la MyWebApp/target

  artifacts:
    paths:
      - MyWebApp/target/*.war
    expire_in: 1 hour

sonarqube_scan:
  stage: sonar
  image: maven:3.9.6-eclipse-temurin-17

  script:
    - |
      mvn sonar:sonar \
        -f MyWebApp/pom.xml \
        -Dsonar.projectKey=MyWebApp \
        -Dsonar.host.url="${SONAR_HOST_URL}" \
        -Dsonar.token="${SONAR_TOKEN}"
      
deploy_to_tomcat:
  stage: deploy
  image: curlimages/curl:latest

  dependencies:
    - build_war

  script:
    - echo "Deploying WAR file to Tomcat running on AWS EC2"

    - |
      curl -v -u ${TOMCAT_USER}:${TOMCAT_PASSWORD} \
      -T MyWebApp/target/MyWebApp.war \
      "http://${TOMCAT_HOST}/manager/text/deploy?path=/MyWebApp&update=true"

Commit the file.

As soon as you commit, build will run immediately in GitLab CICD. 
Now you can see the output of build in Actions tab.


Now login to SonarQube to see the Scan report


Wednesday, September 7, 2022

How to configure VS Code to integrate with GitHub | Working with GitHub in VS Code | GitHub Visual Studio Code Integration

GitHub is popular Git based SCM, hosted on cloud for storing and sharing code amongst developers. Using GitHub with Visual Studio Code lets you share your source code and collaborate with other developers right within your editor. 


There are many ways to integrate with GitHub, using the website or using Git client(CLI) or using VS Code as well. We will be learning how to integrate with GitHub from VS Code. Git Support is provided out-of-the-box in VS Code.

Pre-requisites:

Make sure Git is Enabled in Visual Studio Code

Let's make sure Git is Enabled in VS Code. Click on Manage Icon in the bottom left in VS Code. Click on Settings. 


Search for Git:Enabled make sure Git: Enabled is checked.


Steps to integrate with GitHub from Visual Studio Code

1. Open VS Code, Click on Git icon as Git support is provided out of the box in Visual Studio Code.


2. Click on clone repository, 


3. Click on clone from GitHub

4. Now Click on Allow to sign in using GitHub


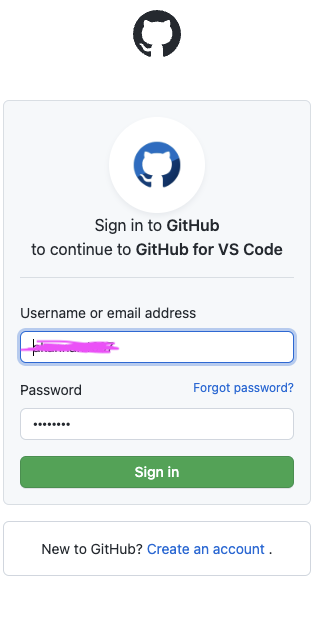
5. Enter GitHub Credentials

Click on Authorize Visual Studio code


6. Now Click on Open Visual studio code


7. Choose the location where you like to clone the repo:


8. Now click on Open to open the cloned repository.


How to make code changes in VS Code after cloning?

Open Terminal window in VS Code

Set user Name and Email before you push code changes:

Set your username: 
git config --global user.name " First Name Last Name"

Set your email address: 
git config --global user.email "your@email.com"

View the entries:
git config --global --list

It should print your entries.

Now let's make some code changes, click on Explorer Icon.


Make code changes. 
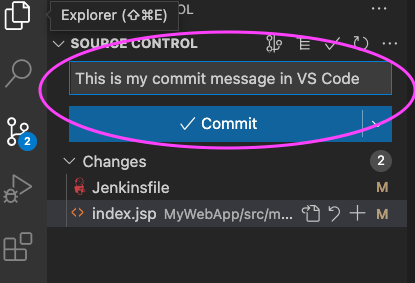
Save the changes. After saving, click on Git Icon on left to see the list of files modified. You will also notice M that says modified files.


Now you can enter commit message above Commit button and Click on Commit. 

Now click on Yes to stage all your changes.


Now to push your code changes into GitHub
Click on ... under Source Control and select Push

Now you can go into GitHub and see your code changes.


Sunday, December 5, 2021

How to migrate a Git Repo from GitHub to Azure Repos? | Migrate a Code from GitHub to Azure Repos including Full History | Import Project from GitHub into Azure Repo

How to migrate a Git Repo from GitHub to Azure Repos including all history?


Pre-requisites:
1. GitHub repo setup in GitHub
2. Azure DevOps account setup and project dashboard created.

Steps to migrate an existing repo from GitHub to Azure Repos
There are many ways to migrate from one Git repo to another Git repo. We will learn how to migrate using UI.

Using import option
You can easily migrate or import a Repo from GitHub into Azure Repos using import option. This will include importing all the branches and history.

1. Login to Azure Repos first. Create a target repo. You will be importing a GitHub Repo into this Repo.

2. Do not check Add a README file option, click on Create

3. Click on import repo

4. Enter source repo details like GitHub Repo url, and select Requires authentication checkbox.

enter username and Personal Access Token or password.


5. Click Import
6. Now you will see GitHub repo fully imported here including history + all the branches.

Tuesday, June 29, 2021

How to Integrate Jenkins and GitHub using SSH keys? | Jenkins and GitHub Integration

GitHub removed password authentication support from August 13, 2021 instead it recommends to use either OAuth or Personal Access Token. We will see how to connect to GitHub from Jenkins using SSH keys instead of using user name and password.

It is also a good practice to use SSH keys in Jenkins jobs instead of using user name and password.


Watch the steps in YouTube channel:

Pre-requisites:

  • Jenkins is up and running
  • Credentials plug-in installed in Jenkins

Create SSH keys in your Jenkins EC2 instance

ssh-keygen

enter four times. this will create keys in .ssh folder.

Copy and paste the public key
sudo cat ~/.ssh/id_rsa.pub

Add public Keys into your respective GitHub

Add public keys into your Repository--> settings--> Deploy keys section


Click on Add Deploy Key and enter public keys and save.

Add Private Keys in Jenkins Master
Login Jenkins. Go to Manage Jenkins. click on Credentials


Click on Jenkins


Click on Global Credentials


Click on Add Credentials


Choose SSH username with private key


Choose SSH username with private key
username can be anything
Click on enter directly under private key option and Click Add


Copy and paste private key(not public key) of your from Jenkins instance. command is below:
sudo cat ~/.ssh/id_rsa

copy the content of whole output from above command.
Click OK to save.

Now go to any Jenkins Job, you can choose this option for checking out from GitHub. Make sure you enter SSH url not https url.


That's it. This is how you use SSH url and private keys to checkout code from bitbucket or Github without entering username/password in Jenkins.


Click here to authenticate with GitHub using Personal Access Token.

Tuesday, May 11, 2021

Why Git is Distributed ? | Advantages of Git | How Git is different from traditional SCM tools?

Most of version control systems such as SVN, TFVC or CVS work on client-server model. After making code changes, when developers check-in the code changes, it goes to central server. All history is being maintained in a central server, not locally.

Whereas in Git, developers clone the remote repo into local machine which is called local repo. When they clone in local machine, all history is copied into local repo. After making code changes, when they commit the code, it goes into local repo with new version. Then they can push code changes into remote repo where it is available to others. Client and remote server will have full repository.


Here below is the difference Git and other control systems:

Area Git SVN/TFVC
Repository type Distributed Centralized
Full History Local machine Central machine
Checkout They clone the whole repository and do locally changes Developer checkout working copy which is snapshot of a code
Work Offline Yes No
Branching and Merging Reliable, used often, supports fat forward merge and 3-way merge Reliable, use with caution
Operations speed Fast and most are local Network-dependent
Learning Curve Needs a bit time Relatively simple
Staging area Supported to stash the temporary changes and retrieve it back later Not supported
Collaboration model Repository-to-repository interaction Between working copy and central repo

Thursday, April 1, 2021

How to create another branch from Main branch using command line

 Go to your EC2 instance or where ever your code exists in local repository. login to your instance and go to your repo.

cd reponame

Now let's create a new branch called develop from main branch.

git checkout -b develop

Now you can see how many branches are created locally.

git branch

git push --set-upstream origin develop


That is how you create a new branch from command line and push that branch into Remote repo.

Tuesday, November 24, 2020

How to set up SSH keys in Azure Repos | Setup Java Web App in Azure Git in Azure DevOps using Maven

How to set up SSH keys in Azure Repos and Setup WebApp in Azure Repo


Pre-requisites:
  • Git client installed on your source or local machine.
Steps:

Go to your visual studio home page. You should be able to go by clicking on the below URL.
https://dev.azure.com/

Create a new project by clicking on New project and enter project details like below. This will create a project dashboard.


Once project is created, Click on Repos.


 Click on initialize link to add README.


Click on clone link on the top right hand side.
Click on SSH link
Click Manage SSH keys

Click Add

Go to any virtual machine you had setup that has both Java and Maven installed. If you would like to know how to create a Virtual Machine in Azure Cloud, click here to do so.

Login to your VM

Create the SSH keys by executing the below command:
(If you already have keys generated, you can overwrite it or skip to next step to copy keys)
ssh-keygen

execute the below command to copy the keys:

cat ~/.ssh/id_rsa.pub

Add the public keys.
Once keys added into Azure DevOps, go to Repos, copy the SSH clone url

Go to your machine where you have installed Java, Maven, preferably your EC2. Execute this command:
git clone <ssh_url>

This should download the empty repo from Azure DevOps to local machine(or ec2).
now after cloning, it will create a folder with repo name..

type 

ls -al to see the folder name after you cloned.

go inside that folder by
cd reponame

Install Maven
sudo apt install maven -y 

Now create the maven project executing the below command:
mvn archetype:generate -DgroupId=com.cf -DartifactId=MyAwesomeApp -DarchetypeArtifactId=maven-archetype-webapp -DinteractiveMode=false

type git status --> to see the newly created project
git add *
git status

git commit -m "my first project check-in to Azure Git"
git push

Now go to Azure DevOps, Select the Repos —> Files —> you should see the project uploaded here.
 

Please watch the above steps on YouTube video:

🚀 Live AI-Enabled DevSecOps & Cloud Engineering Bootcamp – Sep 2026

Live AI-Enabled DevSecOps & Cloud Engineering Bootcamp from Coach AK - Sep 2026 Schedule