Showing posts with label Pipeline. Show all posts

Thursday, October 31, 2024

Deploy Python App into Kubernetes Cluster using kubectl Jenkins Pipeline | Containerize Python App and Deploy into EKS Cluster | Kubectl Deployment using Jenkins

We will learn how to automate Docker builds using Jenkins and Deploy into Kubernetes Cluster in AWS Cloud. We will use kubectl command to deploy Docker images into EKS cluster. We will use Python based application. I have already created a repo with source code + Dockerfile. The repo also have Jenkinsfile for automating the following:

- Automating builds using Jenkins
- Automating Docker image creation
- Automating Docker image upload into Elastic container registry
- Automating Deployments to Kubernetes Cluster using kubectl CLI plug-in


Pre-requisites:
1. EKS Cluster is setup and running. Click here to learn how to create EKS cluster.
2. Jenkins Master is up and running.
3. Install Docker in Jenkins.
4. Docker, Docker pipeline and Kubectl CLI plug-ins are installed in Jenkins


5. ECR repo created to store docker images.

The Code for this video is here:
and make necessary changes in eks-deploy-from-ecr.yaml file after you fork into your account.

Step #1 - Create Credentials for connecting to EKS cluster using Kubeconfig
Go to Jenkins UI, click on Credentials -->


Click on Global credentials
Click on Add Credentials

use secret file from drop down.

execute the below command to login as jenkins user.
sudo su - jenkins

you should see the nodes running in EKS cluster.

kubectl get nodes


Create namespace to deploy containers
kubectl create namespace python-app-ns
kubectl get ns

Execute the below command to get kubeconfig info, copy the entire content of the file:
cat /var/lib/jenkins/.kube/config


Open your text editor or notepad, copy and paste the entire content and save in a file.
We will upload this file.

Enter ID as K8S and choose File and upload the file and save.


Step # 2 - Create a pipeline in Jenkins
Create a new pipeline job.


Step # 3 - Copy the pipeline code from below
Make sure you change values as per your settings highlighted in yellow below:

pipeline {
    agent any

    environment {
        registry = "account_id.dkr.ecr.us-east-1.amazonaws.com/coachak/my-docker-repo"
    }
    stages {
        stage('checkout') {
            steps {
                checkout([$class: 'GitSCM', branches: [[name: '*/master']], extensions: [], userRemoteConfigs: [[url: 'https://github.com/akannan1087/myPythonDockerRepo']]])
            }
        }
        
        stage ("build image") 
        {
            steps {
                script {
                    dockerImage = docker.build registry
                      dockerImage.tag("$BUILD_NUMBER")
                    }
                }
        }
        
        stage ("upload ECR") {
            steps {
                script {
                    sh "aws ecr get-login-password --region us-east-2 | docker login --username AWS --password-stdin account_id.dkr.ecr.us-east-2.amazonaws.com"
                sh 'docker push account_id.dkr.ecr.us-east-1.amazonaws.com/coachak/my-docker-repo:$BUILD_NUMBER'
                }
            }
        }
        
    // Avoid latest tag image and pass build ID dynamically from Jenkins pipeline
       stage('K8S Deploy') {
        steps{   
            script {
                withKubeConfig([credentialsId: 'K8S', serverUrl: '']) {
                echo "Current build number is: ${env.BUILD_ID}"
               // Replace the placeholders in the deployment.yaml file 
                sh """ 
                sed -i 's/\${BUILD_NUMBER}/${env.BUILD_ID}/g' k8s-deployment.yaml
                """ 
                sh ('kubectl apply -f  k8s-deployment.yaml -n springboot-app-ns')
                }
            }
        }
       }
    }    
}

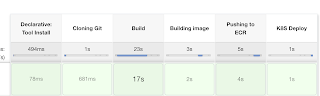
Step # 4 - Build the pipeline


Step # 5 - Verify deployments to EKS

kubectl get pods


kubectl get deployments
kubectl get services


Steps # 6 - Access Python App in K8S cluster
Once deployment is successful, go to browser and enter above load balancer URL 

You should see page like below:


Sunday, October 27, 2024

Deploy Springboot Microservices App into Amazon EKS Cluster using Jenkins Pipeline and Kubectl CLI Plug-in | Containerize Springboot App and Deploy into EKS Cluster using Jenkins Pipeline

 We will learn how to create CICD pipeline to deploy springboot microservices using Jenkins pipeline into EKS Cluster with help of Kubernetes CLI plug-in.

We will use Springboot Microservices based Java application. I have already created a repo with source code + Dockerfile. The repo also have Jenkinsfile for automating the following:

- Automating builds using Jenkins Pipeline
- Automating Docker image creation and tagging
- Automating Docker image upload into AWS ECR
- Automating Docker Containers Deployments to Kubernetes Cluster


Watch steps in YouTube channel:


Same Code for this video is here:

Pre-requisites:
1. Amazon EKS Cluster is setup and running. Click here to learn how to create Amazon EKS cluster.
5. Docker, Docker pipeline and Kubernetes CLI plug-ins are installed in Jenkins

Install Kubernetes CLI plug-in:

6. Install kubectl on your instance

Step # 1 - Create Maven3 variable under Global tool configuration in Jenkins
Make sure you create Maven3 variable under Global tool configuration. 


Step #2 - Create Credentials for connecting to Kubernetes Cluster using kubeconfig
Click on Add Credentials, use Kubernetes configuration from drop down.

use secret file from drop down.


execute the below command to login as jenkins user.
sudo su - jenkins

you should see the nodes running in EKS cluster.

kubectl get nodes


Create namespace to deploy the containers
kubectl create namespace springboot-app-ns
kubectl get ns


Execute the below command to get kubeconfig info, copy the entire content of the file:
cat /var/lib/jenkins/.kube/config


Open your text editor or notepad, copy and paste the entire content and save in a file.
We will upload this file.

Enter ID as K8S and choose File and upload the file and save.


Enter ID as K8S and choose enter directly and paste the above file content and save.

Step # 3 - Create a pipeline in Jenkins
Create a new pipeline job.


Step # 4 - Copy the pipeline code from below
Make sure you change red highlighted values below as per your settings:
Your docker user id should be updated.
your registry credentials ID from Jenkins from step # 1 should be copied

pipeline {
   tools {
        maven 'Maven3'
    }
    agent any
    environment {
        registry = "account_id.dkr.ecr.us-east-1.amazonaws.com/coachak/my-docker-repo"
    }
   
    stages {
        stage('Cloning Git') {
            steps {
                checkout([$class: 'GitSCM', branches: [[name: '*/main']], doGenerateSubmoduleConfigurations: false, extensions: [], submoduleCfg: [], userRemoteConfigs: [[credentialsId: '', url: 'https://github.com/akannan1087/springboot-app']]])     
            }
        }
      stage ('Build') {
          steps {
            sh 'mvn clean install'           
            }
      }
    // Building Docker images
    stage('Building image') {
      steps{
        script {
          dockerImage = docker.build registry 
          dockerImage.tag("$BUILD_NUMBER")
        }
      }
    }
   
    // Uploading Docker images into AWS ECR
    stage('Pushing to ECR') {
     steps{  
         script {
                sh 'aws ecr get-login-password --region us-east-1 | docker login --username AWS --password-stdin account_id.dkr.ecr.us-east-1.amazonaws.com'
                sh 'docker push account_id.dkr.ecr.us-east-1.amazonaws.com/coachak/my-docker-repo:$BUILD_NUMBER'
         }
        }
      }
    // Avoid latest tag image and pass build ID dynamically from Jenkins pipeline
       stage('K8S Deploy') {
        steps{   
            script {
                withKubeConfig([credentialsId: 'K8S', serverUrl: '']) {
                echo "Current build number is: ${env.BUILD_ID}"
               // Replace the placeholders in the deployment.yaml file 
                sh """ 
                sed -i 's/\${BUILD_NUMBER}/${env.BUILD_ID}/g' eks-deploy-k8s.yaml
                """ 
                sh ('kubectl apply -f  eks-deploy-k8s.yaml -n springboot-app-ns')
                }
            }
        }
       }
    }
}

Step # 5 - Build the pipeline
Once you create the pipeline and changes values per your configuration, click on Build now:


Step # 6 - Verify deployments to K8S

kubectl get deployments -n springboot-app-ns


kubectl get pods -n springboot-app-ns


kubectl get services -n springboot-app-ns


If you see any errors after deploying the pods, you can check the pod logs.
kubectl logs <pod_name> -n spring-app-ns

Steps # 7 - Access SpringBoot App in K8S cluster
Once build is successful, go to browser and enter master or worker node public ip address along with port number mentioned above
http://loadbalancer_ip_address

You should see page like below:


Note:

and make changes in eks-deploy-k8s.yaml to pull Docker image from your AWS ECR repo.

Wednesday, March 20, 2024

How to Setup Self-Hosted Linux Docker Build Agent in Azure DevOps | How to configure Self-Hosted Linux Docker Agents in Azure Pipelines | Create Custom Build Agents in Azure DevOps

 Let us learn how to configure a self-hosted agent using Docker in Azure DevOps pipelines.

What is an Agent?

An agent is computing infrastructure with installed agent software that runs one job at a time.To build your code or deploy your software using Azure Pipelines, you need at least one agent. As you add more code and people, you'll eventually need more.

When your pipeline runs, the system begins one or more jobs. 


In Azure pipelines, there are two types of build agents:

  1. Microsoft-hosted agents - This is a service totally managed by Microsoft and it's cleared on every execution of the pipeline (on each pipeline execution, you have a fresh new environment).
  2. Self-hosted agents - This is a service that you can to set up and manage by yourself. This can be a custom virtual machine on Azure or a custom on-premise machine inside your infrastructure. In a self-hosted agent, you can install all the software you need for your builds, and this is persisted on every pipeline execution. A self-hosted agent can be on Windows, Linux, macOS, or in a Docker container.

You can set up a self-hosted agent in Azure Pipelines to run inside a Windows Server Core (for Windows hosts), or Ubuntu container (for Linux hosts) with Docker. We will learn in this article on how to host Ubuntu Docker container on Linux machines.

Pre-requisites:
How to configure Self-hosted docker build agent?

1. Go to Azure DevOps dashboard - https://dev.azure.com/
2. Select your project dashboard
3. Go to your project settings
4. Click on Agent pools


Create a new Agent pool name

Enter name as myAgentPool or any name
Make sure you select Grant access permission to all pipelines


Login to Azure VM where the docker build agents will be running.

Step #1 - Install Docker CLI so we can build docker image

sudo apt update && sudo apt install docker.io -y

Step #2 - Add logged in user to docker group
sudo usermod -a -G docker $USER

Step #3 - Clone repo which has Dockerfile

git clone https://github.com/akannan1087/ado-docker-agent-repo.git

Sample dockerfile is here.. please feel free to add any software in the docker agent.
FROM ubuntu:22.04

RUN apt update -y && apt upgrade -y && apt install curl git jq libicu70 maven -y

# Also can be "linux-arm", "linux-arm64".
ENV TARGETARCH="linux-x64"

WORKDIR /azp/

COPY ./start.sh ./
RUN chmod +x ./start.sh

# Create agent user and set up home directory
RUN useradd -m -d /home/agent agent
RUN chown -R agent:agent /azp /home/agent

USER agent
# Another option is to run the agent as root.
# ENV AGENT_ALLOW_RUNASROOT="true"

ENTRYPOINT ./start.sh

Step #4 - change directory
cd ado-docker-agent-repo/azp-agent-in-docker/

Step #5 - Build the Docker image
sudo docker build --tag "azp-agent:linux" --file Dockerfile .

Step #6: Run the agent as a container
Run the below command:

sudo docker run -e AZP_URL="https://dev.azure.com/your_org_name" -e AZP_TOKEN="XXXX" -e AZP_POOL=myAgentPool -e AZP_AGENT_NAME="myLinuxDockerBuildAgent" --name "azp-agent" azp-agent:linux

that's it, docker agent is successfully started.

Step #7: Verify if docker agent is running or not
Run the below command:
sudo docker ps


Check the status of build Agent
Click on agentPool name, click on Agents

This confirms that Build agent is successfully configured in Azure DevOps and is available to run builds.

How to use the Docker build agent in your pipelines?

Please use the docker agent in the classic pipeline like below: select the agentPool


run the job. now you can see the jobs under myAgentPool--> Jobs
 

Here is the sample pipeline YAML code for automating Maven build for a Java project:

trigger:
- main
pool:
name: myAgentPool
stages:
- stage: Build
displayName: Build stage
jobs:
- job: MavenPackageAndPublishArtifacts
displayName: Maven Package and Publish Artifacts
steps:
- task: Maven@3
displayName: 'Maven Package'
inputs:
mavenPomFile: 'MyWebApp/pom.xml'

References:

Watch steps in YouTube channel:

Monday, January 16, 2023

How to Setup Self Hosted Linux Agent in Azure DevOps | How to configure Self Hosted Agent for Azure Pipelines | Create Build Agent in Azure Cloud

Let us learn how to create and configure a Self-Hosted Agent in Azure DevOps (ADO).

What is an Agent?

An agent is computing infrastructure with installed agent software that runs one job at a time.

To build your code or deploy your software using Azure Pipelines, you need at least one agent. As you add more code and people, you'll eventually need more.

When your pipeline runs, the system begins one or more jobs. 


In Azure pipelines, there are two types of build agents:

  1. Microsoft-hosted agents - This is a service totally managed by Microsoft and it's cleared on every execution of the pipeline (on each pipeline execution, you have a fresh new environment).
  2. Self-hosted agents - This is a service that you can to set up and manage by yourself. This can be a custom virtual machine on Azure or a custom on-premise machine inside your infrastructure. In a self-hosted agent, you can install all the software you need for your builds, and this is persisted on every pipeline execution. A self-hosted agent can be on Windows, Linux, macOS, or in a Docker container.
Pre-requisites:

Watch Steps in YouTube channel:

How to configure Self-hosted build agent?

1. Go to Azure DevOps dashboard - https://dev.azure.com/
2. Select your project dashboard
3. Go to your project settings
4. Click on Agent pools


Create a new Agent pool name

Enter name as Ubuntu18-VM-Pool or any name
Make sure you select Grant access permission to all pipelines
click on Ubuntu18-VM-Pool, Agents, New agent


Click on Linux

Note down the steps to configure Linux build agent.
Login to your Azure VM now.

Step #1 - Create the Agent
mkdir myagent && cd myagent

Step #2 - Download the agent
wget https://vstsagentpackage.azureedge.net/agent/2.214.1/vsts-agent-linux-x64-2.214.1.tar.gz


Step #3 - Configure the Agent
tar zxvf vsts-agent-linux-x64-2.214.1.tar.gz


List the files in the directory after extracting.
ls -al


Step #4:
Run the below command:
./config.sh


Accept the Team Explorer Everywhere license agreement now?
Type Y and enter
Step #5:
Enter server URL >
https://dev.azure.com/yourorganization

Step #6:
Enter authentication type (press enter for PAT) > PAT

Step #7:
Enter personal access token, generated from this step

Step #8:
Enter Agent pool
Give some name

Step #9:
Enter Agent name --> myBuildAgent_1

Step #10:
Enter work folder > enter

that's it agent is successfully configured.

Configure the Agent to run as a Service

sudo ./svc.sh install &

Execute now to run as a service
./runsvc.sh &

Check the status of build Agent
Click on Ubuntu-18-VM pool name
Click on Agents

This confirms that Build agent is successfully configured in Azure DevOps and is available to run builds.

Steps for removing Agent from the agent pool
Remove the service first
sudo ./svc.sh uninstall


./config.sh remove

To Perform Java related builds on this Agent, make sure you install Java and Maven on this VM.

Install Java 11
sudo apt-get install default-jdk -y

Maven Installation
Maven is a popular build tool used for building Java applications. Please click here to learn more about Maven. You can install Maven by executing below command:

sudo apt update && sudo apt install maven -y

Check if Maven got installed

mvn --version

Master DevSecOps and Multi Cloud Computing Course by Coach AK | DevSecOps and Cloud Computing Online Classes | Sep 2025 Schedule

  Master DevSecOps and cloud Computing Bootcamp Schedule for Sep 2025 Are you ready to  supercharge your career  in  DevSecOps ? Whether you...