Showing posts with label Java. Show all posts

Thursday, February 22, 2024

Maven Build compilation Error | Failed to execute goal org.apache.maven.plugins:maven-war-plugin:2.2:war

When you are using Java 17 and trying to compile your Java project using Maven, you may experience this error. this is due to version incompatible issue of maven war plug-in.


you can upgrade your Java version in Jenkins by executing below command:
sudo apt install openjdk-17-jdk -y

or you can follow steps to setup Jenkins with Java 17.

Fix in your Java Web App:

Add following plug-in to pom.xml of your Java Project to fix the build issue:

  <build>
    <finalName>MyWebApp</finalName>
     <plugins>
        <plugin>
          <groupId>org.apache.maven.plugins</groupId>
          <artifactId>maven-war-plugin</artifactId>
          <version>3.3.1</version>
        </plugin>
      </plugins>

  </build>
</project>

Save the pom.xml and re-run the build.


Saturday, February 10, 2024

Ansible Role for Java 17 Installation on Ubuntu - Ansible Role to Install Java on Ubuntu 22.0.4

1. Login to Ansible management server/machine. Create SSH keys in Ansible host machine by executing the below command: (if you already have keys created, please skip this step)

ssh-keygen 

enter three times..now you will see keys successfully created.
2.  Execute the below command on Ansible management node and copy the public key content:
sudo cat ~/.ssh/id_rsa.pub

copy the above output.
3. Now login to target node, execute the below command to open the file
sudo vi /home/ubuntu/.ssh/authorized_keys
type shift A and then enter now 
    and paste the key in the above file. please do not delete any existing values in this file.

4. Now go back to Ansible mgmt node, do changes in /etc/ansible/hosts file to include the node you will be installing software. Make sure you add public IP address of target node as highlighted below in red color:
sudo vi /etc/ansible/hosts
[My_Group]  
xx.xx.xx.xx ansible_ssh_user=ubuntu ansible_ssh_private_key_file=~/.ssh/id_rsa  ansible_python_interpreter=/usr/bin/python3

5. let's make sure Ansible Control node is able to connect to target node

ansible -m ping all

ansible all -a "whoami"


6. make changes in Ansible Role as given below,
cd ~/roles

sudo vi aws-infra-role/tasks/installJava17.yml

---
    - name: Task - 1 Update APT package manager repositories cache
      become: true
      apt:
        update_cache: yes
    - name: Task -2 Install Java using Ansible
      become: yes
      apt:
        name: "{{ packages }}"
        state: present
      vars:
        packages:
           - openjdk-17-jdk

7. Create Ansible main playbook

sudo vi aws-infra-role/setup-jenkins.yml
---
# This Playbook creates infra in aws cloud

- hosts: My_Group
  gather_facts: False
  tags: jenkins creation

  tasks:
  - include: tasks/installJava17.yml

8. Execute Ansible Role
ansible-playbook aws-infra-role/setup-jenkins.yml

now after successfully executing, enter below command to make sure Java is installed in target node:

java -version
openjdk version "17.0.7" 2020-04-14
OpenJDK Runtime Environment (build 11.0.7+10-post-Ubuntu-2ubuntu218.04)
OpenJDK 64-Bit Server VM (build 11.0.7+10-post-Ubuntu-2ubuntu218.04, mixed mode, sharing)

Wednesday, January 17, 2024

Install Jenkins on Ubuntu 24.0.4 | Setup Jenkins on Linux instance | How to setup Jenkins in Ubuntu EC2 instance using Java 21?

Jenkins is an open source continuous integration/continuous delivery and deployment (CI/CD) automation software DevOps tool written in the Java programming language. It is used to implement CI/CD workflows, called pipelines.


Please follow the steps to install Java, Jenkins, Maven on Ubuntu 24.0.4 instance. Jenkins, Maven are Java based applications, so we need to install Java first. 

Pre-requisites:
  •  at least memory should be t2.medium (4 GB RAM)
  • port 8080 opened in firewall rule to access Jenkins
  • Connect to EC2 instance using git bash or iTerm

Change Host Name to Jenkins
sudo hostnamectl set-hostname Jenkins

Perform update first
sudo apt update

Install Java 21
sudo apt install openjdk-21-jre -y

Verify Java Version
java -version

Maven Installation
Maven is a popular build tool used for building Java applications. Please click here to learn more about Maven. You can install Maven by executing below command:

sudo apt install maven -y

you can type mvn --version
you should see the below output.


Now lets start Jenkins installation

Jenkins Setup

Add Repository key to the system
sudo wget -O /etc/apt/keyrings/jenkins-keyring.asc https://pkg.jenkins.io/debian-stable/jenkins.io-2026.key

Append debian package repo address to the system
echo "deb [signed-by=/etc/apt/keyrings/jenkins-keyring.asc]" \
  https://pkg.jenkins.io/debian-stable binary/ | sudo tee \
  /etc/apt/sources.list.d/jenkins.list > /dev/null


Update Ubuntu package
sudo apt update
Install Jenkins
sudo apt install jenkins -y


The above screenshot should confirm that Jenkins is successfully installed.

Access Jenkins in web browser

Now Go to AWS console. Click on EC2, click on running instances link. Select the checkbox of EC2 you are installing Java and Jenkins. Click on Action. Copy the value from step 4 that says --> Connect to your instance using its Public DNS:

Now go to browser. enter public dns name or public IP address with port no 8080.

Unlock Jenkins
You may get screen, enter the below command in Git bash( Ubuntu console)
Get the initial password from the below file
sudo cat /var/lib/jenkins/secrets/initialAdminPassword


Copy the password and paste in the browser.
Then click on install suggested plug-ins. 
Also create user name and password.
enter everything as admin. at least user name as admin password as admin
Click on Save and Finish. Click on start using Jenkins. Now you should see a screen like below:


That's it. You have setup Jenkins successfully 😊
Please watch the steps in our YouTube channel:

Friday, June 9, 2023

Install Jenkins on Ubuntu 24.0.4 in Azure VM | Setup Jenkins on Azure Linux instance | How to setup Jenkins in Ubuntu Virtual Machine running in Azure Cloud?

Jenkins is an open source continuous integration/continuous delivery and deployment (CI/CD) automation software DevOps tool written in the Java programming language. It is used to implement CI/CD workflows, called pipelines.


Please follow the steps to install Java, Jenkins, Maven on Ubuntu 24.0.4 instance. Jenkins, Maven are Java based applications, so we need to install Java first. 

Pre-requisites:

Change Host Name to Jenkins
sudo hostnamectl set-hostname Jenkins

Perform update first
sudo apt update

Install Java 11
sudo apt install default-jdk -y

 
Once install java, enter the below command

Verify Java Version
java -version

Maven Installation
Maven is a popular build tool used for building Java applications. Please click here to learn more about Maven. You can install Maven by executing below command:

sudo apt install maven -y

you can type mvn --version
you should see the below output.


Now lets start Jenkins installation

Jenkins Setup

Add Repository key to the system
sudo wget -O /etc/apt/keyrings/jenkins-keyring.asc https://pkg.jenkins.io/debian-stable/jenkins.io-2026.key


Append debian package repo address to the system
echo "deb [signed-by=/etc/apt/keyrings/jenkins-keyring.asc]" \
  https://pkg.jenkins.io/debian-stable binary/ | sudo tee \
  /etc/apt/sources.list.d/jenkins.list > /dev/null


Update Ubuntu package
sudo apt update
Install Jenkins
sudo apt install jenkins -y


The above screenshot should confirm that Jenkins is successfully installed.

Access Jenkins in web browser

Now Go to Azure Portal console. Click on Jenkins VM, Copy the public IP address.
 

Now go to browser. enter public IP address with port no 8080.

Unlock Jenkins
You may get screen, enter the below command in Git bash( Ubuntu console)
Get the initial password from the below file
sudo cat /var/lib/jenkins/secrets/initialAdminPassword


Copy the password and paste in the browser.
Then click on install suggested plug-ins. 
Also create user name and password.
enter everything as admin. at least user name as admin password as admin
Click on Save and Finish. Click on start using Jenkins. Now you should see a screen like below:


That's it. You have setup Jenkins successfully. 

Please watch the steps in our YouTube channel:    

Thursday, March 30, 2023

Install Jenkins on Ubuntu 22.0.4 | Setup Jenkins on AWS EC2 Ubuntu instance | How to setup Jenkins in Ubuntu EC2 instance?

Jenkins is an open source, continuous integration/continuous delivery and deployment (CI/CD) automation software DevOps tool written in the Java programming language. It is used to implement CI/CD workflows, called pipelines


Please follow the steps to install Java, Jenkins, Maven on Ubuntu 22.0.4 instance. Jenkins, Maven are Java based applications, so we need to install Java first. 

Pre-requisites:
  • EC2 instance is up and running
  • port 8080 is open in firewall rule
  • connect to EC2 instance using Git bash or item or any SSH terminal
Steps to install Jenkins:

Change Host Name to Jenkins
sudo hostnamectl set-hostname Jenkins

Perform update first
sudo apt update

Install Java 11
sudo apt install default-jdk -y

 
Once install java, enter the below command

Verify Java Version
java -version

Maven Installation
Maven is a popular build tool used for building Java applications. Please click here to learn more about Maven. You can install Maven by executing below command:

sudo apt install maven -y

you can type mvn --version
you should see the below output.


Now lets start Jenkins installation

Jenkins Setup

Add Repository key to the system
curl -fsSL https://pkg.jenkins.io/debian/jenkins.io-2023.key | sudo tee \
  /usr/share/keyrings/jenkins-keyring.asc > /dev/null

Append debian package repo address to the system
echo deb [signed-by=/usr/share/keyrings/jenkins-keyring.asc] \
  https://pkg.jenkins.io/debian binary/ | sudo tee \
  /etc/apt/sources.list.d/jenkins.list > /dev/null


Update Ubuntu package
sudo apt update
Install Jenkins
sudo apt install jenkins -y


The above screenshot should confirm that Jenkins is successfully installed.

Access Jenkins in web browser

Now Go to AWS console. Click on EC2, click on running instances link. Select the checkbox of EC2 you are installing Java and Jenkins. Click on Action. Copy the value from step 4 that says --> Connect to your instance using its Public DNS:
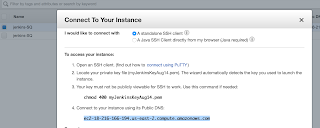
Now go to browser. enter public dns name or public IP address with port no 8080.

Unlock Jenkins
You may get screen, enter the below command in Git bash( Ubuntu console)
Get the initial password from the below file
sudo cat /var/lib/jenkins/secrets/initialAdminPassword


Copy the password and paste in the browser.
Then click on install suggested plug-ins. 
Also create user name and password.
enter everything as admin. at least user name as admin password as admin
Click on Save and Finish. Click on start using Jenkins. Now you should see a screen like below:


That's it. You have setup Jenkins successfully. Please watch the steps in our YouTube channel:

Sunday, November 29, 2020

How to fix Jenkins Error | Incorrect Java 11 version

You may have this issue when trying to install Jenkins with default JDK version(Java 11) in Ubuntu 18.0.4. We need to fix by installing JDK 8.

Remove Jenkins first.

sudo apt-get remove jenkins -y
 

Install Java 8 version

sudo apt-get install openjdk-8-jdk -y


Now choose which version to select from both Java 11 and Java 8 
sudo update-alternatives --config java
type 2 to choose Java 8 version.

Check Java version after setting:

Install Jenkins

sudo apt-get install jenkins -y
Now try to access Jenkins in the browser.

Complete AI-Enabled DevOps Learning Roadmap for 2026 | Skills Required to Become a Modern DevSecOps Engineer

🚀  AI-Enabled DevOps Engineer Roadmap for 2026 The future belongs to AI-Enabled DevOps Engineers, not AI-only Engineers. Strong DevOps fund...