Showing posts with label RedHat Linux. Show all posts

Tuesday, August 22, 2023

How to create Red Hat Linux Virtual Machine (VM) in Azure? | Create Red Hat Linux VM in Azure | How to connect to Azure VM from your local machine

How to Create Red Hat Linux Virtual Machines(VM) in Azure Cloud? 

Creating Virtual Machine is easy and straight forward in Azure Cloud. Let us see how to do that in Azure portal. 

Watch Steps in YouTube channel:

Pre-requisites:

  • Azure account subscription, click here if you don't have one.
  • SSH client such as Git bash, putty or iTerm(mac os)
Steps to create Red Hat Linux Virtual Machine in Azure
 
1. Login to Azure portal, go to https://portal.azure.com/
2. Click on Virtual Machines.

3. Click on Add/Create virtual machine. 


Enter resource group name, select region.


4. Select security type as Standard
5. Now enter the details as below or give values per your subscription and requirements. Select Red Hat Enterprise Linux 8.x VM from the drop down.


6. choose authentication type as SSH public key, enter azureuser as user name, enter key pair name.
This step will eventually create SSH keys and allow you to download in your machine.


7. Under Networking


Go with Allow selected ports - SSH port 22
And also select Delete public IP and NIC when VM is deleted option


8. Under Monitoring, disable Boot diagnostics

9. Click on Review, it may take a few mins to finish the validations. If all good, it should pass the validations. Click on Create.

10.  Now download the SSH keys and save it locally.
 

11. Once created, Click on virtual machines.

12. You should see the new VM is running like below:


How to connect to Azure VM from your local machine?


1. Now select that instance, click on connect


2.Then choose SSH 


3. Enter ssh key name in private key path 
4. Copy the value as it shows below in your local terminal(iTerm for Apple laptop) or Git bash for Windows laptop.

5. Make sure your SSH keys is not accessible by others, by executing the below command:

chmod 400 myUbuntuVM_key.pem
6. Now ssh into VM from your local machine using the key

ssh -i myUbuntuVM_key.pem azureuser@your_ip_address


Now it should show you that you are connected to Azure.

Sunday, August 6, 2023

How to install Terraform on RedHat Linux OS | Install Terraform on CentOS/Red Hat Linux(RHEL) | TerraForm Installation on Linux


Terraform is an open source infrastructure as code (IaC) tool developed by HashiCorp. It allows you to define, manage, and provision infrastructure resources in a cloud or on-premises environment using declarative configuration files. Terraform maintains the state of the infrastructure in a state file. 

Please find the steps for installing Terraform On Red Hat Enterprise Linux or CentOS in AWS cloud.

Pre-requisites:

Red Hat EC2 instance is already up and running

Go to HashiCorp Website

Copy steps for Linux under CentOS/RHEL


sudo yum install -y yum-utils
sudo yum-config-manager --add-repo https://rpm.releases.hashicorp.com/RHEL/hashicorp.repo
sudo yum -y install terraform

Check Terraform version
terraform -version


this should show version of Terraform. As of Aug 3, 2023 version was
 
Terraform v1.5.4

Please watch the above steps in action below:

Thursday, August 3, 2023

How to provision Red Hat Linux EC2 Instance in AWS | How to create EC2 instance in AWS console | Launch Red Hat Instance in AWS

How to create a Red Hat Linux EC2 instance in AWS console using new UI experience?

What is EC2 instance? 

It is virtual server provided by AWS.  Please follow the below steps to create an Red Hat Linux EC2 instance.

Pre-requisites:

Steps:
1: Login to AWS console by clicking this link -->  https://aws.amazon.com/console/
click on All services, Click on Compute -->  Click on EC2


2. Click on Launch instance


3. Enter Name as EC2 and enter 1 as number of instance


4. Select Red Hat and choose Red Hat Enterprise Linux


5. Enter t2.small as instance type
6. Click on Create new Key Pair


7. Choose the existing key pair if you have one, otherwise create new one, give some name as myJenkinsKey. Make sure you download the key in your local machine. Please do NOT give space or any character while naming the key.


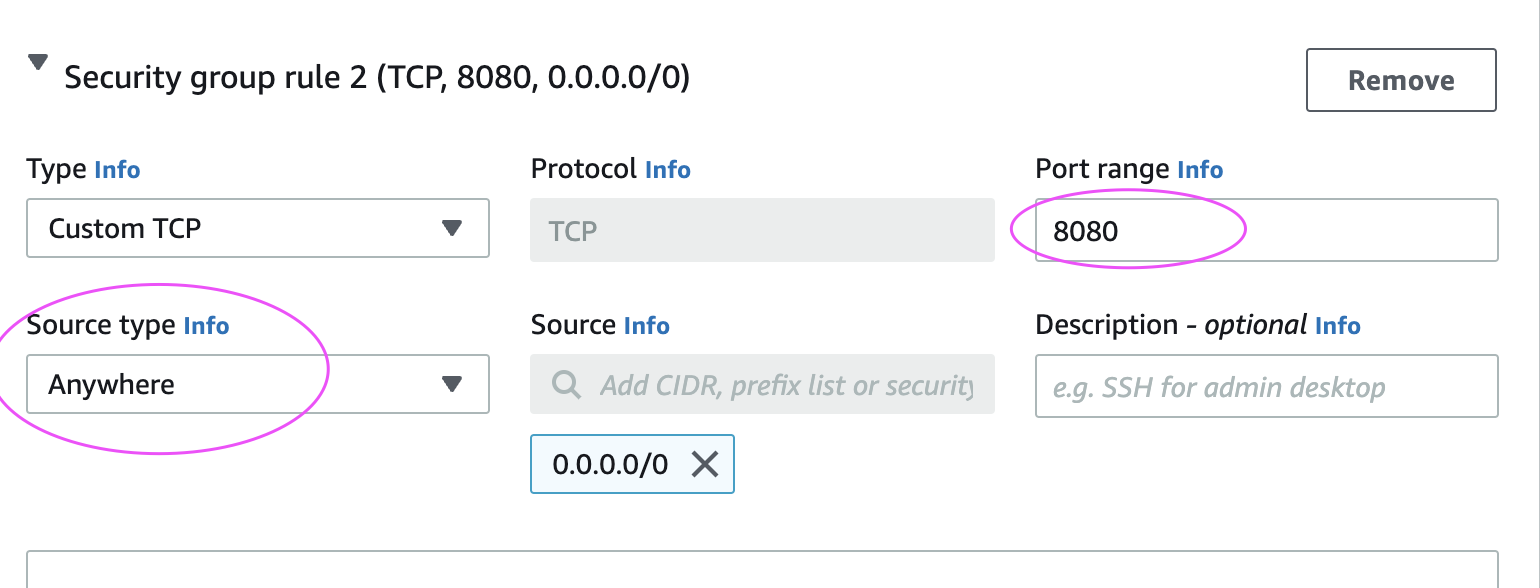
8. Under Network settings, Click Edit


Add port range as 8080 and select AnyWhere as Source Type, that should enter 0.0.0.0/0 as Source

9. Configure Storage
Enter 15 GB as root volume 


And then make sure in Summary, values appear as below:


10. Click on Launch Instance.

Click on View instances

Now you should be able to view instance in AWS console. 

Please follow steps below to connect to EC2 instance from your local machine.

Connect to EC2 instance from local machine:
Please click the below link to understand the steps for connecting to EC2 instance from your local machine - windows or Apple laptop.

http://www.cidevops.com/2018/02/how-to-connect-to-ec2-instance-from.html

Watch Steps in YouTube channel:

๐Ÿš€ Live AI-Enabled DevSecOps & Cloud Engineering Bootcamp – Sep 2026

Live AI-Enabled DevSecOps & Cloud Engineering Bootcamp from Coach AK - Sep 2026 Schedule