We will learn how to build Docker image for a springboot app and upload the Docker image into Azure Container Registry(ACR) using Azure YAML pipelines.

1. Azure subscription
2. Azure DevOps project dashboard in https://dev.azure.com/
3. Dockerfile created along with the application source code
Create Resource Group
Make sure you are login to Azure portal first.
az login
Execute below command to create a resource group in Azure portal.az group create --name myResourceGroup --location southcentralus
How to Create Azure Container Registry?
Run the below command to create your own private container registry using Azure Container Registry (ACR).
az acr create --resource-group myResourceGroup --name myacrrepo31 --sku Standard --location southcentralus
You can login to Azure portal to see the ACR repo.
How to create Azure Build YAML Pipeline
1. Login into your Azure DevOps dashboard
2. Click on Pipelines.

3. Click on New Pipeline

5. Enter your repo name and branch name where you have stored your source code along with Dockerfile.
Type docker as name and select the below repo

7. Choose the subscription


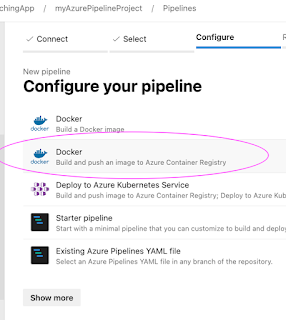
6. Click on Continue. Now choose the template by typing Docker, Select below task and Apply.

7. Choose the subscription

Click on Continue
Enter Microsoft credentials.
Now choose ACR repo and enter name for the image and select the path for Dockerfile

Click on Validate and configure.
# Create a Jar file using Maven
# Create a docker image and push the image to Azure Container Registry
# https://docs.microsoft.com/azure/devops/pipelines/languages/docker
trigger:
- master
resources:
- repo: self
variables:
# Container registry service connection established during pipeline creation
dockerRegistryServiceConnection: 'sdsd4'
imageRepository: 'mypythondockerrepo'
containerRegistry: 'myacrrep31.azurecr.io'
dockerfilePath: '$(Build.SourcesDirectory)/Dockerfile'
tag: '$(Build.BuildId)'
vmImageName: 'ubuntu-latest'
stages:
- stage: Build
displayName: Build and push stage
jobs:
- job: Build
displayName: Build
pool:
vmImage: $(vmImageName)
steps:
- task: Maven@4
inputs:
mavenPomFile: 'pom.xml'
publishJUnitResults: true
testResultsFiles: '**/surefire-reports/TEST-*.xml'
javaHomeOption: 'JDKVersion'
mavenVersionOption: 'Default'
mavenAuthenticateFeed: false
effectivePomSkip: false
sonarQubeRunAnalysis: false
- task: Docker@2
displayName: Build and push an image to container registry
inputs:
command: buildAndPush
repository: $(imageRepository)
dockerfile: $(dockerfilePath)
containerRegistry: $(dockerRegistryServiceConnection)
tags: |
$(tag)

Now click Save + run and run to start Building the pipeline. Now check the status of the pipeline.

Once the build is completed, you should be able to see the Docker images under
Services --> Repositories

Clean up resources in Azure Cloud:
az group delete --resource-group MyResourceGroup
This should clean up resources in Azure cloud..
Watch Steps in YouTube channel:
Watch Steps in YouTube channel:


