🔴 FREE LIVE WEBINAR
How to Become a DevOps Engineer in 2027
From Zero to DevOps Champion!
November 21st, 2026
9:30 AM CST
Live DevSecOps CI/CD Demo
Career Roadmap • Live Q&A
REGISTER FOR FREE →
100% FREE • Live on Zoom
🎁 FREE CAREER GUIDE
2027 AI-Enabled DevSecOps Career Roadmap
Your Career Journey Starts Here!
📘
9-Stage Learning Roadmap
15-Week Study Plan
8-Page PDF + 12 Interview Q&As
GET FREE ROADMAP →
100% FREE • Delivered to Your Inbox
🚀 NEW WEEKEND BATCH
AI-Enabled DevSecOps & Cloud Engineering Bootcamp
Starts December 5th, 2026
Sat: 9:30 AM – 11:30 AM CST
Sun: 10:30 AM – 12:30 PM CST

15 Weeks • 70+ Labs • Live Training
REGISTER FOR BOOTCAMP → Explore Bootcamp →
Enrollment Open!
3,500+ Students Trained
25+ Years of IT Experience
70+ Hands-On Labs
🔴 Free Webinar Register Free
🎁 Free Roadmap Get Roadmap
🚀 Weekend Batch Enroll Now →

Monday, January 16, 2023

How to Setup Self Hosted Linux Agent in Azure DevOps | How to configure Self Hosted Agent for Azure Pipelines | Create Build Agent in Azure Cloud

Let us learn how to create and configure a Self-Hosted Agent in Azure DevOps (ADO).

What is an Agent?

An agent is computing infrastructure with installed agent software that runs one job at a time.

To build your code or deploy your software using Azure Pipelines, you need at least one agent. As you add more code and people, you'll eventually need more.

When your pipeline runs, the system begins one or more jobs. 


In Azure pipelines, there are two types of build agents:

  1. Microsoft-hosted agents - This is a service totally managed by Microsoft and it's cleared on every execution of the pipeline (on each pipeline execution, you have a fresh new environment).
  2. Self-hosted agents - This is a service that you can to set up and manage by yourself. This can be a custom virtual machine on Azure or a custom on-premise machine inside your infrastructure. In a self-hosted agent, you can install all the software you need for your builds, and this is persisted on every pipeline execution. A self-hosted agent can be on Windows, Linux, macOS, or in a Docker container.
Pre-requisites:

Watch Steps in YouTube channel:

How to configure Self-hosted build agent?

1. Go to Azure DevOps dashboard - https://dev.azure.com/
2. Select your project dashboard
3. Go to your project settings
4. Click on Agent pools


Create a new Agent pool name

Enter name as Ubuntu18-VM-Pool or any name
Make sure you select Grant access permission to all pipelines
click on Ubuntu18-VM-Pool, Agents, New agent


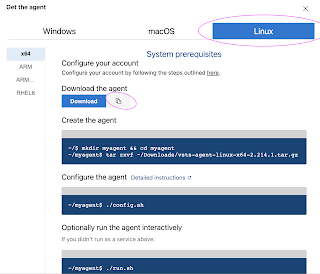
Click on Linux

Note down the steps to configure Linux build agent.
Login to your Azure VM now.

Step #1 - Create the Agent
mkdir myagent && cd myagent

Step #2 - Download the agent
wget https://vstsagentpackage.azureedge.net/agent/2.214.1/vsts-agent-linux-x64-2.214.1.tar.gz


Step #3 - Configure the Agent
tar zxvf vsts-agent-linux-x64-2.214.1.tar.gz


List the files in the directory after extracting.
ls -al


Step #4:
Run the below command:
./config.sh


Accept the Team Explorer Everywhere license agreement now?
Type Y and enter
Step #5:
Enter server URL >
https://dev.azure.com/yourorganization

Step #6:
Enter authentication type (press enter for PAT) > PAT

Step #7:
Enter personal access token, generated from this step

Step #8:
Enter Agent pool
Give some name

Step #9:
Enter Agent name --> myBuildAgent_1

Step #10:
Enter work folder > enter

that's it agent is successfully configured.

Configure the Agent to run as a Service

sudo ./svc.sh install &

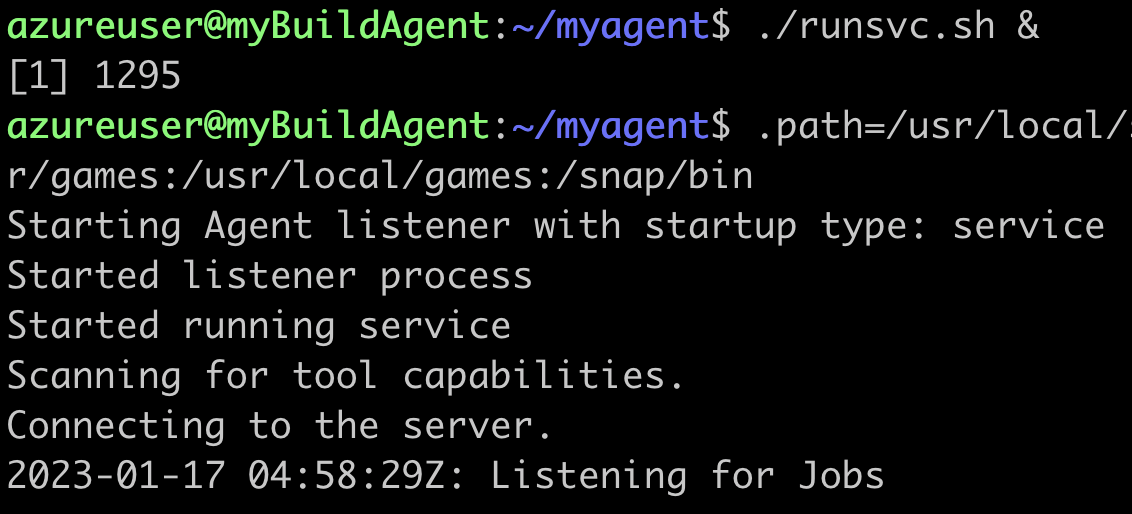
Execute now to run as a service
./runsvc.sh &

Check the status of build Agent
Click on Ubuntu-18-VM pool name
Click on Agents

This confirms that Build agent is successfully configured in Azure DevOps and is available to run builds.
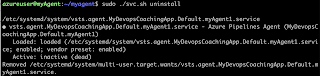
Steps for removing Agent from the agent pool
Remove the service first
sudo ./svc.sh uninstall


./config.sh remove

To Perform Java related builds on this Agent, make sure you install Java and Maven on this VM.

Install Java 11
sudo apt-get install default-jdk -y

Maven Installation
Maven is a popular build tool used for building Java applications. Please click here to learn more about Maven. You can install Maven by executing below command:

sudo apt update && sudo apt install maven -y

Check if Maven got installed

mvn --version

Monday, January 2, 2023

Ansible playbook for AWS S3 bucket creation | How to create S3 bucket using Ansible in AWS Cloud

We will learn how to create new S3 bucket using Ansible playbook and automate the execution using Jenkins Pipeline. 


Pre-requisites:


  • Playbook for creating new S3 bucket needs to be created but you can refer my GitHub Repo

Ansible playbook for AWS S3 bucket creation

Steps:

1. Create Ansible playbook for S3 bucket creation

(Sample playbook is available in my GitHub Repo, you can use that as a reference)

2. Create Jenkins Pipeline 

pipeline {
    agent any
    stages {
        
        stage ("checkout") {
            steps {
                        checkout([$class: 'GitSCM', branches: [[name: '*/master']], extensions: [],                                                     userRemoteConfigs: [[url: 'https://github.com/akannan1087/myAnsibleInfraRepo']]])         
            }
        }
        stage('execute') {
            steps {
                //to suppress warnings when you execute playbook    
                sh "pip install --upgrade requests==2.20.1"
                // execute ansible playbook
                ansiblePlaybook 'create-s3.yml'
            }
        }
    }
}

Execute Pipeline


Pipeline Console output


Playbook for creating S3 for your reference:

create-s3.yml

---
 - name:  provisioning S3 Bucket using Ansible playbook
   hosts: localhost
   connection: local
   gather_facts: False
   tags: provisioning

   tasks:
     - name: create S3 bucket
       s3_bucket:
         name: myansibles3bucket312
         state: present
         region: us-east-1
         versioning: yes
         tags:
           name: myansiblebucket
           type: example
       register: s3_url

     - name: Display s3 url
       debug: var=s3_url

Saturday, December 31, 2022

How to run Ansible playbook from Jenkins pipeline job | Automate EC2 provisioning in AWS using Jenkins and Ansible Playbook | Create new EC2 instance in AWS cloud using Ansible Playbook and Jenkins Pipeline

We will learn how to create new EC2 instance using Ansible playbook and automate using Jenkins Pipeline. 

Watch Steps in YouTube Channel:

Pre-requisites:

  • Ansible is installed and Boto is also installed on Jenkins instance
  • Ansible plug-in is installed in Jenkins. 
  • Make sure you create an IAM role with AmazonEC2FullAccess policy and attach the role to Jenkins EC2 instance.
  • Playbook for creating new EC2 instance needs to be created but you can refer my GitHub Repo
Steps:

Create Ansible playbook for provisioning EC2 instance

(Sample playbook is available in my GitHub Repo, you can use that as a reference)

Create Jenkins Pipeline 
pipeline {
    agent any

    stages {
        
        stage ("checkout") {
            steps {
                        checkout([$class: 'GitSCM', branches: [[name: '*/master']], extensions: [],                                                     userRemoteConfigs: [[url: 'https://github.com/akannan1087/myAnsibleInfraRepo']]])         
            }
        }
        stage('execute') {
            steps {
                //to suppress warnings when you execute playbook    
                sh "pip install --upgrade requests==2.20.1"
                // execute ansible playbook
                ansiblePlaybook playbook: 'create-EC2.yml'
            }
        }
    }
}

Execute Pipeline


Pipeline Console output


Tuesday, December 27, 2022

Ansible playbook for LAMP Installation on Ubuntu | How to Install LAMP stack using Ansible on Ubuntu 22.0.4

LAMP Stack comprises the following open-source software applications.

    • Linux – This is the operating system hosting the Applications.
    • Apache – Apache HTTP is a free and open-source cross-platform web server.
    • MySQL– Open Source relational database management system.
    • PHP – Programming/Scripting Language used for developing Web applications.
    Watch the steps in YouTube Channel:

    Pre-requisites:
    Steps to setup SSH keys:
    1. Login to Ansible management server/machine. Create SSH keys in Ansible host machine by executing the below command: (if you already have keys created, please skip this step)
    ssh-keygen 

    enter three times..now you will see keys successfully created.
    2.  Execute the below command on Ansible management node and copy the public key content:
    sudo cat ~/.ssh/id_rsa.pub

    copy the above output.
    3. Now login into target node where you want to install LAMP stack, execute the below command to open the file
    sudo vi /home/ubuntu/.ssh/authorized_keys
    type shift A and then enter now 
        and paste the key in the above file. please do not delete any existing values in this file.

    4. Now go back to Ansible mgmt node, do changes in /etc/ansible/hosts file to include the node you will be installing software. Make sure you add public or private IP address of target node as highlighted below in red color:
    sudo vi /etc/ansible/hosts
    [LAMP_Group]  
    xx.xx.xx.xx ansible_ssh_user=ubuntu ansible_ssh_private_key_file=~/.ssh/id_rsa  ansible_python_interpreter=/usr/bin/python3

    Ansible playbook for installing LAMP(Linux Apache MySQL PHP) stack on Ubuntu

    sudo vi installLAMP.yml
    ---
    - hosts: LAMP_Group
      tasks:
        - name: Task # 1 - Update APT package manager repositories cache
          become: true
          apt:
            update_cache: yes
        - name: Task # 2 - Install LAMP stack using Ansible
          become: yes
          apt:
            name: "{{ packages }}"
            state: present
          vars:
            packages:
               - apache2
               - mysql-server
               - php

    ansible-playbook installLAMP.yml


    This is the execution result of the playbook.

    Now go to browser and use target node DNS to confirm if Apache is installed. make sure port 80 is opened in security firewall rules.


    Now login to target EC2 instance, type below commands to verify PHP and MySql versions:

    php --version

    mysql --version