Amazon
ECR uses Amazon S3 for storage to make your container images highly
available and accessible, allowing you to reliably deploy new containers
for your applications. Amazon ECR transfers your container images over
HTTPS and automatically encrypts your images at rest. Amazon ECR is
integrated with Amazon Elastic Container Service (ECS), simplifying your
development to production workflow.

1. Create a Repository in AWS ECR
2. Create an IAM role with AmazonEC2ContainerRegistryFullAccess policy.
3. Assign the role to EC2 instance
4. Download pythonApp from Github.
5. Build docker image for the Python App
6. Tag & push docker image to ECR
7. Run python app in Docker container
Pre-requisites:
- Ec2 instance up and running with Docker installed
- Make sure you open port 8081
Step 1 - Create a repo in ECR


Go to AWS console and search for ECR
Click on Create Repository
Enter name for your repo - all lower case and Click create repository

Once repo is created, choose the repo and click on view push commands. Note down the account ID

Note the URL from step # 3 below, this will be used for tagging and pushing docker images into ECR.

That's it, you have created repo successfully. Let us create docker images and push it to above repo in ECR.
Step 2- Create an IAM role
You need to create an IAM role with

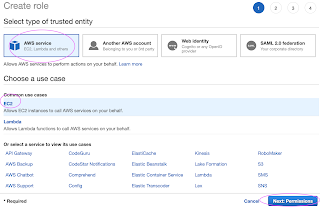
Now search for

Step 2- Create an IAM role
You need to create an IAM role with

Select AWS services, Click EC2, Click on Next permissions.

Now search for

Skip on create tag.
Now give a role name and create it.

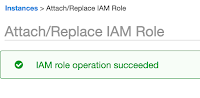
Step 3 - Assign the role to EC2 instance
Go to AWS console, click on EC2, select EC2 instance, Choose instance setting.
Click on Attach/Replace IAM Role

Choose the role you have created from the dropdown.
Select the role and click on Apply.
 Now Login to EC2 instance where you have installed Docker. You must be
able to connect to AWS ECR through AWS CLI which can be installed by
Now Login to EC2 instance where you have installed Docker. You must be
able to connect to AWS ECR through AWS CLI which can be installed by
sudo apt install awscli -y
Once AWS CLI is installed, you can verify the installation:
aws --version

Now give a role name and create it.

Step 3 - Assign the role to EC2 instance
Go to AWS console, click on EC2, select EC2 instance, Choose instance setting.
Click on Attach/Replace IAM Role

Choose the role you have created from the dropdown.
Select the role and click on Apply.

sudo apt install awscli -y
Once AWS CLI is installed, you can verify the installation:
aws --version
Now you can login to AWS ECR using CLI:
aws ecr get-login-password --region us-east-2 | docker login --username AWS --password-stdin your_acct_id.dkr.ecr.us-east-2.amazonaws.com
Where your_acct_id is from AWS ECR in the above picture.

Step 4 - Download GitHub Repo
git clone https://bitbucket.org/ananthkannan/mydockerrepo; cd mydockerrepo/pythonApp
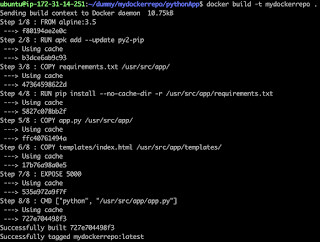
 Step 5 - Build Docker image
docker build . -t mypythonapp
the above command will build a docker image.
Now tag Docker image you had build
docker tag mypythonapp:latest your_acct_id.dkr.ecr.us-east-2.amazonaws.com/your-ecr-repo-name:latest

You can view the image you had built.

git clone https://bitbucket.org/ananthkannan/mydockerrepo; cd mydockerrepo/pythonApp
docker build . -t mypythonapp
the above command will build a docker image.

Now tag Docker image you had build
docker tag mypythonapp:latest your_acct_id.dkr.ecr.us-east-2.amazonaws.com/your-ecr-repo-name:latest
You can view the image you had built.
Step 6 - Push Docker image into AWS ECR
docker push your_acc_id.dkr.ecr.us-east-2.amazonaws.com/your-ecr-repo-name:latest


Step 7 - Run Docker container from Docker image
sudo docker run -p 8081:5000 --rm --name myfirstApp1 your_acc_id.dkr.ecr.us-east-2.amazonaws.com/your-ecr-repo-name
sudo docker run -p 8081:5000 --rm --name myfirstApp1 your_acc_id.dkr.ecr.us-east-2.amazonaws.com/your-ecr-repo-name

Note: You can also create a ECR repo through AWS CLI command in AWS ECR.
aws ecr create-repository --repository-name myawesome-repo --region us-east-2
You can watch the steps on YouTube:


No comments:
Post a Comment