What is Amazon EKS
Amazon EKS is a fully managed container orchestration service. EKS allows you to quickly deploy a production ready Kubernetes cluster in AWS, deploy and manage containerized applications more easily with a fully managed Kubernetes service. Kubernetes is an open-source system for automating deployment, scaling, and management of containerized applications.

EKS takes care of master node/control plane. We need to create worker nodes.
- Managed nodes - Linux - Amazon EC2 instances
- Fargate - Serverless
Pre-requisites:
This Lab is using an EC2 instance with following configured:
Install Terraform
Install kubectl – A command line tool for working with Kubernetes clusters.
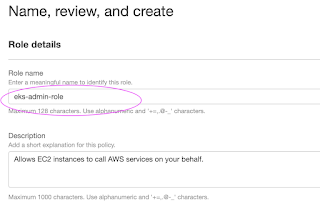
Create an IAM role with AdministratorAccess
Create IAM Role with Administrator Access


Now search for
Skip on create tag.
Now give a role name and create it.
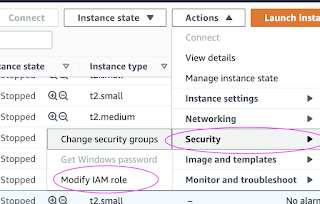
Go to AWS console, click on EC2, select EC2 instance, Choose Security.
Click on Modify IAM Role
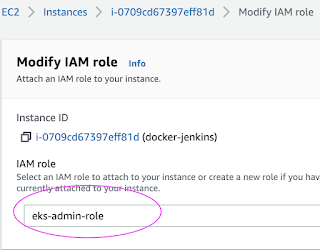
Choose the role you have created from the dropdown.
Select the role and click on Apply.


Plan: 10 to add, 0 to change, 0 to destroy.
Now let's create the EKS cluster:

Update Kube config
Update Kube config by entering below command:
aws eks update-kubeconfig --name my-eks-cluster --region us-east-1
kubeconfig file be updated under /home/ubuntu/.kube folder.
you can view the kubeconfig file by entering the below command:
cat /home/ubuntu/.kube/config
Connect to EKS cluster using kubectl commands
To view the list of worker nodes as part of EKS cluster.
kubectl get nodes

kubectl get ns

Deploy Nginx on a Kubernetes Cluster
Let us run some apps to make sure they are deployed to Kubernetes cluster. The below command will create deployment:
kubectl create deployment nginx --image=nginx
View Deployments
kubectl get deployments

Delete EKS Cluster
terraform destroy
the above command should delete the EKS cluster in AWS, it might take a few mins to clean up the cluster.
Errors during Cluster creation


No comments:
Post a Comment