Building pipelines in Azure DevOps is really easy, you can migrate
your web application code from any where into Azure Cloud by using Azure pipelines.
We are going to migrate Java Web App that was setup in Azure Git into Azure Cloud by creating a WebApp in Azure.
Pre-requisites:
You need to create WebApp in Azure Cloud. WebApp is an App service (mostly Platform as a Service) provide by Azure Cloud to migrate any web applications.
Once you sign in to Azure Portal, you need to create an app service which is a WebApp.
Steps for Creating WebApp in Azure Portal
1. Now login to https://portal.azure.com
2. Click on App services

3.Click on + Add or click on Create app service

Click on Web App.

Choose Free Azure subscription
Create a new resource group(for first time if you create an app service, otherwise you can use existing group name)
Enter App service name(it should be unique)
Publish as Code
Run time stack as Java 11 --> Tomcat9.0
Operating System as Linux
Region as South Central US
Enter LinuxPlan name
Choose SKU and size as given below:
Choose DEV/Test and use 1 GB memory


Click on Apply
Now click on Apply & Create
This will take bit time to create the app service.
Once WebApp is created, go resources, click on WebApp name and click on the URL.

You should see the app service home page some thing like below:

Since our WebApp is up and running, now we can start creating pipelines to migrate to Azure cloud.
2. Creating pipelines in Azure Devops
1. Now go to your visual studio project page --> https://dev.azure.com/
Select the Project dashboard you already created.
Click on Pipelines, Builds.

2. Click on New pipeline and click on use the classic editor to create a pipeline without YAML


5. Click on pipeline name and re-name per your naming standard

6. Modify maven goal as clean install and also choose POM.xml by clicking on three dots ...


8. Leave the value as it is for Publish Artifact: Drop
9. Click on Stop Azure WebApp step, Enter Azure WebApp details - where you would like to deploy your app in Azure. Select Free trial subscription from the drop down. Click on Authorize button.
Make sure you disable popup blocker.

10. Do the same in Deploy Azure WebApp & Start Azure WebApp steps.
Enable Webhooks in Pipeline
11. Click on Triggers and then enable check box for Continuous Integration

12. Now click on Save and Queue

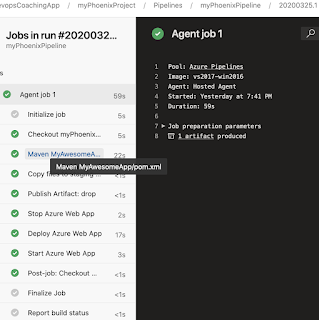
13. If your configurations are correct, you should be able to see the build success and able to access in the Azure. Click on Pipelines and pipeline name
 Now you will see that Azure DevOps would have started build.
14. Make sure build is success, it should have all green like below.
After successful build, you can check the output by accessing below URL:
https://myAzureWebAppUrl/MyAwesomeApp
We are going to migrate Java Web App that was setup in Azure Git into Azure Cloud by creating a WebApp in Azure.
Pre-requisites:
Once you sign in to Azure Portal, you need to create an app service which is a WebApp.
Steps for Creating WebApp in Azure Portal
1. Now login to https://portal.azure.com
2. Click on App services

3.Click on + Add or click on Create app service

Click on Web App.

Choose Free Azure subscription
Create a new resource group(for first time if you create an app service, otherwise you can use existing group name)
Enter App service name(it should be unique)
Publish as Code
Run time stack as Java 11 --> Tomcat9.0
Operating System as Linux
Region as South Central US
Enter LinuxPlan name
Choose SKU and size as given below:
Choose DEV/Test and use 1 GB memory


Now click on Apply & Create
This will take bit time to create the app service.
Once WebApp is created, go resources, click on WebApp name and click on the URL.

You should see the app service home page some thing like below:

Since our WebApp is up and running, now we can start creating pipelines to migrate to Azure cloud.
2. Creating pipelines in Azure Devops
1. Now go to your visual studio project page --> https://dev.azure.com/
Select the Project dashboard you already created.
Click on Pipelines, Builds.

2. Click on New pipeline and click on use the classic editor to create a pipeline without YAML


3. Select source repository as Azure Repo Git and click continue

4. Since our application is Java stack, type Java and Choose Azure WebApp for Java

5. Click on pipeline name and re-name per your naming standard

6. Modify maven goal as clean install and also choose POM.xml by clicking on three dots ...


7. Leave the value as it is for Copy Files to staging folder
8. Leave the value as it is for Publish Artifact: Drop
9. Click on Stop Azure WebApp step, Enter Azure WebApp details - where you would like to deploy your app in Azure. Select Free trial subscription from the drop down. Click on Authorize button.
Make sure you disable popup blocker.

10. Do the same in Deploy Azure WebApp & Start Azure WebApp steps.
Enable Webhooks in Pipeline
11. Click on Triggers and then enable check box for Continuous Integration

12. Now click on Save and Queue

13. If your configurations are correct, you should be able to see the build success and able to access in the Azure. Click on Pipelines and pipeline name

14. Make sure build is success, it should have all green like below.

After successful build, you can check the output by accessing below URL:
https://myAzureWebAppUrl/MyAwesomeApp


Renovations are quite possibly of the best speculation a mortgage holder can make to their current spot of home.howmuch
ReplyDelete