Watch steps in YouTube channel:
Step-by-Step Guide
Navigate to Your Repository:
- Go to the Azure Repos repository where you want to create a PR template.
Create a
.azuredevops Directory:- create a new directory named
.azuredevops in the root of your repository. This is where Azure Repos looks for configuration files, including PR templates.
- create a new directory named
Create a
PULL_REQUEST_TEMPLATEFile:- Inside the
.azuredevopsdirectory, create a file namedPULL_REQUEST_TEMPLATE.md. This file will contain the template for your pull requests.

4. Add Template Content:
Open the
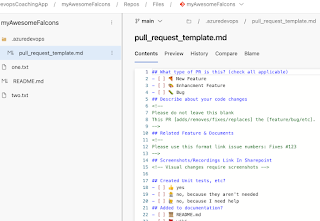
PULL_REQUEST_TEMPLATE.mdfile and add the content you want to include in your PR template. You can use Markdown to format the template. Here’s an example of a basic PR template:
## What type of PR is this? (check all applicable)
- [ ] 🍕 New Feature
- [ ] 🎨 Enhancment Feature
- [ ] 🐛 Bug
## Describe about your code changes
<!--
Please do not leave this blank
This PR [adds/removes/fixes/replaces] the [feature/bug/etc].
-->
## Related Feature & Documents
<!--
Please use this format link issue numbers: Fixes #123
-->
## Screenshots/Recordings Link In Sharepoint
<!-- Visual changes require screenshots -->
## Created Unit tests, etc?
- [ ] 👍 yes
- [ ] 🙅 no, because they aren't needed
- [ ] 🙋 no, because I need help
## Added to documentation?
- [ ] 📜 README.md
- [ ] 📕 wiki
- [ ] 🙅 no documentation needed
## [optional] Are there any post-deployment tasks we need to perform?
5. Commit and Push:
Commit the
PULL_REQUEST_TEMPLATE.mdfile to your repository and push it to Azure Repo.


No comments:
Post a Comment