Terraform is an open-source tool for provisioning and managing cloud infrastructure. Terraform can provision resources on any cloud platform.
Terraform allows you to create infrastructure in configuration files(tf files) that describe the topology of cloud resources. These resources include virtual machines, storage accounts, networking interfaces, etc.
Please watch steps in YouTube channel:
Pre-requisites:
- Install Terraform on your EC2 instance.
- Create an IAM role or access keys/secret keys
You can provision resources in AWS cloud using Terraform by two ways
as mentioned below:
- AWS Access keys + secret keys (un-secure way)
- IAM Role with AmazonEC2FullAccess Policy. (more secure way)
Option 2 is recommended approach as we already installed Terraform on
EC2 instance that is inside AWS cloud. So we do not need Access Keys +
secret keys. But if you have installed Terraform on your local machine
you would need to go with Option1.
We will see how you can use Terraform to provision EC2 instance.
Please do the below steps for provisioning EC2 instances on AWS.
Step - 1 Create an IAM role to provision EC2 instance in AWS

Select AWS service, EC2, Click on Next Permissions

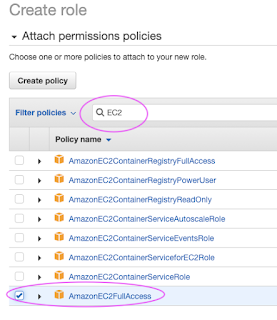


Go to AWS console, click on IAM


Type EC2 and choose AmazonEC2FullAccess as policy

Click on Next tags, Next Review
give some role name and click on Create role.

Step - 2 Assign IAM role to EC2 instance
Go back to Jenkins EC2 instance, click on EC2 instance, Security,
Modify IAM role

Type your IAM role name my-ec2-terraform-role and Save to attach that role to EC2 instance.

Login to EC2 instance where you have installed Terraform.
Step 3 - Create Terraform files
cd ~
mkdir project-terraform
cd project-terraform
Create Terraform Files
make sure you change what ever is high lighted in red color below per
your settings.
sudo vi variables.tf
variable "aws_region" {
description = "The AWS
region to create things in."
default
= "us-east-1"
}
variable "key_name" {
description = " SSH keys to
connect to ec2 instance"
default
= "myJune2021Key"
}
variable "instance_type" {
description = "instance
type for ec2"
default
= "t2.micro"
}
variable "security_group" {
description = "Name of
security group"
default
= "my-jenkins-security-group-apr-2024"
}
variable "tag_name" {
description = "Tag Name of
for Ec2 instance"
default
= "my-ec2-instance"
}
variable "ami_id" {
description = "AMI for
Ubuntu Ec2 instance"
default
= "ami-0c7217cdde317cfec"
}
Now create main.tf file
sudo vi main.tf
provider "aws" {
region = var.aws_region
}
resource "aws_vpc" "main" {
cidr_block = "172.16.0.0/16"
instance_tenancy = "default"
tags = {
Name = "main"
}
}
#Create security group with firewall rules
resource "aws_security_group" "jenkins-sg-2023"
{
name
= var.security_group
description = "security group for
jenkins"
ingress {
from_port = 8080
to_port =
8080
protocol = "tcp"
cidr_blocks = ["0.0.0.0/0"]
}
ingress {
from_port = 22
to_port = 22
protocol = "tcp"
cidr_blocks = ["0.0.0.0/0"]
}
# outbound from Jenkins server
egress {
from_port = 0
to_port =
65535
protocol = "tcp"
cidr_blocks = ["0.0.0.0/0"]
}
tags= {
Name = var.security_group
}
}
resource "aws_instance" "myFirstInstance" {
ami
= var.ami_id
key_name = var.key_name
instance_type = var.instance_type
vpc_security_group_ids =
[aws_security_group.jenkins-sg-2023.id]
tags= {
Name = var.tag_name
}
}
# Create Elastic IP address
resource "aws_eip" "myElasticIP" {
domain = "vpc"
instance =
aws_instance.myFirstInstance.id
tags= {
Name = "jenkins_elastic_ip"
}
}
Step 4 - Execute Terraform Commands
Now execute the below command:
terraform init
you should see like below screenshot.

Execute the below command
terraform plan
the above command will show how many
resources will be added.
Plan: 4 to add, 0 to change, 0 to
destroy.
Execute the below command
terraform apply
Plan: 4 to add, 0 to change, 0 to destroy.
Do you want to perform these actions?
Terraform will perform the actions described above.
Only 'yes' will be accepted to approve.
Enter a value: yes
Do you want to perform these actions?
Terraform will perform the actions described above.
Only 'yes' will be accepted to approve.
Enter a value: yes
Apply complete! Resources: 4 added, 0 changed, 0 destroyed.
Now login to EC2 console, to see the new
instances up and running
List of Resources created by Terraform
List of Resources created by Terraform
Execute the below command to view list of the
resources created by Terraform.
terraform state list
The above command will list four resources
created.

You should be able to see EC2 instance up and
running in AWS console.
Cleanup resources after creation:
Execute the below command
terraform destroy
Plan: 0 to add, 0 to change, 4 to destroy.
Do you want to perform these actions?
Terraform will perform the actions described above.
Only 'yes' will be accepted to approve.
Enter a value: yes
Do you want to perform these actions?
Terraform will perform the actions described above.
Only 'yes' will be accepted to approve.
Enter a value: yes
this will go ahead and delete all the resources created from Terraform.
How to push Terraform files
into GitHub
All Terraform files should be checked into version control systems such as GitHub, BitBucket or GitLab. Let us see how to push code changes into GitHub. Make sure you are in the directory where Terraform files are created.
All Terraform files should be checked into version control systems such as GitHub, BitBucket or GitLab. Let us see how to push code changes into GitHub. Make sure you are in the directory where Terraform files are created.
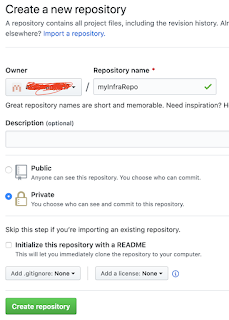
Create Remote repo in GitHub
Create a new repo with below name, make sure it is a private repo. Also do not click on initialize this repository with a README option.
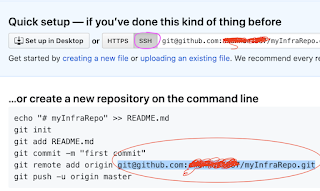
 Note down the remote url under SSH as highlighted
below:
Note down the remote url under SSH as highlighted
below:
Note:
If you have any issues in uploading tf files, you may not have created ssh-keys and uploaded into GitHub. Create ssh keys using ssh-keygen command:
Create a new repo with below name, make sure it is a private repo. Also do not click on initialize this repository with a README option.


Note:
If you have any issues in uploading tf files, you may not have created ssh-keys and uploaded into GitHub. Create ssh keys using ssh-keygen command:
ssh-keygen
This should generate both public and private
keys.
Copy the public keys by executing the below
command:
sudo cat ~/.ssh/id_rsa.pub
Initialize the directory first
git init
The above command will create local git repository.
Now add terraform files. add only tf files, not other files.
git add *.tf
git commit -m "Added terraform files"
Copy the below red highlighted url from above screenshots circled in red.
git remote add origin your remote repo SSH url per above screenshot, not https url
Now push the code into GitHub
git push -u origin master
Now Login to GitHub to view the Terraform files
You may get this error if you have not uploaded
ssh keys into GitHub/BitBucket. try creating SSH keys by executing ssh-keygen command and upload public keys into GitHub.

So make sure you upload SSH keys into your SCM.


I face this issue when i reach the Terraform Plan stage.
ReplyDeleteWhat seems to be the issue?
NoCredentialProviders: no valid providers in chain. Deprecated.
you need to add IAM role or AWS root keys
Delete